Cloud Storage

Save Data Conveniently, Offer Life Convenience

Month: November 2015

Upload download YouTube to Dropbox for iPad playback

It is no wonder that YouTube as the world’s top-notch video sharing website comes to your first choice, but not everyone has the spare time to sit in front of computer to watch YouTube videos from the beginning to end. If you often use Dropbox to play videos on iPad. It’s wonderful for you to find a good way to download YouTube to Dropbox so as to watch YouTube videos later at your leisure time. Here we go!

First, convert downloaded YouTube to Dropbox:

Since there is no direct way to put YouTube to Dropbox, my suggestion is to get YouTube download to computer and then upload it to Dropbox. Anything like movies and music on the computer can be saved to the Dropbox. It can support a wide range of formats like .mp4, 3gp, .avi, .mov, wmv, .mpg, .mkv, etc. To share YouTube videos from Dropbox to iPad, what you need to do is to convert YouTube movies to Dropbox/iPad (Pro/Air/Mini) friendly format first.
Pavtube Video Converter Ultimate Mac is the bee’s knees, which can help you fast convert YouTube movies to a format playble by iPad from Dropbox while keeping the original quality. Besides, if also offers the optimal presets for iPhone, Galaxy Tab, Kindle Fire HD, Nexus and more media devices. The built-in video editor allows you to trim, crop, rotate video, add watermarks, etc. to get the very part and effect you want.

Hot Search: H.265 Video to Dropbox, ISO to Dropbox, Blu-ray to Dropbox

Free Download or Purchase Video Converter Ultimate for Mac:

       
Other Download:
– Pavtube old official address: http://www.pavtube.cn/blu-ray-video-converter-ultimate/

Convert YouTube movies to Dropbox for iPad playback

One: Download YouTube vdieos on computer and run YouTube to Dropbox converter. You can load the YouTube movies by clicking “Add video” button. The converter supports converting multiple files at a time.


Two: Click and format bar and select the appropriate format. For Dropbox, you can choose MP4 format in “Common Video” column. Or you can directly choose iPad as output format depending on your device.


Tip: Simply click Settings bar and you can tweak the settings to your satisfaction and even save it as preset. If you only have the free account of DropBox, you only have 2 GB of space. You’d better adjust the video settings to keep a balance of video size and video quality.


Three: After all necessary settings, click the “Start conversion” button to begin converting YouTube movies to Dropbox highly compatible video files. After the conversion, you can easily find the generated files in “Open” panel.

How to Drop your files in your Dropbox folder

It’s easy to add files to Dropbox. Move your files into your Dropbox by dragging and dropping them into your Dropbox folder. That’s it. The files in your Dropbox folder will automatically be synced online and to your other computers. You don’t have to do anything. You can even use the Save As… menu option in most applications to save files directly to your Dropbox folder.

Play YouTube from Dropbox for iPad

When Dropbox for iPad is installed, login and you could find all your Dropbox files on the left. Tap a YouTube video to play on the right hand side. Hit the arrow on top to enter full screen mode.

This is the real option that lets you play YouTube videos anywhere – download an offline version of the YouTube video of Dropbox to your device. To do so, tap the ‘star’ button in the top right corner when you have an internet connection. Make sure the downloading process is complete in the Favorite tab. From the Dropbox tab, you will see the offline YouTube videos with a circled star icon. Then Click it to play YouTube video offline from Dropbox. Enjoy!

More Topics:

.

Transfer DVD to My Cloud Mirror for streaming everywhere

DVD backup is an efficient and cost-effective way to reduce or even avoid DVD data loss and save cash. It helps keep DVD discs safe and away from various damages like scratches, breakage, crash, fingerprints, etc. With My Cloud Mirror, you can easily create a DVD backup for storage and organize all your videos in one, double-safe place on your home network.

Due to the large demand of DVD backup on My Cloud Mirror, questions like “How to copy DVD to My Cloud Mirror?” and “Why can’t I transfer my DVD library to My Cloud Mirror?” are frequently seen online. You can get satisfied answers and solutions in this post.

To achieve this goal, an easy-to-use DVD copy software is the key. What is the best tool to copy DVD to My Cloud Mirror without quality loss? This may exist in every DVD disc holder’s mind, especially those who would like to backup DVD to My Cloud Mirror . The standard might differ upon personal requirements. These standards might be applied: disc decrypting feature, quality lossless DVD copy on video and audio, wide OS and disc compatibility, high quality compression, application stability, ease of use, user friendliness, etc.

Pavtube Video Converter Ultimate is such a wise choice for you to solve the problem.

With it, you can rip and convert DVD to My Cloud Mirror with super fast conversion speed and excellent image and sound quality. What’s more, with this DVD ripping tool, you can easily backup your DVD disk with whole content copy or backup main movie only. For Mac users, you can get the ( Mac). Now you’re ready to migrate your DVD movies into the all-digital future for transferring to My Cloud Mirror.

Hot Search: DVD to OneDrive, DVD to Amazon Cloud Drive, Blu-ray to My Cloud Mirror, Cloud Storage Review

Free Download or Purchase  Video Converter Ultimate:

      
Other Download:
– Pavtube old official address: http://www.pavtube.cn/blu-ray-video-converter-ultimate/

How to rip DVD collection to My Cloud Mirror

Step 1: Load DVD movies

Run the DVD Ripper and click “Load file(s)” icon to load DVD movies for converting. You can also import movies files from DVD folder, ISO image files.

Tip 1: Before start converting DVD, you can backup your DVD contend first with its full disc copy or directly copy features.

Step 2: Choose output format

As My Cloud Mirror is powerful enough to almost all kinds of formats, you can choose the format according to your own needs like MP4, MOV, AVI, MKV, etc.

Tip 2: You can click settings button to customize the output parameters, such as resolution, bitrate, etc, you can also skip this step.

Step 3: Copy DVD to My Cloud Mirror

After all settings, click “Start conversion” button to rip/convert DVD to optimized format for My Cloud Mirror.

Once you’ve liberated your DVD movie library, you’ll make it available for viewing anytime, anywhere just with the help of your My Cloud Mirror.
Have more questions about Dropbox vs Google Drive, please feel free to contact us>> or leave a message at Facebook

More Topics:

.

Backup your video library to Google Drive for Storage

Can I backup a library of video files onto Google Drive?

“Hello. Currently I have a few terabytes of video files – mainly avi and mkv. Is there a program I can run that will convert every non MP4 video for backing up on Google Drive but without losing quality or any other possible errors? I have a iMac connected to it so I was wondering if I could accomplish this using Handbrake or something similar?”

Google Drive allows you to access your files and folders from anywhere including your mobile phone. You can copy and upload any videos to Google Drive to save space as it has 5 GB free space and 200GB of storage for $9.99 per month. From Google official site, Google Drive can sync or upload video files in formats like .WebM, .MPEG4, .3GPP, .MOV, .AVI, .MPEGPS, .WMV, .FLV, .MTS, etc. While, some devices may not support playback of all these files. For example, MKV usually contains one or several audio tracks and subtitle tracks that are multiplexed together into one stream form, it is not so easy to playback.

In order to play all kinds of videos through Google Drive easily with kinds of phones or tablets, you’d better convert incompatible videos to a widely supported format i.e. MP4 before storing on Google Drive. Pavtube Video Converter Ultimate Macis a highly recommended tool to help you finish the task which can be taken as Handbrake alternative for Mac OS X (El Capitan).

It is a great Video converter that supports transcoding MKV, Tivo, VOB, MXF, XAVC, XAVC-S, etc. to best format for storing on not only Google Drive, but also Dropbox, CudaDrive and Box Cloud Storage. Meanwhile, it also comes with useful editing functions, like video joining, video trimming, splitting, cropping, add subtitles, etc. For those who are running on Windows PC (Windows 10), please get it. Now just download the program to learn how to convert videos to store on Google Drive for storage.

Free Download or Purchase Video Converter Ultimate for Mac: 


Other Download:
– Pavtube old official address: http://www.pavtube.cn/blu-ray-video-converter-ultimate/

Convert videos to Google Drive compatible videos without Quality Loss

STEP 1. Import video files to the converter

Install and launch the program, and then click “Add video” button to import the MKV, Tivo, VOB, MXF, XAVC, XAVC-S, etc. files or directly drag and drop them into the main display window of this program.

Tip: If you want to join video files into a big file, tick the “Merge into one file” box.

STEP 2. Decide output format

Tap Format bar and choose a proper output format. To play videos from Google Drive, you’d choose a Google Drive supported video format. MPEG-4 or H.264 MP4 from “Common Video” or “HD Video” is a wise choice. If you would like to enjoy movies to your mobile phone and tablet, you can select a decent format like “iPad > iPad HD Video(*.mp4)” from the profile list comes with the software.

Tip: If the default parameters do not meet your needs, you can click “Settings” to change the video encoder, resolution, frame rate, etc. according to the devices you want to play on. Note that the maximum resolution for playback in Google Drive is 1920×1080.

STEP 3. Convert videos for storing on Google Drive

Click “Start conversion” button to start converting video to MP4 for Google Drive uploading. After the conversion, you can get the resulted videos by clicking the Open button and then you can get these optimized videos for playback on iPad, iPod, iPhone, Xbox 360, PS3, Galaxy Tab, Nook HD, Kindle Fire HD and more via Google Drive for our home viewing.

There are two ways to upload files to Google Drive, follow the steps below:

1. Drag and drop

If you’re using the latest versions of Chrome or Firefox, you can drag a folder from your desktop into Google Drive. You can also drag files directly into folders or subfolders.

2. Upload files using Google Drive

  • Go to drive.google.com.
  • On the left, click New.
  • Select File upload.
  • Select the file you want to upload. To select multiple files, press Ctrl (PC) or Command (Mac) and click all the files to upload.
  • You’ll see a box that shows the progress of your file upload. To open the file, click the filename. To close the box, click the X.

More Detail about how to upload videos to Google Drive could be found here
Have more questions about Dropbox vs Google Drive, please feel free to contact us>> or leave a message at Facebook

More Topics:

.

Get iFastime Video Converter Ultimate for Win/Mac at lowest price

It’s that time of year again. Savvy shoppers are scanning their mailboxes and email inboxes for Black Friday and Cyber Monday mailers and they are making their battle plans — which stores to hit to find the best deals on the season’s hottest items. Looking for something special during this big discounts season? Don’t know how to choose from the dizzy marketing promotions?

iFasime, a new multimedia solution provider, kicked off its 2015 Black Friday & Cyber Monday Big Deal to present people, both Mac and Windows users, with wonderful 50% Off-discounted apps- Pavtube Video Converter Ultimate Mac from November 25th to November 27th, 2015.

What can iFastime Video Converter Ultimate for Windows/Mac do for you:

Videos come in hundreds of different file types. Depending on the playing media you are using, you may have to convert the video from one format to the other for enjoying. iFastime Video Converter Ultimate for Windows/Mac is presented in the form of half price, wishing shoppers experience an unbounded movie enjoyment with tablets, Smartphones and PCs. It will be what you and your family need most. Only $22.97 for each.

With it, you are allowed to rip Blu-ray, DVD and convert/compress videos to play on iPad Pro/Mini 4, iPad Air 2, iPhone 6s (Plus)/6 (Plus)/5S, Surface Pro 3/4/Book, PS4, Xbox One, Apple TV, Samsung Galaxy Note 5/S6 Edge+, Kindle Fire, Google Nexus and so on.

Another great feature in the software is its video editor. While the converter offers a full-featured editor as a separate application, it has included some of the basic editing tools. These tools give you the ability to trim clips, adjust settings such as contrast and brightness, and add watermarks and subtitles to your videos.

CLICK HERE TO RESERVE YOUR DISCOUNTED VIDEO TOOL:


Other Download:
– Pavtube old official address: http://www.pavtube.cn/blu-ray-video-converter-ultimate/

The deal expires November 27th, at midnight. iFastime has promised that any person around the world could take part in this  Promotion activity during the period. And if you are Facebook users

Have more questions about Dropbox vs Google Drive, please feel free to contact us>> or leave a message at Facebook

More Topics:


Backup Toy Story That Time Forgot Blu-ray to WD My Cloud Network Disk

TOY STORY THAT TIME FORGOT is an unforgettable tale packed with family fun! If you have got Store Toy Story That Time Forgot Blu-ray disc, why not store this Blu-ray to WD My Cloud which is a great option for storing your stuff from anywhere and helps you to stream videos to DLNA-compatible devices. This article focus on how to backup Toy Story That Time Forgot Blu-ray for streaming through WD My Cloud. If you are just seeking for the way, just read on and you can get what you want.

WD My Cloud device uses TwonkyMedia as its DLNA media server, which can fully support a wide range of video, audio files including 3GP, AVI, FLV, MKV, MOV, MP4, MPG, etc. While, due to the reason of lacking BD drive, WD My Cloud can not meet the demands of copying Toy Story That Time Forgot Blu-ray online.

To achieve this goal, an easy-to-use Blu-ray Ripper is the key. Pavtube Video Converter Ultimate  is such a wise choice for you to solve the problem.

It is one of the dynamic Blu-ray ripping tool that can help you rip Blu-ray/DVD collection to WD My Cloud compatible MP4, MOV, AVI, etc. video files with high output video quality and fast ripping speed. Besides, the program is also an excellent BD/DVD backing up tool that can make 1:1 copy of your source BD/DVD with original structure including extras and menus.

What’s more, this app is regarded as a great BD/DVD ripping program to help users to convert DVD/Blu-ray collections for various multimedia devices including but not limited to iPad Air, iPad Mini, iPhone 6, iPhone 6 Plus, Samsung Galaxy Tab 4, Galaxy S5, Kindle Fire HDX, Google Nexus 10/7 and so forth. If you’re using a Mac, please turn to Mac  (El Capitan and Yosemite included). Just download the free trial and follow the tutorial below to digitize Toy Story That Time Forgot Blu-ray to WD My Cloud Network Disk for streaming.

Hot Search: Blu-ray to OneDrive, Blu-ray to Amazon Cloud Drive, Blu-ray to Dropbox, Top Cloud Storage Review

Download Blu-ray to WD My Cloud Converter:


Other Download:
– Pavtube old official address: http://www.pavtube.cn/blu-ray-video-converter-ultimate/

How to backup Blu-ray collection to WD My Cloud

Note: Before you start ripping your Blu-ray, you should free run this software and install it successfully.

Step 1: Load Blu-ray movies

Run the Blu-ray Ripper and click “Load file(s)” icon to load Blu-ray movies for converting. You can also import movies files from BD folder, ISO image files.

Tip: Before start converting Blu-ray, you can backup Blu-ray content first with its full disc copy or directly copy features.

Step 2: Choose output format

As WD My Cloud is powerful enough to almost all kinds of formats, you can choose the format according to your own needs like MP4, MOV, AVI, MKV, etc. If you would like to enjoy movies from physical discs to your mobile phone and tablet, you can select a decent format like “iPad > iPad HD Video(*.mp4)” from the profile list comes with the software.

Tip: You can click settings button to customize the output parameters, such as resolution, bitrate, etc, you can also skip this step. This converter enables you to compress the file size before storing on WD My Cloud.

Step 3: Copy Blu-ray to WD My Cloud

After all settings, click “Start conversion” button to rip/convert Blu-ray to optimized format for WD My Cloud.

Once you’ve liberated your Blu-ray movie library, you’ll make it available for viewing Blu-ray through WD My Cloud easily with kinds of media devices like WD TV HD Live, PS3, Xbox 360 or other DLNA-compatible PCs.

Have more questions about Dropbox vs Google Drive, please feel free to contact us>> or leave a message at Facebook

More Topics:


How to upload bundles of movies to Dropbox with best quality

Think of the Dropbox online file storage service as a giant extra hard drive that holds any type of file you can store on it. If you upload a video to your Dropbox account, you can access that file on any computer that has an Internet connection. If you are really a film buff, sharing bundles of movies to Dropbox is the best for you to watch online movies on mobile devices. Well, how to add movies to Dropbox for playing everywhere?


There are many choices to upload movies to Dropbox. However, if you don’t have a media player that can play a Dropbox video that you’ve downloaded, you may have to do some work in advance. I mean you’ll need to convert videos to Dropbox compatible video formats first since there the Dropbox can’t support these formats natively.

Pavtube Video Converter Ultimate Mac works as an expert to convert videos to various formats like MP4, MOV, WMV, MKV, AVI, FLV etc. of course including Dropbox video formats. In addition, the converting process is too short to influence the movies watching for its fast converting speed. Not to mention the faultless video quality during converting. Besides, with the built-in video editor, you can freely trim, crop, adjust effect, add (*.ass, *.ssa, *.srt) subtitles to your source video.

If you are running on Windows PC, please turn to Video Converter Ultimate. Follow the guide below for more convenience of converting and uploading movies on Dropbox with just couple of clicks.

Hot Search: Blu-ray to Dropbox,  GoPro Hero 4 4K Video to DropBoxiPhone/iPad/Android phone to DropBoxISO to Dropbox, H.265 to Dropbox, Formats for Storing Movies

Free Download or Purchase  Video Converter Ultimate for Mac:


Other Download:
– Pavtube old official address: http://www.pavtube.cn/blu-ray-video-converter-ultimate/

How to Convert MKV/AVI/VOB to Dropbox in three simple steps

1. Add AVI, MKV, VOB files to the converter

Launch the Video Converter for Dropbox. To add .avi, .vob, .mkv videos, you can just drag video from your file folders to the list in the operating window, or head to Add button to choose the file you want to convert.


2. Set output format

Click the format icon to open the format list, and then choose H.264 MP4 as output format from “Common Video” or “HD Video” category. Note: The output format is preferably in a common format, like MP3 for audio, MPEG-4 for video. The more common format you use, the more devices you can stream to.

Tip 1: This Dropbox video converter also enables to edit the video before the conversion by trimming, cropping, changing video effect, add subtitles etc. Click “Edit selected task” button to do it.

A couple other things to keep in mind about DropBox. If you only have the free account, you only have 2 GB of space (at least initially, unless you’ve invited some friends and gotten a little more) so you may run into space limitation issues. So, you’d better trim your DVD files if necessary. Just turn to “Trim” to trim the videos to get the very part you want.

Tip 2: If you want to change the sample rate, resolution, bitrates, etc to better cater for your playing needs, you can click “Settings” option to access the setting window.

3. Start encoding your videos

Click “Start conversion” to start converting MKV/AVI/VOB to Dropbox. This program will do the rest perfectly for you! If you have done all these steps in a well-mannered way, you will surely get the video with high prints and quality, and then you can easily upload different videos of your own choice to Dropbox for enjoying.

How to load video to Dropbox

  • Switch on your Dropbox and log it in.
  • In the top menu, find “Upload” button and click it.
  • When the window appear, select the file you want to add to your Dropbox
  • After you finished the above three steps, the window will disappear and a progress indicator will shows to you.

When uploading process finishes, it means that the information is updated on your Dropbox account. Then you can access your bundles of movies from Dropbox on your mobile phone, computer and tablet.

Files that can be viewed from the website via Dropbox

Files that preview as an image:
.jpg and .jpeg, .png, .tiff and .tif, .gif, .bmp, .ai, .psd
Files that preview as a video:
.3gp, 3gpp, .3gpp2, .avi, .mov, .mp4, .wmv, .m4v, .mpg, .mkv, .mpeg, .vob, .flv, .mts, .m2t, .ts, .dv

Have more questions about Dropbox vs Google Drive, please feel free to contact us>> or leave a message at Facebook

More Topics:


What’s the best digital format for storing movies?

The local and online space is a very huge and entertaining world. You can store all kinds of your favourite videos and movies on different mobile devices, media servers, game consles, and so on in digital formats. Thus, you may wonder which file formats should he use for storing movies?

Here is an movie storage experience shared to you:

I thought I would rip some old DVDs to free up some space, as I did with my music collection some years ago. I planned to store the content on my NAS to stream/sync to a range of devices, including a couple of DLNA-compliant Smart TVs, iPad, iPhone, Xbox 360 and obviously PCs. I’m not overly concerned about file size, and would prefer the best-quality video and audio possible. I would also like to preserve any multichannel audio (ie 5.1 surround sound).

What file formats would you recommend to enable me to remain flexible and future-proof myself as much as possible? I have already tried a couple of DVDs saved as .mpg, which work well with my smart TVs. I’ve tried importing these into iTunes for syncing with my iPad, but iTunes does not seem to like them.

Since most DVDs store movies in the standard MPEG-2 format (aka H.262) defined by the Motion Pictures Expert Group, though MPEG-1 is also supported. The video is held in VOB (Video Object) files. The video is interlaced for display on ordinary TV sets. The result is a resolution of 720 x 576 pixels at 25 frames per second, for 50Hz TV sets, or a resolution of 720 x 480 pixels at 29.97 frames per second, for 60Hz TV sets.

MPEG-2 was the obvious choice for DVDs as it was already being used for broadcast and cable television. The 720 x 480 format came from America’s NTSC television system and 720 x 576 from Europe’s PAL.

ISO or MPEG – You need to save DVD as ISO files

If you want to preserve everything on a DVD, then the simplest option is to copy the whole disc as an ISO disc image. You could burn this copy to another DVD for backup purposes. You could also play the ISO disc image using a software DVD player, including VideoLan’s VLC, or rip it using your choice of DVD ripping software.

The next generation

Some early Blu-ray discs actually used MPEG-2, as that was the basis for digital production at the time. However, H.264/MPEG-4 Part 10 AVC – commonly known as H.264 – is the most widely used format.

Blu-ray movies usually come in 16:9 widescreen resolutions of 1280 x 720 pixels, which is known as HD (High Definition) or 720p, or 1920 x 1080 pixels, which is Full HD or 1080p, where p stands for “progressive”. Blu-ray also allows for the use of interlaced video and the 4:3 DVD formats for backwards compatibility. HD TV sets will de-interlace videos automatically.

Now, video consumes a huge amount of space, so both DVDs and BDs use lossy compression to make the files smaller. MPEG-2 and MPEG-4 files are the equivalent of MP3 audio files in that respect. And, as you know, “transcoding” from one lossy format to another involves a loss in quality. It’s something to avoid if possible, and if not, to do only once.

Fortunately, this usually isn’t a problem if you’re reducing the movie’s resolution – for example, converting a 1080p video to 720p to get a much smaller file size – or viewing it on a smaller screen. It can be a problem if you are “upscaling” a DVD movie to 720p or 1080p. Also learn how to compress 4K to 1080p video.

Movies for iPads and iPhones

You don’t have much choice if you want to use Apple iTunes and watch movies natively on an iPad or iPhone. Apple makes things simpler by eliminating dozens of popular alternatives (AVI, WMV, DivX, Xvid, FLV, MKV etc) and only allowing two real digital video options: MPEG-4 at 640 x 480 pixels and H.264 at up to 720p on most iPads, and up to 1080p on the iPad mini and iPad Air. Both formats are MPEG-4, so what’s the difference? MPEG-4 comes in lots of varieties and H.264 is actually MPEG-4 AVC.

The alternative is to use a third-party video player, such as VideoLan’s open source VLC for iOS. The website says it “can play all your movies and shows in most formats directly without conversion” and it works with iTunes.

If you decide to convert files, it depends on your DVDs and your iPhone and iPad. You can transcode your 720 x 576 MPEG-2 movies into 640 x 480 MPEG-4 movies, which iTunes should be happy to accept. If you have any widescreen movies, then I’d convert them to H.264/AVC in the 720p format. You might get a little extra quality if your iPad supports 1080p, but on such a small screen, there won’t be enough of a difference to justify the much bigger file sizes and longer transcoding times. (I don’t own an iPad so I’m basing this opinion on using PCs with much bigger screens.)

Transcoding software

Threre are some free video transcoders that handle the whole array of different file formats, codecs, resolutions, frame rates, bit-rates and so on. Examples include Super, which is slow and ugly, and Handbrake, which is pretty clunky, as well as more stylish programs such as Xmedia Recode and Media Coder but maybe not compatible with latest Windows 10 and Mac OS X El Capitan.

The best option I recommend here is iFastime Video Converter Ultimate. (Read review) This versatile program not only helps to convert videos to editable and playable videos for storage, but also enables you to customize the videos by splitting, trimming, cropping, add subtitles, etc. What’s more, it offers optimized presets for iPhone, iPod, iPad, etc to ease your conversion greatly. Below comes the detailed guide, it’s genuinely as easy as 3 steps.

Free Download or Purchase iFastime Video Converter Ultimate:

Other Download:

Cnet Download: http://download.cnet.com/iFastime-Video-Converter-Ultimate/3000-2194_4-76449859.html
Top 4 Download: http://www.top4download.com/ifastime-video-converter-ultimate/chjkfujg.html
Free Downloads Center:http://www.freedownloadscenter.com/Multimedia_and_Graphics/Misc__Sound_Tools/iFastime_Video_Converter_Ultimate.html
Softonic Download: http://ifastime-video-converter-ultimate.en.softonic.com/
WinSite Download: http://www.winsite.com/Multimedia/Video/iFastime-Video-Converter-Ultimate/

Do video conversion for easy movie storage

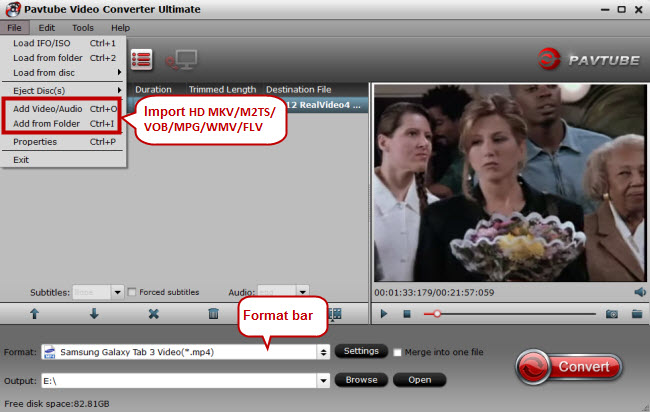
Step 1: Add video files

Two options:

1) Click “File”>”Add Video/Audio” to load videos you want to convert.
2) Simply drag and drop your videos from the desk or other folders into the program.

If you have a couple of video files, load them together to save time and ease your conversion.

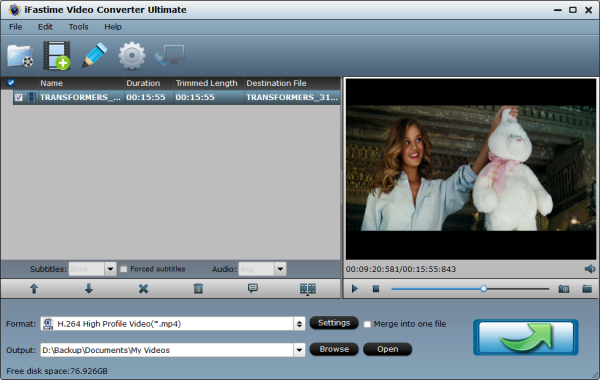
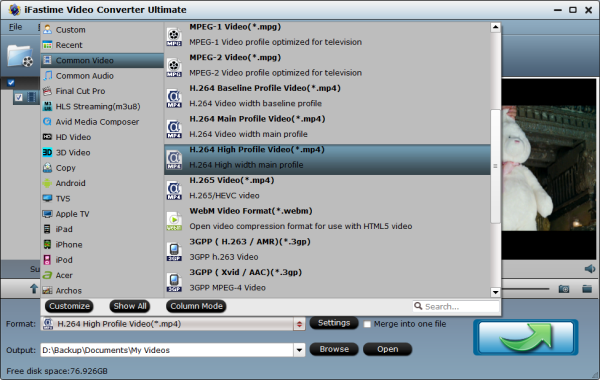
Step 2: Choose your preferred output

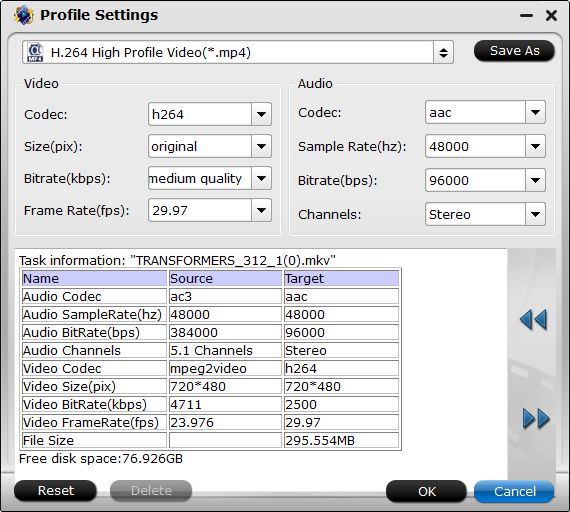
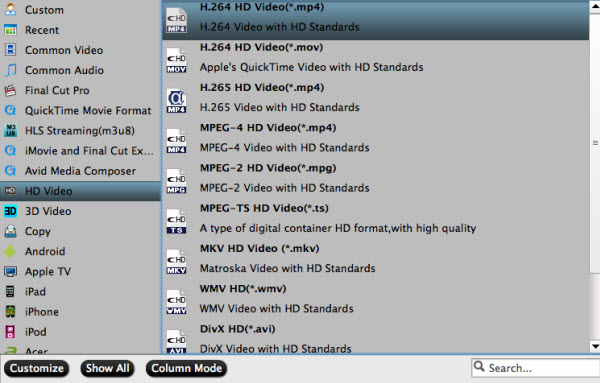
Click the format icon to pop up its output format list, and then choose your preferred output from format list.
You can choose playable MP4, MKV, AVI from “Common Video” or “HD Video”. Besides, this converter offers presets for moble devices in “iPad”, “iPhone”, “Android” category.

Tips: This Ultimate Converter provides editing functions which enables you to modify output video. Common editing tools are provided: crop, trim, effect, watermark, subtitles (simply click “Edit selected task” button on the right side of each video item).

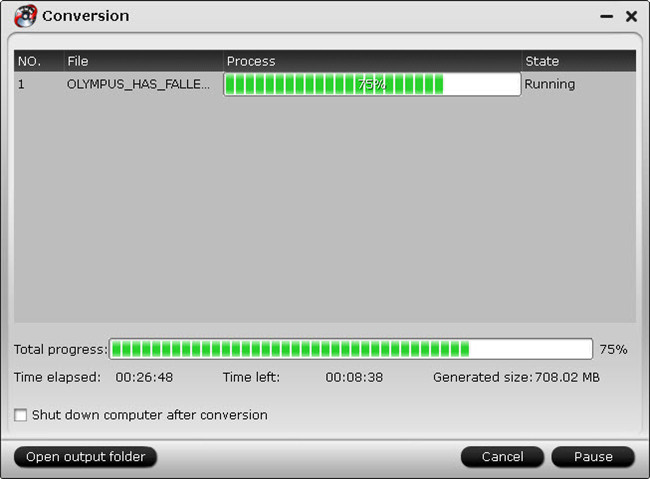
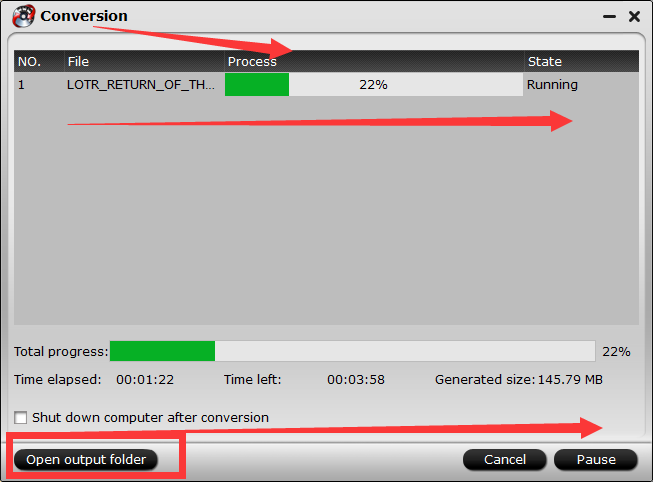
Step 3: Start video conversion

Click the “Start conversion” button and let the Video Converter takes care of movie rendering. It may take a while, depending on file size and quantity. That’s it! When conversion finished, you can stream the converted file to your NAS server, Cloud storge or export to your mobile device now.

Have more questions about what’s the best digital format for storing movies, please feel free to contact us>> or leave a message at Facebook.

More Topics:

.

Thanksgiving holiday is just in our sight. If you’re looking for a Thanksgiving gift for a family member or friend who is considered the resident movie buff, take a look at “2015 iFastime Special Offer” without doubt. This deals features up to 50% OFF big discounts for the best-selling iFastime Video Converter Ultimate for Windows and Mac, with the aim of ripping any Blu-ray, DVD movies and convert multimedia files for playing on the upcoming Thanksgiving Day.  

2015 iFastime Thanksgiving Promotion Ideas

* 2015 Thanksgiving wishes

Often in life we come across many people who have helped us, made our lives better and taught us good lessons. They may or may not be family but are truly cherished. On Thanksgiving Day we express our gratitude towards them. Let people know how much they mean to you. Pen down what your heart says here are some thanksgiving wishes wording.

To Myself      2015-11-13

I want to say hello to you and thanks for your hard working.

Dear Mum and Daddy:      2015-11-12

I would like to send my best wishes to you! I bless you good health and happy forever.

To my Creator:      2015-11-11

I give thanks for this wonderful life where each of us has the opportunity to learn lessons we could not fully comprehend by any other means.

Dear Teacher      2015-11-11

I’m learned and thanks to you!

* 2015 Thanksgiving specials

This kind of festival always comes with plenty of theme movies. After happy dinner with family, watching some Thanksgiving movies on the coach with dear family and friends is such a thing making you get happiness without question. But how can you bear that this warm thinking is disrupted by the stuck in movie playback for the incompatibility issue?

iFastime Video Converter Ultimate (Mac version) can help you avoid the embarrassing situation. Good news is it is powerfully compatible with Windows 10 and Mac OS X El Capitan.

This awesome BD/DVD/Video converter only needs to be paid for $36.76 while the original price is $45.95. The crazy promotion will ends until Dec.6 2015. Once the activity finishes, the price will go back to the original one. Get interested? You can buy them below:


* 2015 Thanksgiving big surprise

Click “Lucky Draw” to take part in “A hundred percent winning” campaign and get 30% OFF – 50% OFF big surprise. Only for the first 100 users. Anyone can get the surprise! Seize the chance!

* 2015 Thanksgiving related topics

With 2015 Thanksgiving looming large, people start to get the decorations like candles and pumpkins, party music or songs and of course Thanksgiving recipes ready to make tricks and treats at the big gathering night. So what’s your plan, take a look at Thanksgiving releated hot topics: downloading Thanksgiving El Capitan Wallpapers, watching Thanksgiving movies, singing Thanksgiving songs, etc.

No matter which Thanksgiving gift ideas you choose, the final goal is to make a wonderful Thanksgiving holiday. Have fun! Read full promotion info here.

Have more 2015 Thanksgiving ideas, please feel free to contact us>> or leave a message at Facebook.

More Topics:

Source: http://smarttv-tips.com/thanksgiving-gifts-2015/.

Best Approach to get Blu-ray to My Cloud Mirror (Gen 2)

Unlike public clouds, My Cloud Mirror personal cloud storage allows you to keep all your content in one safe place on your home network. Plus, you can get all the storage you need with no monthly fees. Compared to the My Cloud Mirror model from last year, the Gen 2 version has a faster internal platform. (Read Cloud Storage Review)

When you got the troubles of disc loss or damage or the space of physical hard disk is low, you can ripping Blu-rays to My Cloud Mirror (Gen 2) for uploading which enable you can share cherished Blu-ray Movies with your family members or access your movies at home or on the road. In this article will show you step-by-step how to get your Blu-ray movies into My Cloud Mirror (Gen 2).

Before storing Blu-ray to My Cloud Mirror (Gen 2), you need to process Blu-ray to digital conversion. With a fast and easy-to-use Blu-ray to My Cloud Mirror (Gen 2) ripper, you will save your time and effort in establishing a complete and convenient online personal movie theater.

A Suitable Blu-ray to My Cloud Mirror (Gen 2) Converter:

When it comes to choosing a right tool, we take into consideration the conversion speed, output quality, price, etc. I would introduce to you a right software: Pavtube Video Converter Ultimate Mac

This software excels in converting your Blu-rays. It has a powerful Blu-ray decryption function so you can rip latest Blu-rays to My Cloud Mirror (Gen 2) with this Blu-ray Converter. Some latest Blu-rays Trainwreck, No Escape, Self/Less, Inside Out poster, Inside Out, etc. Additionally, you also can convert Blu-ray to mainstream devices, such as Blu-ray to iPad Pro, Blu-ray to iPhone 6S. This easy-to-use converter is fit for novices. Just three steps are enough to finish ripping with this software.

Download Blu-ray to My Cloud Mirror (Gen 2) Converter:

    
Other Download:
– Pavtube old official address: http://www.pavtube.cn/blu-ray-video-converter-ultimate/

Tutorial of Storing Blu-ray into My Cloud Mirror (Gen 2)

Note: Before you start ripping your Blu-ray, you should free run this software and install it successfully.

Step 1: Double click to open this converter after inserting Blu-ray to Blu-ray drive.


Step 2: Load right Blu-ray with “Load file(s)” and click “Format” bar to choose format. For general uses, MP4 video format in “Common Video” or “HD Video” is recommended.

This converter adjusts parameters automatically. If necessary, you can adjust them on your demands.

Step 3: Click “Start conversion” to start conversion process.

After finish converting, upload output files to My Cloud Mirror (Gen 2) and streamed later for different uses. Just dozens of seconds are enough to backup Blu-ray to My Cloud Mirror (Gen 2). Then My Cloud Mirror (Gen 2) helps you enjoy favorite Blu-rays with TV, tablets, mobile phones, Roku box, game console, etc online at home or on the go.

Have more questions about Dropbox vs Google Drive, please feel free to contact us>> or leave a message at Facebook

More Topics:

.

© 2017 Cloud Storage

Theme by Anders NorenUp ↑