Cloud Storage

Save Data Conveniently, Offer Life Convenience

Category: Amazon Cloud Drive

How to Upload movies and videos onto Amazon S3?

What Is Amazon S3? 

Amazon Simple Storage Service is storage for the Internet. It is designed to make web-scale computing easier for developers. 

Amazon S3 has a simple web services interface that you can use to store and retrieve any amount of data, at any time, from anywhere on the web. It gives any developer access to the same highly scalable, reliable, fast, inexpensive data storage infrastructure that Amazon uses to run its own global network of web sites. The service aims to maximize benefits of scale and to pass those benefits on to developers. 

This guide explains the core concepts of Amazon S3, such as buckets and objects, and how to work with these resources using the Amazon S3 application programming interface (API). 


How to Upload Objects into Amazon S3 quickly? 

When you upload a folder, Amazon S3 uploads all the files and subfolders from the specified folder to your bucket. It then assigns a key value that is a combination of the uploaded file name and the folder name. For example, if you upload a folder /images containing two files, sample1.jpg and sample2.jpg, Amazon S3 uploads the files and then assigns the corresponding object key names images/sample1.jpg, and images/sample2.jpg. Note that the key names include the folder name as a prefix. 

If you upload one or more files that are not in a folder, Amazon S3 uploads the files and assigns the file names as the key values for the objects created. 

This section explains how to use the AWS Management Console to upload one or more files or entire folders into Amazon S3. Amazon S3 stores all files in the specified bucket. 

To upload files and folders into Amazon S3 

1. Sign in to the AWS Management Console and open the Amazon S3 console at https://console.aws.amazon.com/s3/. 

2.In the buckets list, click the name of bucket where you want to upload an object and then click Upload. 


3. (Optional) In the Upload – Select Files wizard, if you want to upload an entire folder, click Enable Enhanced Uploader to install the necessary Java applet. After you choose the Enhanced Uploader, if the uploader is not ready to use after two minutes, you might need to change your platform (Windows or Mac) or browser configuration to get the Java applet to work. For instructions on changing your platform and browser configuration, see Using the Enhanced Uploader. 

You only need to do this step once per console session. After you click Enable Enhanced Uploader and then don’t want to use it, you can either refresh the browser, or close and reopen the browser to reset the uploader to the default. 

The Enhanced Uploader uses a Java applet. 

Note 
If you are behind a firewall, you will need to install your organization’s supported proxy client for the Java applet to work. 

4.Click Add Files. 


5.In the dialog box that appears, click the file or files that you want to upload, and then click Open. 

If you enabled the advanced uploader in step 2, you see a Java dialog box titled Select files and folders to upload, as shown. 
If not, you see the File Upload dialog box associated with your operating system. 

6. If you are ready to upload the object immediately, without providing further details about the object, click Start Upload. Otherwise, click Set Details. 

7.The Set Details dialog box gives you the options to set the storage class and choose whether to encrypt your object with server side encryption (SSE). 

Each object in Amazon S3 has a storage class associated with it. For information on Amazon S3 storage classes, see Storage Classes in the Amazon Simple Storage Service Developer Guide. 


When using server-side encryption (SSE) Amazon S3 encrypts your data at the object level as it writes it to disks in its data centers and decrypts it for you when you access it. For more information about using SSE in Amazon S3 go to Protecting Data Using Server-Side Encryption in the Amazon Simple Storage Service Developer Guide. 

A.If you select Use Server Side Encryption you have two SSE options; Use the Amazon S3 service master key or Use an AWS Key Management Service master key. 


Selecting the AWS Key Management Service option enables you to select the Master Key from a dropdown list with the following options: 

aws/s3 (default)— This is the default AWS KMS master key. 
Enter a key ARN— You can give external accounts the ability to use this object protected by a AWS KMS key. To do this, you’ll need to provide the Amazon Resource Name (ARN) for the external account in the ARN / ID field. Administrators of an external account that have usage permissions to an object protected by your AWS KMS key can further restrict access by creating a resource-level IAM policy. The other options in this dropdown list are all AWS KMS master keys that you have previously created. For more information about creating a AWS KMS key, go to Creating Keys in the AWS Key Management Service Developer Guide. 
Note 
Only keys in the same region as this bucket are available for encrypting objects in this bucket. 

B. When you’ve finished setting the object details, click Set Permissions. 

8.In the Set Permissions dialog box, do the following: 

Select (the default) or clear the Grant me full control check box. 
To grant read access to anonymous requests, select the Make everything public check box on the Upload – Set Permissions panel. By default, the check box is cleared, so no access is granted. 
Note 
By default, the owner of the upload has full control over all uploaded objects. 


9.To grant access to other users and groups for the objects you are uploading, click Add more permissions. 

In the grantee row that appears: 

For each permission you grant, an entry is made in the object’s Access Control List (ACL). For more information, see Using ACLs in the Amazon Simple Storage Service Developer Guide. 
If you click Add more permissions, a new Grantee row appears. Each Grantee row maps to a grant in the Access Control List (For more information, see Using ACLs) associated with the object. You can grant permission to a user or one of the predefined Amazon S3 groups. 

10. There are built-in groups that you can choose from the Grantee box: 

Everyone—Use this group to grant anonymous access. 
Authenticated Users—This group consists of any user that has an Amazon AWS Account. When you grant the Authenticated User group permission, any valid signed request can perform the appropriate action. The request can be signed by either an AWS Account or IAM User. 
Log Delivery—This group grants write access to your bucket when the bucket is used to store server access logs. For more information, see Managing Bucket Logging. 
Me—This group refers to your AWS root account, and not an IAM user. 

You can grant permission to an AWS account by entering the accounts canonical user ID or email address in the Grantee field. The email address must be the same one they used when signing up for an AWS account. You can grant a grantee any of the following permissions: 

Open/Download—Enables the account to access the object when they are logged in 
View Permissions—Can view the permissions associated with the object 
Edit Permissions—Can edit the permissions associated with the object 

11.To set metadata, click Set Metadata. 

In the Upload – Set Metadata do the following: 

If you want the Amazon S3 to infer the content type of the uploaded objects, select the Figure out content types automatically check box (default). 

To add custom metadata, click Add more metadata and enter the key-value pairs that you want. 

Amazon S3 object metadata is represented by a key-value pair. User metadata is stored with the object and returned when you download the object. Amazon S3 does not process custom metadata. Custom metadata can be as large as 2 KB, and both the keys and their values must conform to US-ASCII standards. Any metadata starting with prefix x-amz-meta- is treated as user-defined metadata. When you add user-defined metadata, select x-amz-meta- from the Key box and then append the metadata name to it. 


12.Click Start Upload. 

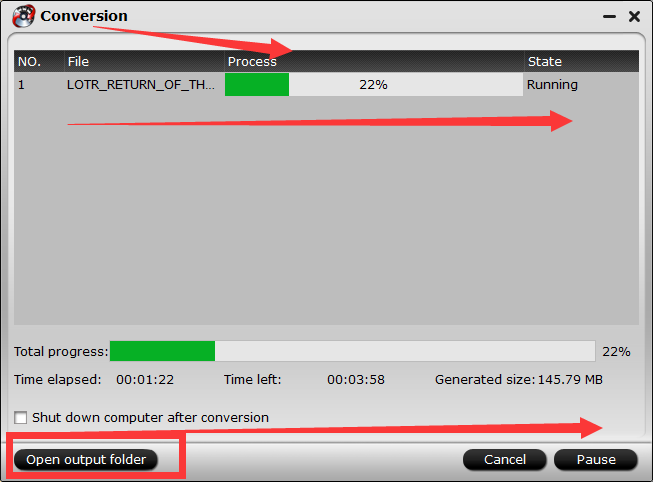
You can watch the progress of the upload from within the Transfers panel. 

Tip: To hide the Transfer panel, click None. To open it again, click Transfers. 

When objects upload successfully to Amazon S3, they appear in the Objects and Folders list. 

To view file content and properties 

Do either or both of the following: 

To view the file content, in the Objects and Folders list, double-click the object. 
To view object properties, in the Objects and Folders list, choose the object and then choose Properties. 


Note 

By default your Amazon S3 resources are private. Only the object owner can click the object link and view the object. If you share this link with others, for example add this link to your web pages, Amazon S3 will deny access. The clickable links on your webpage will work only if you make the object public (see Editing Object Permissions) or you use a pre-signed URL for the clickable link. For more information about pre-signed URL, go to Share an Object with Others in the Amazon Simple Storage Service Developer Guide. 

How to Upload DVD, Blu-ray, ISO to Amazon S3? 

Here we firstly take DVD as an example: 

Almost all movies are encrypted with CSS copy protection. Decryption keys are stored in the normally inaccessible lead-in area of the disc. You’ll usually get an error if you try to copy the contents of an encrypted DVD to Amazon S3s. However, if you have used a software player to play the movie it will have authenticated the disc in the drive, allowing you to copy without error, but the encryption keys will not be copied. If you try to play the copied VOB files, the decoder will request the keys from the DVD-ROM drive and will fail. You may get the message “Cannot play copy-protected files”. 

Now that it doesn’t work to directly copy DVDs to Amazon S3 and other Cloud Storage devices. To turn a real-world DVD into a digital file that you can stream to the viewing platform of your choice, you have to rip it from the disc. As with ripping DVDs, you’ll copy the contents of a DVD to a Cloud-friendly format. In order for this to work, obviously, you must have access to a PC with a DVD drive. 

One quick caveat: Though the police won’t break your door down for ripping DVDs that you already own, the process does technically violate copyright law. Still, as long as you’re not sharing movies on BitTorrent or selling copies on the street, it qualifies as fair use – just as ripping CDs (which is technically legal) does. 

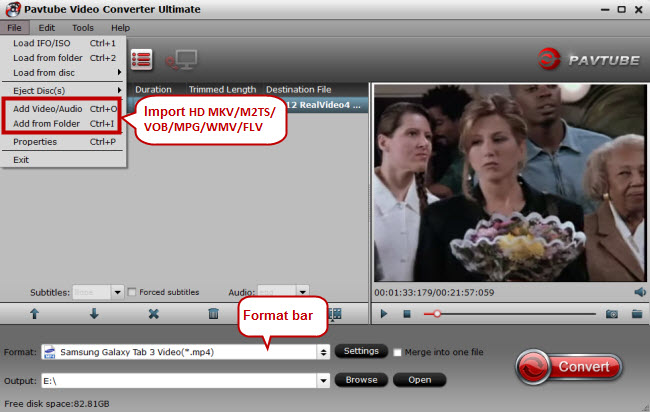
That said, you’ll need a DVD-ripping utility that can remove DVD protections and then rip DVDs to Cloud supports MP4, AVI, MOV, FLV, WMV etc. video files. 

A free option works nearly as well: perennial favorite HandBrake. It, too, converts DVDs, though it needs a little help to remove copy protection. After installing the program, you have to obtain a file called libdvdcss-2.dll, which you can download from this public archive site. After downloading libdvdcss-2.dll, copy it to the folder where you installed HandBrake—usually C:\Program Files\Handbrake. Now you’re ready to migrate your movies into the all-digital future. Load up HandBrake, and insert one of your DVDs into the PC. Then click the Source button, and choose the location of your disc – on my PC it’s the D: drive. Be patient – it may take a few minutes for HandBrake to read the contents of the DVD. But you’ll find that almost all commercial DVD discs failed to load. 

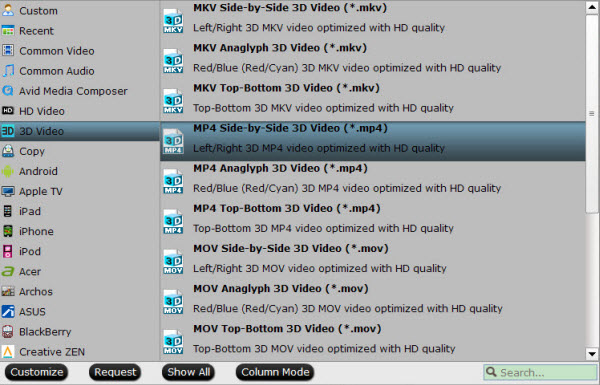
Now that Handbrake doesn’t work to directly copy DVDs to Cloud, using  Pavtube Video Converter Ultimate Mac  is the best way, it circumvent most copy protection schemes and convert the DVD, Blu-ray, ISO and other formats like H.265, MOV, MKV, AVI, MP4, VOB, MTS, Tivo etc to the Cloud – the mobile – or home-theater-friendly format of your choice. 

The best DVD to Cloud converter offers powerful yet easy-to-use functions, excellent video/audio quality, and fast ripping speed. It is not only a professional yet easy-to-use DVD ripping application that helps you rip your DVD movies to whatever video or audio files. It is also your ultimate solution to rip any DVD regardless of DVD copy protections and region locks, including DVD CSS, region code, RCE, Sony ArccOS, UOPs, Disney X-project DRM to MP4, MOV, AVI, M4V, FLV, WMV, MPG, 3GP for storing in Cloud, or playing on all Windows media players, Apple iPhones, iPads, iPods, Apple TVs, Samsung Galaxy S7/S7 Edge, Surface tablets, BalckBerry, Sony PSP, PS3/PS4, Xbox 360/One, Wii, Roku, WD TV Live, etc. 

Read the best video converter for Cloud Storage device review to learn more. 

Hot search: DVD to Amazon Cloud DriveiPhone video to BoxISO files to iCloudBlu-ray Collection to Cloud StorageDVDs to Google Drive 


Free download and install

Other Download:
– Pavtube old official address: http://www.pavtube.cn/blu-ray-video-converter-ultimate/
– Cnet Download: http://download.cnet.com/Pavtube-Video-Converter-Ultimate/3000-2194_4-75938564.html

Have more questions about Dropbox vs Google Drive, please feel free to contact us>> or leave a message at Facebook

Store Music Online with Amazon Cloud Drive

Last week Amazon set their sights on the mobile app market, launching their Appstore for Android. This week they’re attacking Android devices once again, but that’s not all—they’re getting into the online storage biz.

On Monday, they launched Amazon Cloud Drive and Amazon Cloud Player. Cloud Drive is an online storage space that lets you upload and store all of your digital files in one convenient place on the web. We’re talking music, pictures, videos, documents—if it’s digital, it can be stored on their servers.

But this isn’t anything new—other companies have their own versions of online storage. Apple gives MobileMe paid subscribers 20GB worth on iDisk. Microsoft provides 25GB of free storage with SkyDrive. And you get 2GB free with Dropbox, though you can opt for larger space for a monthly price. But if you’re a frequenter of Amazon, the Cloud Drive could suit you better, which provides you with 5GB free. You can also upgrade for free to 20GB of storage space once you’ve purchase an MP3 album.


Cloud Drive works with both Mac and PC, and the photos, videos and documents you store online will open up in their respective programs on your computer. The music files, in either MP3 or AAC format, can play via their web-based, streaming Cloud Player. It has basic play controls as well as playlist functionality. And with their digital music store app, Amazon MP3, Android device owners can stream their stored music directly on their phones or tablets.

Part 1. How to Store Music Online with Amazon Cloud Drive and Stream via Cloud Player?

To get started, check out Amazon’s walkthrough video to see how it works. Click on the video to begin playback

Step 1. Get Started

Just go to Amazon Cloud Drive to get set up. Click on the Get Started button, sign in to your Amazon account, and agree to the Cloud Drive terms of service. And that’s it! You now have 5GB of free online storage space.

Step 2. Upload Docs

Now that you have your account, you can start uploading your documents, images, vids, etc. Simply click on the Upload Files button and follow the directions. It’s intuitive and no different than any other online upload system, so you shouldn’t have any problems.

Tip:

Large files will take longer to upload, but uploading a 70MB MP3 album shouldn’t take more than 5 minutes with a decent Internet connection.

Step 3. Start Steaming Music

Now that you have some music loaded, simply navigate to your music folder in Cloud Drive and click on the song you want to play. The Could Player should automatically open in a new window. You may have to agree to another set of terms of service before you can gain access to the player.

As your songs continue to upload, they will automatically populate into the Cloud Player. Use the controls in the bottom left to play, skip, pause, etc.

Step 4. Upgrade to 20GB for Free

Now, if you want to bypass the $20/year price for 20GB, just purchase an MP3 album from Amazon and you’ll automatically get it for free. What’s better? Paying $20 then buying an album, or just buying an album for less than $10? You save money and get something for your music library.

From the Cloud Player, click on the MP3 Store logo in the top right (or just click here). Search for an album you want and purchase, then click the Save it to your Amazon Cloud Drive button to transfer directly to Cloud Drive and Cloud Player.

Step 5. Stream on Android Devices

So far, it’s been a cinch. And if you own an Android device, streaming your stored music to your smartphone or tablet is just as easy. Just download the free Amazon MP3 app from the Amazon Appstore for Android or the Android Market.

Part 2. How to Solve can’t Store Music Online with Amazon Cloud Drive?


As you know, music has different audios. Sometimes music is not supported by Amazon Cloud Drive. So in order to make you store Music Online with Amazon Cloud Drive smoothly, you’d better convert music to Amazon Cloud Drive supported music like MP3 for personal usages and then stream via Cloud Player without any problems. With  Pavtube Video Converter Ultimate Mac, you can easily convert your music to Amazon Cloud Drive more friendly MP3 for nice storing.

This program also lets you customize the media output setting including the audio channels. Besides, it supports extracting audios from Blu-ray, DVD and movies to WMA, AAC, MP3, WAV, M4A, AC3, RA, AU, etc. for enjoying on music players. What’s more, it also can let you convert any movies including ISOBlu-ray, DVD, AVI/MP4/H.265/MKV etc to Amazon Cloud Drive 


 Other Download:
– Pavtube old official address: http://www.pavtube.cn/blu-ray-video-converter-ultimate/

Have more questions about Dropbox vs Google Drive, please feel free to contact us>> or leave a message at Facebook

More Topics:

How to Upload recorded videos to Amazon Cloud Drive?

Upload a File or Folder Using the Cloud Drive Website

You can upload files and folders to Amazon Cloud Drive using a web browser on your computer, tablet, or mobile device.

You can upload your documents, spreadsheets, and other files to Amazon Cloud Drive using a compatible web browser. For system requirements, go to About Uploading Files and Folders Using the Cloud Drive Website.
For file requirements, go to Cloud Drive Files File Requirements.

Note:

The Cloud Drive web uploader requires HTML5, which is supported on Internet Explorer version 10 or greater, Firefox 4, Chrome, Safari (desktop) 6, Safari (mobile) 6.1, Opera (desktop) 12, Opera (mobile) 12, and Android 3. Upgrade to the latest version of your favorite browser to take advantage of the full features of Amazon Cloud Drive.
At this time, the option to upload entire folders through a web browser is only available for Google Chrome (version 21 and above.)

To upload your files and folders:

1. Go to Amazon Cloud Drive.
2. Select the All Files tab in the header.
3. Click Add Files.
4. Drag and drop files into the window that opens, or click Select Files to browse your files.
5. Choose a destination folder for your files or create a new folder.
Note: You can move your files into a different folder once your upload is complete.
6. Click Add to [folder name].

Tip: For information about uploading files using the Cloud Drive Desktop application, go to About Cloud Drive Desktop.


Tip 1. How to Solve can’t Upload recorded videos to Amazon Cloud Drive?

Amazon Cloud Drive is your place for everything digital. Cloud Drive offers free mobile apps, secure access from any computer, and it’s built in to your Amazon devices—so you can access your digital content everywhere you are. You can upload some videos like recorded videos by some cameras or smartphones to Amazon Cloud Drive for storage or other usages, but sometimes you can encounter some troubles due to incompatibility issues. In this case, what you need to do is to convert the videos to Amazon Cloud Drive supported videos on your computer and then transfer them to your Amazon Cloud Drive smoothly. With  Pavtube Video Converter Ultimate Mac, you can easily convert any videos including DVDBlu-rayISO, H.265, MKV, AVI, etc to Amazon Cloud Drive for storing.

Free download the best video to Amazon Cloud Drive video converter for Mac:


Other Download:
– Pavtube old official address: http://www.pavtube.cn/blu-ray-video-converter-ultimate/

– Cnet Download: http://download.cnet.com/Pavtube-Video-Converter-Ultimate/3000-2194_4-75938564.html

Step 1. Click “Add video” button to choose your recorded video files to the program .


Step 2. Set right output format. Click “Format” bar, and select .mp4 from “Common video” or “HD video” to upload videos to Amazon Cloud Drive nicely.


The default settings may not satisfy you, and you can click the “Settings” button to change the settings by yourself including video resolution, bit rate, audio sample rate, audio channel etc. for full screen playback smoothly. Or keep no changes, which is also a good choice.

Step 3. Click the “Start conversion” button on the main interface and the software will start to convert any videos to Amazon Cloud Drive friendly video formats immediately. When the conversion done, click “Open” to find the converted video files. Then you can effortless transfer the video files to Amazon Cloud Drive easily. 

Tip 2. How to get 6 months of unlimited Amazon cloud storage for free?

There are two words we just never get tired of hearing: “unlimited” and “free.” That’s right, no matter how often these words get tossed around, we can never get enough of them. And in the rare cases where these two magic words appear together, it almost always brings a smile to our faces.

Here’s a good example: Right now for a limited time, you can get 6 months of unlimited Amazon cloud storage for free, and we’ll tell you how.

Amazon always runs promotions for its popular cloud storage service. There are two main kinds of cloud solutions offered to end users by Amazon. One is unlimited photo storage, which is just $9 per year or completely free for Amazon Prime members, and the second is unlimited file storage.

The company typically charges $45 per year for unlimited cloud storage for all of your files, which is a darn good deal when you consider how expensive rival services are. But right now, you can get 6 months of unlimited cloud storage for your files for free. Simply visit this page and spend at least $19.99 in Amazon’s office supplies and electronics sections, and you’re good to go.


Other Download:
– Pavtube old official address: http://www.pavtube.cn/blu-ray-video-converter-ultimate/

Have more questions about Dropbox vs Google Drive, please feel free to contact us>> or leave a message at Facebook

More Topics:


Store Blu-ray on Amazon Cloud Drive for Fire Kids Edition

This article aims to teach you guys how to store Blu-ray movies onto Amazon Cloud Drive for Fire Kids Edition or other devices:

“I recently bought a Fire Kids Edition for my grandson. And I have some Disney Blu-ray movies that I want to put onto my Amazon Cloud Drive for playing on this Fire Kids Edition for I bought 8 GB edition. I know that I have to rip Blu-ray to MP4 format but I don’t know how. Do I need a software and how can I rip Blu-ray?”

Kindle Fire HD Kids Edition is the amazing device for children. And from its spec, we know that it just supports MP4, VP8, 3GP, WebM, M4V, 3G2 video. So before you put Blu-ray movies on Amazon Cloud Drive, you should rip Blu-ray to MP4, M4V etc supported by Fire Kids Edition. Here, you can use Pavtube Video Converter Ultimate Mac . This Blu-ray ripping tool can rip any encrypted Blu-ray disc, Blu-ray folder, Blu-ray ISO to MP4/M4V for Fire Kids Edition. For outputting smaller video size, the built-in editor also allows you to extract Blu-ray clips with the very part you want or adjust video bitrate to down the video size.

You can simply download and install Windows version at below:

Other Download:
– Pavtube old official address: http://www.pavtube.cn/blu-ray-video-converter-ultimate/

How to rip Blu-ray to Amazon Cloud Drive with Fire Kids Edition suitable format?

Step 1. Launch the Blu-ray Ripper and click “Load files” to add Blu-ray to the app.


Step 2: Press on “Format”>”Android”>”Amazon Kindle Fire HD(*.mp4)”as the output format.


Tip: To decide the video size, you can use two methods: 1. click “Settings” to down the size and video bitrate; 2. click “Edit” to trim the Blu-ray videos to get the very part you want.

Step 3: Hot on “Start Conversion” to rip Blu-ray to Amazon Cloud Drive for Fire Kids Edition. After the process, open the output folder to locate the ripped Blu-ray movies.

Upload Movie to Amazon Cloud Drive Using the Cloud Drive Website

You can upload your ripped DVD to Amazon Cloud Drive using a compatible web browser. For system requirements, go to About Uploading Files and Folders Using the Cloud Drive Website.

Note:

· The Cloud Drive web uploader requires HTML5, which is supported on Internet Explorer version 10 or greater, Firefox 4, Chrome, Safari (desktop) 6, Safari (mobile) 6.1, Opera (desktop) 12, Opera (mobile) 12, and Android 3. Upgrade to the latest version of your favorite browser to take advantage of the full features of Amazon Cloud Drive.

· At this time, the option to upload entire folders through a web browser is only available for Google Chrome (version 21 and above.)

To upload your files and folders:

1. Go to Amazon Cloud Drive.

2. Click Add Files.

3. Drag and drop files into the window that opens, or click Select Files to browse your files.

4. Choose a destination folder for your files or create a new folder.

Note: You can move your files into a different folder once your upload is complete.

5. Click Add to [folder name].

Once you have stored Blu-ray to Amazon Cloud Drive, you can log into your Amazon account on Fire Kids Edition. Then you can watch Blu-ray movies on Fire Kids Edition.

Have more questions about Dropbox vs Google Drive, please feel free to contact us>> or leave a message at Facebook

Related Articles;

.

Upload DVD to Amazon Cloud Drive

Amazon Cloud Drive touts itself as your personal hard drive in the cloud. Its basic functionality is virtually identical to the other cloud services on the market, which provides great content support, allowing you to upload anything digital, including documents, music, photos and videos, with no limit on file size. Even with this powerful function, you still can’t put DVD on Amazon Cloud Drive for the copy protection of DVD disc and format incompatibility issue. Sure, it doesn’t mean that there is no other way to achieve it. In this article, we will show you how to put your DVD library into Amazon Cloud Drive easily and quickly.

Although Amazon Cloud Drive doesn’t support DVD format. To get the movies off DVD discs and onto Amazon Cloud Drive, you can rip DVD to Amazon Cloud Drive friendly format. That is to say, you’ll need a DVD-ripping utility that can remove the Content Scrambling System (CSS) or similar built-in protections that prevent straight-up copying. To finish the task, Pavtube Video Converter Ultimate is highly recommended. This DVD ripping tool can rip any encrypted DVD and convert DVD, DVD IFO/ISO to MP4, MOV, AVI, MKV, etc popular formats. For the video size limit of Amazon Cloud Drive site, the built-in editor also allows you to extract DVD clips with the very part you want. Or, you can just choose to rip certain chapters of a DVD as you like. Mac users can turn to( Mac).

You can simply download and install Windows version at below:


Other Download:
– Pavtube old official address: http://www.pavtube.cn/blu-ray-video-converter-ultimate/

How to rip DVD to Amazon Cloud Drive suitable format?

Step 1. Load DVD movies

Insert the DVD disc into your computer’s DVD drive and run DVD Ripper. You can click the “Load File ” button to load the DVD files to the program. DVD ISO/IFO, VIDEO_TS folder are supported, too.


Step 2. Specify output format

Generally, Amazon Cloud Drive supports MP4, etc video files. Click “Profile” box and move mouse cursor to “Common Video” category and select “H.264 High Profile Video(*.mp4)” as the output format.

Tip: Since Amazon Cloud Drive has limitations about the uploading video size(If you only have the free account), please pay attention to the video size when ripping DVD movies for Amazon Cloud Drive. To decide the video size, you can use two methods: 1. click “Settings” to down the size and video bitrate; 2. click “Edit” to trim the DVD videos to get the very part you want. Besides trimming, cropping, adding watermark, adjusting special effect, are well supported as well

Step 3. Start transcoding DVD movies

Click the “Start conversion” button at the bottom right corner to start transcoding DVD for Amazon Cloud Storage. After conversion click “Open” to find the generated videos.

Upload Movie to Amazon Cloud Drive Using the Cloud Drive Website

You can upload your ripped DVD to Amazon Cloud Drive using a compatible web browser. For system requirements, go to About Uploading Files and Folders Using the Cloud Drive Website.

Note:

  • The Cloud Drive web uploader requires HTML5, which is supported on Internet Explorer version 10 or greater, Firefox 4, Chrome, Safari (desktop) 6, Safari (mobile) 6.1, Opera (desktop) 12, Opera (mobile) 12, and Android 3. Upgrade to the latest version of your favorite browser to take advantage of the full features of Amazon Cloud Drive.
  • At this time, the option to upload entire folders through a web browser is only available for Google Chrome (version 21 and above.)

To upload your files and folders:

1. Go to Amazon Cloud Drive.

2. Click Add Files.

3. Drag and drop files into the window that opens, or click Select Files to browse your files.

4. Choose a destination folder for your files or create a new folder.

Note: You can move your files into a different folder once your upload is complete.

5. Click Add to [folder name].

That’s all. Follow the steps. You should be able to successfully upload DVD to Amazon Cloud Drive.

Have more questions about Dropbox vs Google Drive, please feel free to contact us>> or leave a message at Facebook

Related Articles:

Upload/Attach ISO file to Amazon Cloud Drive

Speaking of top cloud storage providers, Amazon must take up one position. Amazon Cloud Drive is rough around the edges but definitely has potential. It provides cost-efficient plans, widespread file support and a built-in music player. If you have media files, like ISO images, how to upload these ISO files to Amazon Cloud Drive? 

How to get started with attaching ISO to Amazon Cloud Drive?

To get you started with the Amazon Cloud Drive application, here is a step-by-step guide:

Step 1: Download the app and install it.

Download PC/Mac version on your computer. On PCs, it places a small cloud icon in the system tray in the lower-right corner. On Macs, the cloud icon appears in the menu bar at the top of your display.


Step 2: Log in to your Amazon account.

After installing the app, a log-in window appears; you need an Amazon account to use Cloud Drive.

Step 3: Let the uploading begin.

You can simply drag a file, a folder, or multiple files or folders to the cloud icon to upload them to your Amazon Cloud Drive. Or, right-click on a file or folder to upload it. On Macs, choose the “Upload to Cloud Drive” menu option. On PCs, choose Send to > Amazon Cloud Drive.

The steps are easy just like other cloud storage application method.

Suggestion: Before putting ISO images and other formats with low frequency of usage, you’d better transform them to a common format, that the multimedia players you often use can support them.

How to transcode ISO to a popular format before attach these ISO image to Amazon Cloud Storage?


To convert ISO file for Amazon Cloud Storage, you can use Pavtube Video Converter Ultimate . It can work in nearly all kinds of videos like Blu-ray/DVD/4K/SD/HD and change them to H.265, MP4, M3U8, MKV, AVI, MOV, M4V, etc. For saving the space of cloud storage, you can adjust the video/audio parameters in profile settings window. Lower bitrate and resolution leads smaller size. Mac users can turn to ( Mac).

You can simply download and install Windows version at below:


Other Download:
– Pavtube old official address: http://www.pavtube.cn/blu-ray-video-converter-ultimate/

Step 1. Import ISO video files

Click the “Add video” button to import ISO files into the application. It supports batch importing so that you can add as many video files as you wish.


Step 2. Set output format

Click on “Format” bar to select output format. Here you can choose H.264 MP4, MPEG-4 MP4, MPEG-2, FLV, MKV, WMV, MP3, FLAC, OGG, WMA, etc as target format on Window. Here, we choose H.264 mp4 as the target format for its wide compatibility with all kinds of devices.


Step 3. Start transcoding ISO file

Click the “Star conversion” button at the bottom right corner to start transcoding ISO file for Amazon Cloud Storage. After conversion click “Open” to find the generated videos.

With ISO conversion process, you can watch them on you various portable devices or media players via Amazon Cloud Storage. So just try the video conversion operation before putting ISO to Amazon Cloud Drive for your better entertainment.

Have more questions about Dropbox vs Google Drive, please feel free to contact us>> or leave a message at Facebook

© 2017 Cloud Storage

Theme by Anders NorenUp ↑