Cloud Storage

Save Data Conveniently, Offer Life Convenience

Month: March 2016

Can’t Play videos on Microsoft OneDrive?

OneDrive indeed brings us many conveniences for storing files photos and videos together with a capacity of 15GB storage, as well as specifies a brief way to quick access what you have stored via OneDrive app for iOS, Android, Windows Phone and Xbox. Next we will share you how to upload iPhone/Android/computer videos to OneDrive quickly:

iPhone:

1. First go to the Apple App store and download the Microsoft OneDrive app.

2. If you didn’t already know, you have a Microsoft 365 account with your student login. The email will be your username with ‘@stanly.edu’ at the end of it. For example if my username was jsmith1234 then my OneDrive email would be jsmith1234@stanly.edu. If prompted, tap ‘OneDrive for Business.’


3. Once signed in, tap the menu button in the top right corner of the app.


4. Next tap ‘Add Items.’


5. Next either tap, ‘Take a Photo or Video,’ or ‘Choose Existing.’


6. Next find and select the video on your iPhone and then click ‘Upload.’


7. OneDrive will then show your file uploading. It will let you know as soon as your file has been uploaded. This may take some time depending on the length of the video and your connection speed.


8. After your video has been uploaded you will then be able to access it through the OneDrive site on your computer.


Android:

1.First navigate to the Google Play store and search for and download Microsoft OneDrive.

2.Sign in using your Stanly Community College username and password.

3.Select ‘Sign into OneDrive for Business’ and use your Stanly Community College username and password once again.

4.To upload files from your phone or tablet to your SCC OneDrive account, select ‘files’ and then click on the Orange ‘+’ in the bottom right corner.

5.To upload files from your phone or tablet to your SCC OneDrive account, select ‘files’ and then click on the Orange ‘+’ in the bottom right corner.

PC & Mac:

1. First go to your computer and go to onedrive.live.com and login. If you didn’t already know, you have a Microsoft 365 account with your student login. The email will be your username with ‘@stanly.edu’ at the end of it. For example if my username was jsmith1234 then my OneDrive email would be jsmith1234@stanly.edu. Once you type your email click ‘Next.’

2. If prompted, click ‘OneDrive for Business.’

3. If you are using your school login, you will be directed to a Stanly Community College login screen where you will enter your password. Then just click ‘Sign in.’

4. Once logged in click ‘Upload.’

5. Next just select the video from your computer and click ‘Open.’

6. Next your video will start to upload. The progress will be shown at the top of the page. (Note: It may take some time depending on how long your video is and the speed of your internet connection. You may have to start the upload then come back to it later).

7. Once it has finished uploading your video will show up within the list of the other items in your OneDrive account.

Everything seemingly goes well, but OneDrive video playback error involves users who would like to view video on OneDrive in troubles. How to solve the problem of ‘cannot play video on OneDrive’? Though OneDrive enables us to upload videos in any formats, it only supports playback of a few formats. MP4, MOV and M4V videos are proved to be playable video formats on OneDrive in most web browsers. However, the DRM-protected iTunes M4V video cannot be played directly with any browser. Obviously, we cannot play video on OneDrive if the video file is excluded from the three file types.

How to Solve ‘Cannot Play Video on OneDrive’ issue?

Suggestions probably tells that the perfect plan to play video on OneDrive is to download video from this cloud storage and play with a video player. It is quite helpless for users who want to watch video on OneDrive directly without space occupied especially on portable devices. Thus, the smart way to solve OneDrive video playback error is to convert incompatible videos, for example DVDBlu-ray, ISO, H.265, 1080P HD MKV, M2TS/MTS, HEVC, AVI, WMV, FLV, to MP4 and then upload to OneDrive with above methods for an undisturbed playback on PC/Mac and various devices.
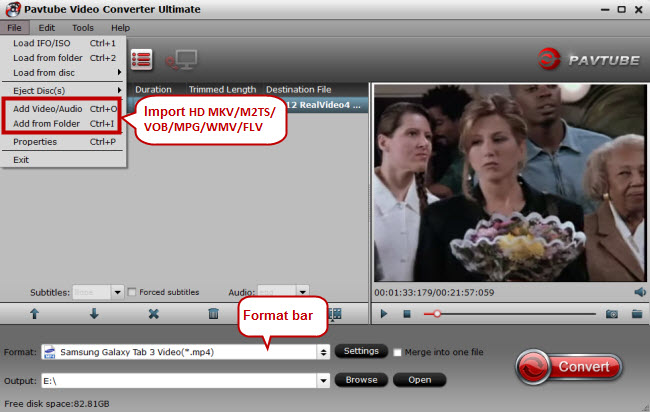
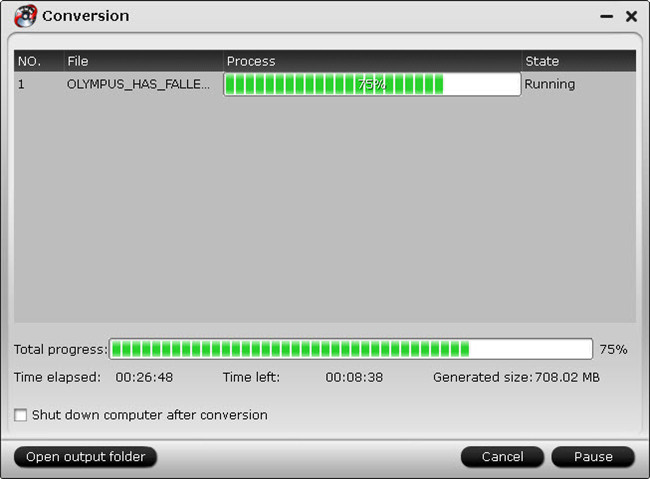
 Pavtube Video Converter Ultimate Mac is the top-rated video converter capable of converting any video formats to MP4 for OneDrive retaining vivid images and nearly lossless audio quality at a high speed. Next, let’s go to convert videos to MP4 for fixing the ‘cannot play video on OneDrive’ error.
       

Other Download:
– Pavtube old official address: http://www.pavtube.cn/blu-ray-video-converter-ultimate/
– Cnet Download: http://download.cnet.com/Pavtube-Video-Converter-Ultimate/3000-2194_4-75938564.htm

Save DVD to HC500 External Hard Drive for use on TV

HC500 external hard drive is made of sturdy metal material. In addition to being a portable storage device, it also supports smart TV programmable recording functions. The HC500 comes with user-friendly personal cloud backup software. Access data on your hard disk anytime, anywhere – the ultimate in convenience for personal storage applications. Of course, you can save your DVDs to HC500 external hard drive for personal storage or for playing on TV. This article show you some tricks about uploading DVD to HC500 External Hard Drive for playing via TV with one easy way, just keep reading.


Ripping DVD to an external hard drive, hard disk drive (HDD) or thumb drive is extremely easy if you have downloaded and installed Pavtube Video Converter Ultimate Mac . Still have no this ripper? Download it Now.

You may be confused about how to choose an output format since there is no direct profile(s) named “Hard Drive” . Indeed, you have a great many choices only depending on what your purpose of using the output video file.

1. Convert DVD to PC/Mac General Video: diversified choices, different video formats for different purposes and acceptances, convert DVD to AVIMP4, MOV, WMV, MPEG, etc with smaller file size

2. Rip DVD to Device/Web Video: convert DVD to mobile/web videos, make DVDs playable on the Apple/Android/Microsoft/Sony/other portable devices in mobile way, or compatible with YouTube, Facebook, general webs, etc.

We recommend MP4 as the output format when ripping DVD to HC500 External Hard Drive and other external drive/thumb drive with comparatively well preserved video quality, small file size and wide uses


Other Download:
– Pavtube old official address: http://www.pavtube.cn/blu-ray-video-converter-ultimate/


How to Add DVD to HC500 External Hard Drive for use on TV?

Step 1. Insert the DVD disc into your computer’s DVD drive and run the best DVD ripper. You can click the “Load file(s)” button to load the DVD files to the program. DVD ISO/IFO, VIDEO_TS folder are supported also.
  

Step 2. Click “Format” bar, and select .mp4 from “Common video” or “HD video”. Or select the formats from ” TVS”.


Tips: The default settings may not satisfy you, and you can click the “Settings” button to change the settings by yourself including video resolution, bit rate, audio sample rate, audio channel etc. for full screen playback smoothly. Or keep no changes, which is also a good choice.

Step 3. Click the ” conversion” button on the main interface and the software will start to convert DVD to MP4 immediately. When the conversion finishes, click “Open” to find the converted video files. Then you can effortless transfer the video files to HC500 External Hard Drive for playback on TV perfectly.

Useful Tips:

Supports TV Recording Functions

The emerging popularity of smart TVs and high-definition video bring features that help you address the problems of a modern busy life. When you have no time to watch your favorite TV programs when they play, simply use your ADATA HC500 external hard drive with supported smart TVs to record hours of programs to enjoy later.

Personal Cloud Storage

Set up your Choice HC500 Hard Drive as a personal data cloud! Use NTI MiST personal cloud software for easy access to your external hard drive from any location. MiST is available for Windows and Mac OS PCs, and Android and iOS mobile devices. 

Easily Set Up Your Data Backup

The HC500 comes with Windows-compatible NTI Backup Now EZ, a convenient, intuitive software package that allows you fingertip backup and restoration of your important data. Combine this with MiST Personal Cloud Storage to easily perform cloud backups.

G Shock Sensor Protection

G Shock Sensor Protection helps protect your data. If your HC500 suffers a severe shock from being struck, G Shock Sensor Protection automatically starts up and displays a flashing red light. When the shock has passed, a solid or flashing blue light displays indicating normal operation has resumed.

Rugged Metal Finish

The HC500 2.5″ external hard drive features an attractive sandblasted metallic finish. Whether next to your TV or PC, its compact design takes up little desk space. When you’re on the go, a special side-panel groove makes your HC500 easy to pick up and carry away.

Super-Speed USB 3.0

With Super-speed USB 3.0, you can connect to your smart TV and enjoy simultaneous recording and playing of your favorite shows and movies. Backwards compatibility with USB 2.0 ensures connectivity with most video capable TVs and consumer electronics devices.

Have more questions about Dropbox vs Google Drive, please feel free to contact us>> or leave a message at Facebook

More Topics:

Get Only $36.76 Easter Blu-ray/DVD/Video Converter at iFastime Facebook

Easter is here, and stores are celebrating. According to the National Retail Federation’s annual Easter Spending Survey conducted by Prosper Insights and Analytics, spending for the holiday is expected to reach $17.3 billion. Those celebrating plan to spend an average of $146 per person, according to the survey. But this time, are you looking for something special? iFastime, a professional multimedia software provider who specializing in DVD, Blu-ray and video backup solutions, rolls out its Easter Special Deals 2016, offering customers 20% discounts on its hot-selling products for lifetime license. The special deals start today, and end on Apirl 4, 2016. 


2016 Easter Deals and Sales at iFastime

* Everyone Gets lifetime License of iFastime Video Converter Ultimate with 20% OFF: 

During the Easter time, any fan at iFastime Facebook can get iFastime Video Converter Ultimate with only$36.76. This video converter software is able to convert all the downloaded/recorded Easter movie and video files including SD/HD/4K in formats like AVI, MKV, MTS/M2TS, AVCHD, MXF, XAVC, WMV, FLV, etc into compatible formats for playback on a wide range of portable & mobile devices including tablets like old or new iPad Pro, iPad Mini 4, Galaxy Tab E, Galaxy Tab S2, Galaxy TabPro S, etc., smart phones like iPhone 6S, Galaxy Note 5, Galaxy S7, etc., game consoles like Xbox 360, Xbox One, PS3, PS4, Wii, PSP, etc. The conversion goes like blazing fast and the output video quality is genuinely astounding. 

Considering the fact that you are also granted the free updates and technical support, it still worth to grab. Don’t hesitate!

Free Download or Purchase iFastime Video Converter Ultimate:


* 20% OFF on hot-selling iFastime Video Converter Ultimate for Mac

iFastime is offering its Video Converter Ultimate for Mac at only $36.76 per license for lifetime use which means you will get an all-in-on Mac Blu-ray/DVD Ripper, Blu-ray/DVD Copy, ISO Ripper, 720p/1080p/2160p Video Converterwith saving $9.19

It is fast and easy to use, able to work with multiple formats (MP4, MKV, MOV, AVCHD – MTS, FLV, etc.) and transcode Easter Blu-ray/DVD/ISO and hot Easter movies 2016 for watching on Gear VR, Rift DK2, streaming to Plex, Roku, or editing on FCP/iMovie/Avid Media Composer/Premiere Pro, doesn’t cost much and delivers super crisp professionally looking videos without loosing quality after conversion. The interface is simple and intuitive to use which means that you can start using it within minutes of installing the program on your Mac computer. Just help yourself to make it before time runs out on the forthcoming Apirl 4, 2016!

Free Download or Purchase iFastime Video Converter Ultimate for Mac:


Participate in iFastime Easter Promotion and enjoy 20% OFF gift and surprisingly huge savings during the 2016 Easter deal! For the terms and conditions of iFastime 2016 Easter Deals, feel free to visit the official website.

Have more questions or need more coupons, please feel free to contact us>> or leave a message at Facebook.

More Topics:

Transfer ISO files to iCloud for viewing on Apple devices

Apple’s iCloud is pretty cool really. It allows you to store music, videos, apps and more and then lets you share them wirelessly between your devices. Pretty useful, right? However, as Apple is so restricted with what it will allow, it’s useful for apps and not much else as it can’t be used as a Dropbox, to lots of people’s annoyance. But now, there is a way to upload ANY file to iCloud, including images, audio, PDF’s and file directories. It’s not as simple as Dropbox and doesn’t work between iOS devices, but works between Mac’s and PC’s giving a handy way to share files between these devices. But not all video files can be uploaded onto iCloud, take ISO as an  example. So how to upload ISO images to iCloud for playing with iPhone/iPad? Check out the solution here.

To store ISO on iCloud, you may have to convert ISO to iCloud supported file formats first. To get that done, here Pavtube Video Converter Ultimate Mac is highly recommended. The program provides good quality output regardless of the end device that you are going to use. It not only can convert ISO to iCloud supported formats , but also can convert DVDBlu-ray, H.265, MKV, evev iMovie video etc to iCloud formats for smooth uploading. Besides, you can crop the black bars, add special video effects, split or merge videos, etc. as you like with the built-in editor. (http://www.ifastime.com/top-video-converters.html]read review)

Just get it and rip videos from ISO to iCloud supported videos for storing, syncing or playback without hassle.


Other Download:
– Pavtube old official address: http://www.pavtube.cn/blu-ray-video-converter-ultimate/

  • Hold ‘Control’, click the file and compress it to a .zip file
  • Change the extension of the file from .zip to .txt as before
  • Go to iCloud on your web browser, log in and go onto iWork. Upload the .txt version of the video file
  • When this has uploaded, go to iCloud on your other computer and download the .txt file. When it has downloaded, locate it in your downloads folder, rename it by removing the .txt extension and replacing it with .zip (so converting it back to a .zip file) and double click the file to open
  • You should then have your video!


Have more questions about Dropbox vs Google Drive, please feel free to contact us>> or leave a message at Facebook 。

More Topics:

Upload iMovie video to iCloud for sharing

iCloud offers much more than cloud backup and storage solutions. For instance, iCloud provides features that make photo/video sharing with your friends and family members an enjoyable experience. You may share photos/videos using your iOS device, Mac (OS X v10.9 or later and either iPhoto or Aperture), Apple TV or Windows PC (Windows 7 or later) and iCloud Control Panel 3.0 or later. For the purpose of this article, we are going to show how you can share iMovie videos on your iOS device or your Mac. Here is how:

Obviously to be able to use this feature, you need an iCloud account. If you do not have one, you may easily set up one.


How to enable this feature?

On your iOS device, simply tap Settings > iCloud > Photos and enable Photo Sharing.


On your Mac, go to Apple () menu > System Preferences then select iCloud, then click the Options… button next to either iPhone or Aperture. Then select Photo Sharing.


Note that files in iCloud Photo Sharing do not use your iCloud storage.

How to share photos and videos

To do this, you need to create a shared stream. Here is how:

On your iOS device (iPhone, iPad or iPod touch)

1. Launch the Photos app
2. Tap Shared
3. Tap Create New Stream


4. Enter a name then tap Next


5. Invite your friends (you may enter from your contacts or an email address) then tap Create


Now your shared stream has been created but it is empty. To add photos or videos, tap on the new shared stream that you just created, then tap the (+) sign to add photos or videos.


6. Select your pictures or videos to share, then tap Done

7. You now need to enter a description, then tap Post.


Now your selected files are shared with the people that you chose. Your invited friends will receive an email letting them know about your invitation to subscribe to your stream.

To change your stream settings, tap Photos > Shared > your stream, then tap People. Here you may invite more people. You may also remove previously invited people. You may enable or disable the feature which allows your friends to add photos and videos to your stream. You may also allow anyone to view your shared videos or photos on iCloud.com. If you turn this feature on, you will see the public url that you can share with people. By visiting this URL on any device and any platform (mobile, computer etc), anybody can see and download your shared stream. Your subscribers will be notified when you add more photos or videos to this stream.

photos settings

If you want to receive notifications when your friends like, comment or add photos or videos, you may also turn that on.

If you would like to delete your stream, simply tap Photos > Shared > Streams > tap the stream you want to delete > People then tap Delete Photo Stream. Note that when you delete a photo stream from one device, it will be removed from all of your devices.

On your Mac OSX using iPhoto or Aperture

You may use iPhoto or Aperture to create a shared photo stream. The steps are very similar in both software:

1. Lauch iPhoto or Aperture
2. Select a Photo/video (or photos/videos) to share
3. Click the share button

iphoto-shared-stream
4. Choose iCloud then New photo stream

5. Enter your friends emails and the name of the stream then click Ok.

iPhoto Mac Stream
Now you are sharing the selected videos/photos with your friends.

To manage this shared stream on your Mac, select iCloud in iPhoto or Aperture, then click the info button. This is where you can add/remove a subscriber or change other settings. You may allow your subscribers to add photos or vides to your stream. You may also enable or disable public URL viewing on icloud.com.

iPhoto shared stream Mac settings

To delete a shared stream on your Mac, click iCloud then select the steam that you want to remove then press Command-Delete. Again when you remove a shared stream from your Mac, it will be removed from all of your other devices as well.

Tips: How to Solve can’t upload iMovie videos to iCloud?

If you want to put iMovie videos into iCloud and sync to other iDevices, you need to check out whether the videos are iCloud compatible formats, if not, you need to convert iMovie  video to iCloud supported formats first. We offer you one professional iMovie video to iCloud converter –Pavtube Video Converter Ultimate Mac to  convert any iMovie projects like AVI, MOV, MP4 etc to iCloud formats, and hope you can smoothly upload all iMovie videos to iCloud. 

Hot search:  Blu-ray to iCloudiPhone video to iCloudMKV to iCloudAVI to iCloud


Other Download:
– Pavtube old official address: http://www.pavtube.cn/blu-ray-video-converter-ultimate/

Have more questions about Dropbox vs Google Drive, please feel free to contact us>> or leave a message at Facebook

More Topics:

Store Video_ts to My Cloud NAS for playback with Plex

You can store and protect all the Video_ts files, photos and music from your PC and Mac computer in My Cloud NAS in your home. Then you can play Video_ts anytime anywhere via Plex (Plex organizes your entire media collection with one simple interface and keeps it beautiful by adding descriptions, plot summaries, posters and album covers). It seems a little difficult to let it come true. 


Since Video_TS are actually DVD videos, to convert DVD Video_TS folder to MP4, we need to get a DVD file converter. Searching online, more than one people recommend Pavtube Video Converter Ultimate Mac  to change Video_TS format to My Cloud NAS and Plex acceptable one. 

This video app works as the best software to convert Video_TS files to My Cloud NAS and Plex friendly format MPEG-4, etc with least quality loss. Moreover, this program also comes with optimized format presets for almost all popular multimedia devices including iPhone, iPad, Android, TV, PSP, PS4, XboX etc. With it, you should be able to open, play, edit, upload the new file without any hassle. And you could get wonderful output files and never worry about out of audio/video sync. Now just get the right version and follow the steps below to encode Video_TS for adding to My Cloud NAS for playing via Plex Media Sever. 


Other Download:
– Pavtube old official address: http://www.pavtube.cn/blu-ray-video-converter-ultimate/

How to Convert Video_TS to My Cloud NAS for playback with Plex?

Step 1. Run the program and click “Load Disc” button to select and load the Video_TS folder to the program. As you can see, added files will be displayed on the left source pane and can be previewed on the right preview window. By clicking the dropdown list of “Subtitles”, you can select your preferred subtitles while viewing your Video_ts movie.


Step 2. Set right output format. Click “Format” bar, and select .mp4 from “Common video” or “HD video” to fit My Cloud NAS and Plex for storing and playing.


Tips: The default settings may not satisfy you, and you can click the “Settings” button to change the settings by yourself including video resolution, bit rate, audio sample rate, audio channel etc. for full screen playback smoothly. Or keep no changes, which is also a good choice.

Step 3. Click the “Start conversion” button on the main interface and the software will start to convert Video_TS to MP4 format immediately. When the conversion finishes, click “Open” to find the converted video files. Then you can effortless transfer the video files to My Cloud NAS for playback via Plex.

Have more questions about Dropbox vs Google Drive, please feel free to contact us>> or leave a message at Facebook

More Topics:

Play MKV movies on LG TV via 2TB WD My Book

smart LG TV is a big and nice entertainment in our daily life. Nowadays it is convenient to put movies on USB flash drive and play on a LG LED, LCD, 3D or Ultra HD 4K TV via 2TB WD My Book. Though LG TV claims to support MKV formats, somtimes we still encounter LG TV MKV playback issues. Some MKV files play nicely while others won’t play on your LG TV or MKV playback with no sound. So what’s the matter? Check out the reason and solution here.


It’s refusing to play an MKV file on LG TV because of the unsupported audio codec in the video file. For your information, an MKV is only a container. Different MKV files tends to contain different video and audio codecs. The MKV files with unsupported audio codec (i.e. MKV DTS files) certainly can’t be played on the LG TV. The solution for you is to find a third-party tool to make everything easy. 

The Pavtube Video Converter Ultimate Mac is one of the options. It’s good because you can use it as a video converter to first transcode your MKV files to LG TV supported formats and also you can use it to stream MKV files with any audio codecs to your LG TV as long as it has DLNA support. If not, it’s okay if you have a streaming device like Chromecast, Apple TV, Roku, Xbox, PS3, Plex etc. (read review)

Ok, first you need to download this program and get it installed. Then let’s see the detailed guide to use the popular MKV to LG TV converter to convert MKV files to watch on LG TV and also stream MKV files to LG TV via 2TB WD My Book. 

Free download and install


Other Download:
– Pavtube old official address: http://www.pavtube.cn/blu-ray-video-converter-ultimate/

How to Stream MKV to LG TV via 2TB WD My Book?

Step 1. Load the MKV videos to the program

Install and run the best MKV to LG TV Converter, and then import the source MKV videos to it. To do so, you can directly drag & drop the files onto the main interface, or you can click the “Add video” icon on the upper left to locate the videos from your local disk. Note that batch conversion is supported, so you can add several files to the converter at one time.


Step 2. Set LG TV output video format

Click “Format” bar and turn to “TVS” category. The program has a number of presets for Samsung/Sony/Panasonic/LG TV. Here “LG TV (*.mp4)” preset is recommended for playing on LG TV.


Step 3. Start to convert MKV videos to LG TV

When you finish the settings, you can press the big “Start conversion” button to kick off the conversion. By using future-proof technology, the conversion will be finished with ultrafast speed and the best video quality kept. After the conversion, you can then stream them via 2TB WD My Book and play your MKV videos on LG TV via 2TB WD My Book with easy.

If your TV is Samsung TV, you can learn how to play videos on Samsung TV for your smooth playback. Have a try. Wish you a nice day.


Have more questions about Dropbox vs Google Drive, please feel free to contact us>> or leave a message at Facebook

More Topics:

Store downloaded 3D MP4 on Samsung TV from My Book Live

My Book Live is a popular Personal Cloud Storage. You can connect the drive to your wireless router to provide shared storage and wireless backup for all the PC and Mac computers on your home network. It can free up space on your smartphone or tablet by uploading photos & videos directly to your My Book Live. Maybe if you have downloaded some 3D MP4 videos on your computer, want to store them to My Book Live for playing on Samsung TV? Have any troubles? Take it easy, we will provide you one solution to solve it.

We all know MP4 is a complicated format which has different codecs. In order to play downloaded 3D MP4 on Samsung TV via My Book Live without any problems, what you need is  a powerful converter that can do all this for you, you can easily get 3D MP4 converted. Pavtube Video Converter Ultimate Mac is your smart choice. It can convert 3D MP4 to Samsung TV supported MP4 formats fo your playback on Samsung TV from My Book Live.  

Besides 3D MP4 to Samsung TV, this popular Samsung TV converter also can convert DVD, Blu-ray, DVD ISO, Blu-ray ISO, VOB, FLV, MPEG/MPGAVIVideo_TS etc to Samsung TV complicated format for nice playing. Now first download the top TV converter to learn how to store downloaded 3D MP4 on Samsung TV from My Book Live.

       
Other Download:
– Pavtube old official address: http://www.pavtube.cn/blu-ray-video-converter-ultimate/

3 Steps to Convert downloaded 3D MP4 to Samsung TV from My Book Live?

Step 1. Click “Add video” button to add your downloaded 3D MP4 video files to the program. Or directly drag the video you want to convert to the left item bar. 

  
Step 2. Set right output format. Click “Format” bar, and select Samsung TV .mp4 from “TVS”. If your Samsung TV is 3D TV, here you can select the 3D side by side .mp4 from “3D Video”.


Tips: The default settings may not satisfy you, and you can click the “Settings” button to change the settings by yourself including video resolution, bit rate, audio sample rate, audio channel etc. for full screen playback smoothly. Or keep no changes, which is also a good choice.

Step 3. Click the “Start conversion” button on the main interface and the software will start to convert 3D MP4 to Samsung TV friendly video formats immediately. When the conversion done, click “Open” to find the converted video files. Then you can effortless transfer the video files to My Book Live for playing on Samsung TV.

Have more questions about Dropbox vs Google Drive, please feel free to contact us>> or leave a message at Facebook

More Topics:

© 2017 Cloud Storage

Theme by Anders NorenUp ↑