Cloud Storage

Save Data Conveniently, Offer Life Convenience

Month: August 2016

Backup DVD to Cloud Services:Google Drive, Dropbox, OneDrive, iCloud …

Summary: To turn a real-world DVD file  into  Cloud Services:Google Drive, Dropbox, OneDrive, iCloud … that you can stream to the viewing platform of your choice, you have to rip DVD Cloud-friendly format.

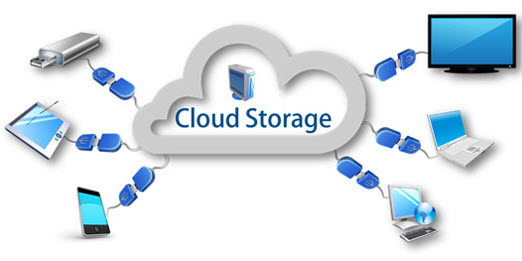
Cloud storage focuses on the saving and management of data. When you got the troubles of disc loss or damage or the space of physical hard disk is low, you can ripping DVDs to cloud lets you upload a personal DVD to Cloud Storage devices (like Google Drive, Dropbox, OneDrive, iCloud, Seagate personal cloud media storage, Network disk, Plex and Box etc.) enable you can share DVD Movies with your family members or access your movies at home or on the road.

Almost all movies are encrypted with CSS copy protection. Decryption keys are stored in the normally inaccessible lead-in area of the disc. You’ll usually get an error if you try to copy the contents of an encrypted DVD to Cloud Storage devices. However, if you have used a software player to play the movie it will have authenticated the disc in the drive, allowing you to copy without error, but the encryption keys will not be copied. If you try to play the copied DVD files, the decoder will request the keys from the DVD-ROM drive and will fail. You may get the message “Cannot play copy-protected files”.

Now that it doesn’t work to directly copy DVDs to Cloud Storage devices. To turn a real-world DVD into a digital file that you can stream to the viewing platform of your choice, you have to rip it from the disc. As with ripping DVDs, you’ll copy the contents of a DVD to a Cloud-friendly format. In order for this to work, obviously, you must have access to a PC with a DVD drive. It sounds ideal. Take all those DVDs you own and, from the comfort of your own home, effortlessly gain digital copies for a low price.

To backup DVD to Cloud Services what you need is a third-party program to share on Apple TV, iPad, iPhone, Samsung tablet TV, PS4, Xbox One/360, Roku and any of other portable device. that can accomplish the task. Here Pavtube DVDAid is highly recommended. With it, you can easily and quickly backup DVD to Cloud Services to a decent format like MP4 you want keeping the best quality. ( Mac)

Free download and install:

Other Download:
– Pavtube old official address: http://www.pavtube.cn/dvd_ripper/
– Cnet Download: http://download.cnet.com/Pavtube-DVDAid/3000-7970_4-76158510.html

How to Rip DVD to Cloud Storage Devices for streaming and sharing?

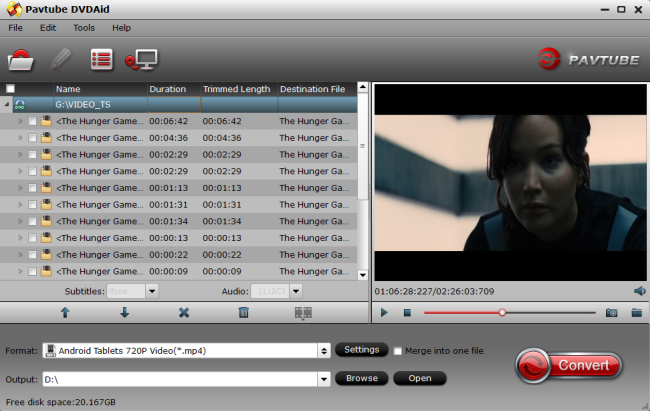
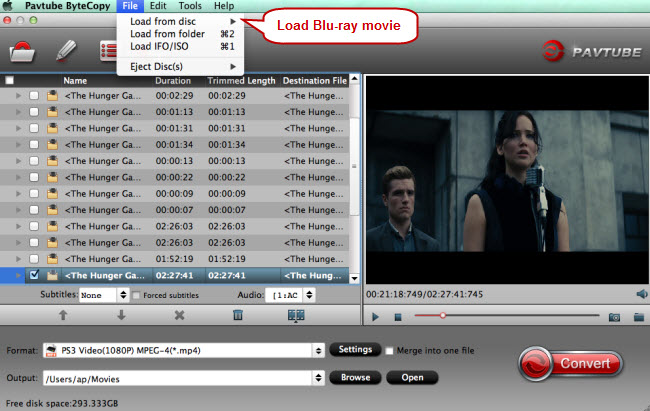
Step 1. Load DVD movie

Insert the DVD disc into your computer’s DVD drive and run DVD Ripper. You can load the DVD movies by clicking the “Load DVD” button on the top left. This DVD converter also supports ripping ISO and IFO files.

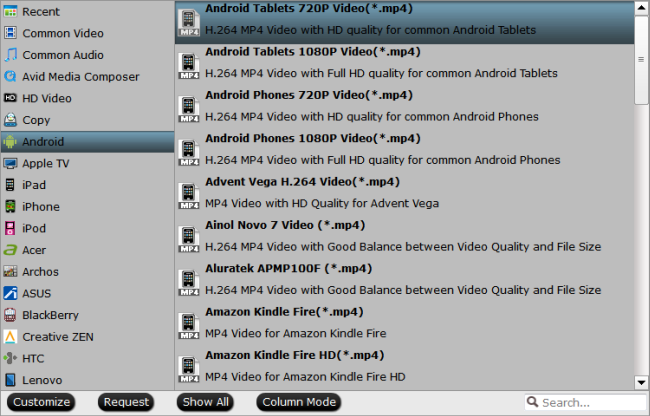
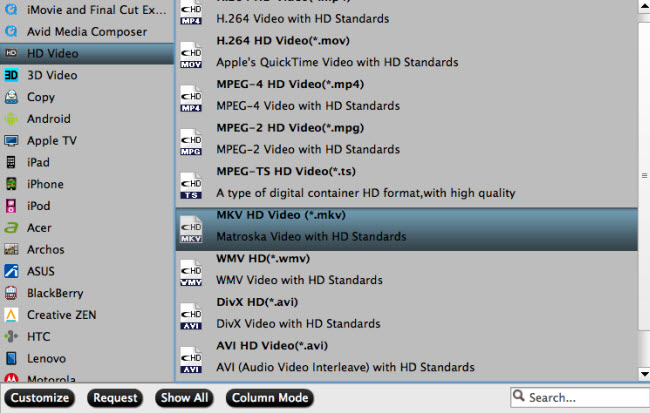
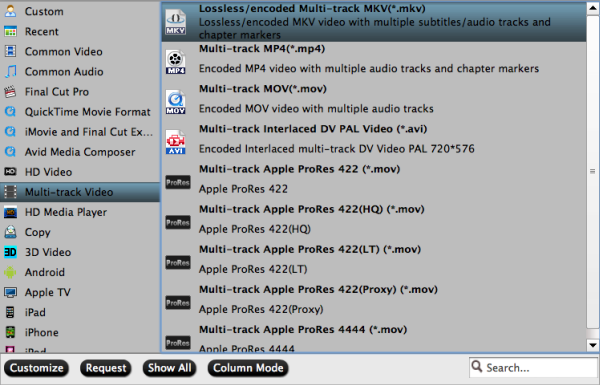
Step 2. Set output formats

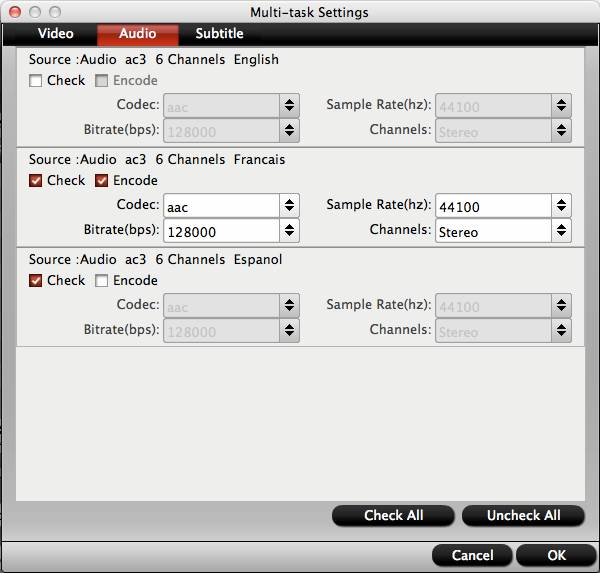
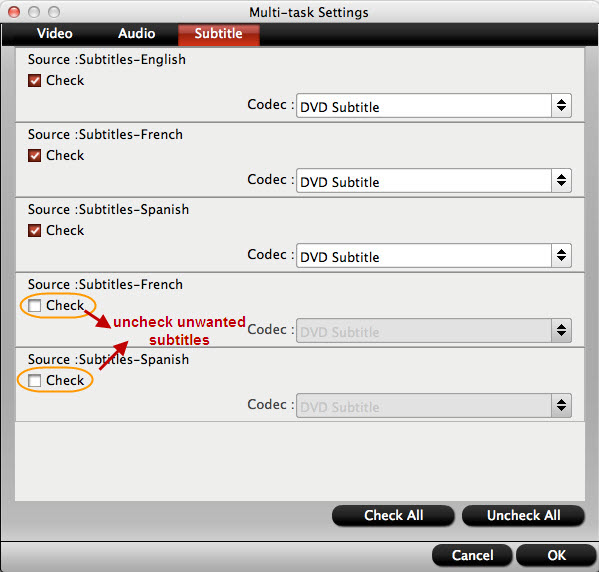
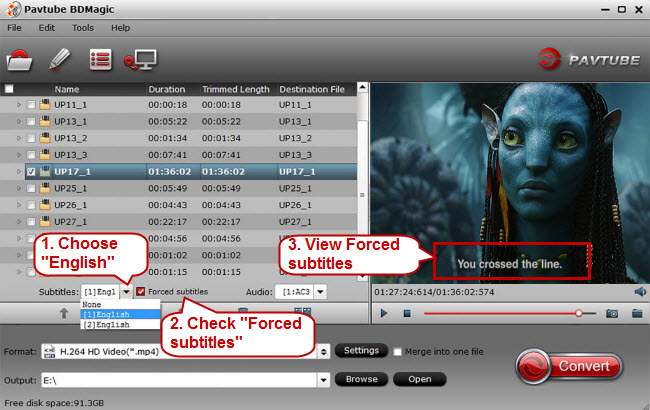
The selection of output format depends on your specific need, MP4 video format in “Common Video” or “HD Video” is recommended. You can also select an common or HD video format as per your needs. There are common MP4, MOV, M4V, AVI, MKV, WMV, MPG, ASF, FLV, etc. from “Common Video” or HD MP4, HD MOV, HD AVI, HD WMV, etc. from “HD Video” available for your choice.  Choose the high quality for Cloud: Google Drive, Dropbox, OneDrive, iCloud or other cloud storage.

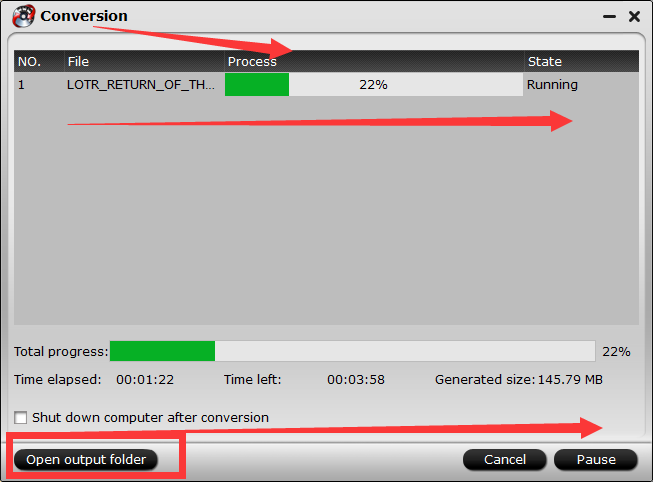
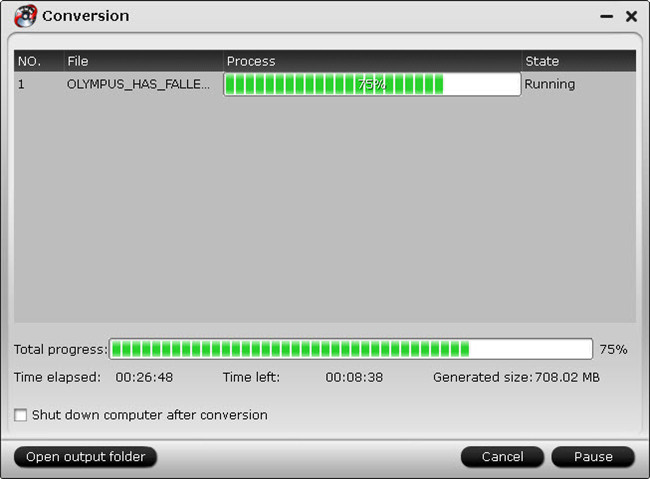
Step 3. One click to begin converter DVD to Cloud for storage

When you finish all settings, click the “Converter” button to start ripping the DVD movie to the digital file accepted by your Cloud storage device. Movies converted from your DVD files to 720/1080p will give great visual quality. The only thing is that the larger files with more pixels will result in much slower conversions. When the ripping is done, you can click on “Find Target” button to locate the ripped movies.

Related External Source:

Cloud storage–Cloud Storage is a model of data storage where the digital data is stored in logical pools, the physical storage spans multiple servers and often locations, and the physical environment is typically owned and managed by a hosting company. Converter DVD to Cloud Storage devices like Google Drive, Dropbox, OneDrive, iCloud, Seagate personal cloud media storage, Network disk, Plex and Box etc. Please share this rip and upload DVDs to Cloud storage device converted DVDs on Apple TV, iPad, iPhone, Samsung tablet TV, PS4, Xbox One/360, Roku and any of other portable device tutorial if you think it is helpful!

Related Articles:

Have more questions about Pavtube, please feel free to contact us >> or leave a message at Facebook.

2016 Best Mac Online Backup Cloud Services Reviews

Summary: Adopting cloud computing services is a big decision for any business, regardless of how big your company is. Many companies can take advantage of the benefits of cloud computing, which can include a savings in resources, an increase in security and more flexibility for your employees .

Part one: The More Information about Cloud Services

Cost
Cloud providers help you keep these costs down because you’re essentially renting all of the aforementioned equipment and services. Additionally, you won’t have to worry about upgrading your hardware and software, which can be costly over time.

Scalability
As your data storage needs increase, you need to invest in a larger data center. However, cloud computing companies make it easy for you to grow and not feel the pinch of a large investment in yet another server and rack. You can simply move over to the next cloud data storage plan and keep business going as usual.

Support
When things go wrong with your data center and this is an inevitability you have to rely on your IT team to physically set things right again. If you use a virtual data center in the cloud, you get built-in support from the third party you pay to maintain your information. Alternatively, your IT team can have access from their own laptops or mobile devices to fix the issue.

Automation
Cloud computing companies make it easier for you to schedule maintenance and upgrades without having to disrupt your employees’ or customers’ schedules. Automatic updates can be slated for the middle of the night or a weekend, or any other time that’s suitable for your business.

Security
Cloud providers are in the business of storing data securely, so they’re expected to offer the best encryption and security available. Additionally, data storage companies often offer daily, weekly or monthly backup options so that in the case of hardware or software failure, you can quickly and easily recover your data and apps.

Part Two: More Software About Cloud Services to Backup

This powerful  Pavtube Video Converter Ultimate  also features the unique ability to convert Multi-track HD videos M2TS, MKV, AVCHD, HDTV BDAV and MPEG-TS video movies, offering users the most convenient way to play no matter 720p or 1080p HD video on other device. What’s more, you can also choose to convert DVD/Blu-ray/ video to iPhone ,YouTube, NAS, Networked Devices, MSN, Myspace, Facebook, Google, Yahoo, Dailymotion, FOX, NBA, Youku, NAS, as you like.

Free download and install

Other Download:
– Pavtube old official address: http://www.pavtube.cn/blu-ray-video-converter-ultimate/
-http://download.foxreal.com/
– Cnet Download: http://download.cnet.com/Pavtube-Video-Converter-Ultimate/3000-2194_4-75938564.html

Step 1: Import Source Video.

After free downloading and installing this video files converter for , click “Add” button to import source video.

Step 2: Choose the Output Video Format.

If you want to play video on Android, please select “to Android” and you can find the specific output format.

Step 3: Press the “Converter” button

Hit the “Converter” button to start to convert video. You can view the conversion progress and batch convert the converting process at anytime.

This powerful software also features the unique ability to convert Multi-track videos M2TS, MKV, AVCHD, HDTV BDAV and MPEG-TS video movies, offering users the most convenient way to play no matter 720p or 1080p HD video. What’s more, you can also choose to conver video to device as you like.

Part Three: TOP 9  Online Backup Cloud Services Reviews On Mac(macOS Sierra)

Comparisons
Price & Value
Acronis True
SpiderOakone
SOS Online
OpenDrive
IDrive
Dropbox
CrashPlan
Crash
Backblaze
Value for Large Family (1TB +5 Users)
C
B-
F
F
A-
B+
B-
D+
C-
Value for Small Family (1TB +3 Users)
C-
C
F
D-
B+
B-
C-
D+
C-
Value for Individual (1TB + 1 Users)
B
B-
F
B-
A-
B
A-
A-
A
Storage
Unlimited
1TB
1TB
Unlimited
1TB
1TB
Unlimited
Unlimited
Unlimited
Computers per Subscription
3
Unlimited
5
2
Unlimited
Unlimited
10
1
1
Yearly Subscription Cost
$159.99
$129.00
$399.99
$129.00
$69.50
$99.00
$149.99
$59.99
$50.00
Speed
C+
B
A-
B
A
B+
C
D
D
Ease of Use
B-
C+
C-
D-
A
C
A-
D-
B
File Backup
Yes
Scheduler
Yes
Yes
Yes
Yes
Yes
Yes
Yes
Continuous Backup
Yes
Yes
Yes
Yes
Yes
Yes
Yes
Yes
Mirror Image Backup
Yes
Yes
Drive Seeding
$
Yes
Yes
Local Backup
Yes
Yes
Yes
Yes
Yes
Device Syncing
YES
Yes
Yes
Yes
File Restoration
Speed
B
A
A-
A-
A-
B+
C+
F
F
Ease of Use
D-
C+
C
D+
A
D+
A
B
D-
Unlimited File Versioning
Yes
Yes
Yes
Yes
In-Place Restore
Yes
Yes
Yes
Yes
Yes
External Drive Restore
Yes
Yes
Yes
Yes
Yes
Yes
Yes
Courier Recover
$
Yes
$
Security
256-bit AES
256-bit AES
256-bit AES
256-Bit AES
256-bit AES
256-BIT AES
448-bit Blowfish
128-Bit blowfish
128-Bit AES
SSL Transfer Encryption
Not Stated
256-bit
128-Bit
128-Bit
256-BIT
128-Bit
128-bit
128-bit
128-bit
Personal Encryption Key
Yes
Yes
Yes
Yes
Yes
Yes
Yes
Two-Step Verification
Yes
Yes
Yes
Servers Owned & Maintained
Yes
Yes
Yes
Business Only
Yes
Yes
Yes
Help & Support
Phone
Yes
Yes
Yes
Yes
Yes
Yes
Email
Yes
Yes
Yes
Yes
Yes
Yes
Yes
Yes
Yes
Live Chat
Yes
Yes
Yes
Yes
Yes
Tutorials
Yes
Yes
Yes
Yes
Yes
Yes
Yes
Yes
Forum
Yes
Yes
Yes
Yes
Yes
Yes
FAQs
Yes
Yes
Yes
Yes
Yes
Yes
Yes
Yes
Yes

Maybe You Want to known…

All Input Files
Output Devices Supported
Output Programs Supported
Output File Types
Video files. Blu-ray/DVD Discs, Blu-ray Folder,

Note:
1. BD ISO image file can be directly loaded without a virtual BD drive.

2. Other video files,can only be loaded via a virtual video files BD drive.

Apple devices: Apple TV 3, iPad Air, iPad 4, New iPad 3, iPad 2, iPad, iPhone 5S, iPhone 5C, iPhone5/4S/4/3, iPod Touch 5, etc.

Android devices: Samsung Galaxy Tab 4, Galaxy NotePro 12.2, Galaxy TabPro, Galaxy Note 10.1 2014 Edition, Galaxy Tab 3, Amazon Kindle Fire HDX, Google Nexus 5, Nexus 7/10, Sony Xperia Z2, Nook HD+, Nabi 2, ASUS, Acer, Toshiba, HTC, LG, Lenovo, etc.

Windows devices: Microsoft Surface 2, Surface Pro 2, Surface RT/Pro, HTC Windows Phone 8X,

Game consoles and media players: PS4, PS3, PS Vita, Xbox 360, Wii, WD TV Media player, Seagate Media Player

Others: BlackBerry, Nokia, VTech InnoTab tablets, Kurio, Coby, Kobo, Alcatel, PSP, Archos, Creative Zen, iRiver, etc

YouTube, NAS, Networked Devices, MSN, Myspace, Facebook, Google, Yahoo, Dailymotion, FOX, NBA, Youku, NAS, PowerPoint Rresentation, PDF, HTPC, Home Theater, A/V receiver, LCD Projector, Keynote, etc. Video: H.265/HEVC, H.264/MPEG-4, DivX, XviD, MKV, MP4, AVI, MPEG, WMV, FLV, SWF, F4V, MOV, 3GP, 3G2, VOB, TS, DV, MPEG-2 HD Video (*.mpg), MPEG- TS Video(*.ts), Quick Time HD Video (*.mov), WMV HD Video (*.wmv), Audio-Video Interleaved HD Video (*.avi)

Audio: MP3, AAC, FLAC, MKA (MKA(Matroska) Audio), OGG (Ogg Vorbis Audio), WAV(Nokia WAV Audio), M4A, DTS (remux),MP2, AIFF, AMR, SUN AU Format

Pavtube ByteCopy For Mac / WindowsThe Popular Blu-ray/DVD Ripper – Pavtube Video Converter Ultimate Rip any Video/DVD/Blu-ray incl. encrypted Video/DVD/Blu-ray to MP4, MOV, AVI. Export single SRT subtitle file. Reviews
Pavtube BDMagic For Mac / WindowsConvert all BD Videos – Pavtube BDMagic Convert to AVI, MP4, FLV, MPEG, MOV, WMV, and iPhone, iPad, Android Samsung, Google, Sony, BlackBerry, Nokia, VTech InnoTab tablets, Kurio, iRiver, etc.Reviews
Pavtube DVDAid For Mac / WinodowsDVD to Phone, iPod – Pavtube DVDAid iPhone Ripper Decrypt Disney, DVD movies, DVD Folder, DVD IFO File, DVD ISO Image File to BlackBerry, Nokia, VTech InnoTab tablets, Kurio, Coby, Kobo, Apple TV, etc.Reviews

Part Four: Related Review:


Why and How to Copy Blu-ray to Hard Drive on macOS Sierra/El Capitan

Summary: In this guide, we will show you how to backup your Blu-ray movie collection on to Blu-Ray discs, along with ripping the Blu-ray movie to Hard Drive on macOS Sierra if you prefer to keep a digital copy instead.

Blu-ray movies get unsurpassed picture and sound quality for its huge storage capacity. It is getting more and more common in home video enjoyment. But it also has more strict copy protection than DVD. And Blu-ray is really expensive. So if we can backup Blu-ray Movies to hard drive, it will save us much time and obviously avoid damaging the expensive and fragile Blu-ray DVD drive and disc. So what should we do, if we want to backup Blu-ray to computer? What we need only, is a Blu-Ray drive in your computer, and a Blu-ray Copy software.

As Blu-ray drives become more common, especially in laptops and many quality conversion software are being released, many users start using Blu-ray discs as the source of their encodings, in order to get excellent quality HD movies, especially 1080p and 720p instead of just the 480p resolution offered by DVDs. However Blu-ray discs have more complicated protection against ripping than Hard Drive hence adding an extra layer of difficulty to the whole process. In the article we will use the most popular decrypting tool.

Pavtube ByteCopy for Mac is program that runs on the background and detects whenever you insert a Blu-ray disc in your drive. It then runs by placing itself between the data your drive provides and the operating system, circumventing any known protection mechanisms the disc may have, automatically providing you with an unprotected disc, ready to be copied or ripped. It also removes the region code, plus the AACS encryption and the BD+ copy protection most Blu-ray discs have. Windows user can using Windows version.

Free download and install:
    

Other Download:
– Pavtube old official address: http://www.pavtube.cn/bytecopy-mac/
– Cnet Download: http://download.cnet.com/Pavtube-ByteCopy/3000-7970_4-76177783.html

How to backup Blu-ray to Hard Drive for streaming without limitation

Step 1: Load the Blu-ray Movie

Run your Blu-ray to Hard drive Converter and insert your Blu-ray disc into your Blu-ray drive. Click “file” to find the “ load from disc” choice to import your Blu-ray movie.


Step 2: Choose output format

Click the format bar to follow “HD Video” > “H.264 HD Video (*.mp4)” supported by general media players as output format.

Output lossless multi-track MKV format

Step 3: Adjust video and audio Settings

Here, you are free to adjust video and audio parameters in “Settings” in order to achieve better movie enjoyment. You could set video size to 1080p and audio channel to 5.1 Channel to get excellent Blu-ray backup to Hard Drive.

Step 4: Backup Blu-ray to Hard Drive

Click Convert button to rip Blu-ray to Hard Drive in video. Afterwards, locate the created video in output folder.

There you get the job done. You backup Blu-ray movies to Hard Drive successfully and you can stream it on TV and computer without limitation. After you backed up Blu-ray, you still can place these Blu-ray replica to Hard Drive for your conveniently playback.

More Situations We Need to Copy Blu-ray to Hard drive
First of all, copy Blu-ray to computer hard drive is simply for creating digital backup of your BD disc. It will prevent your Blu-ray from scratching, cracking and other physical damages even lost. Do you know there are more than DVD owners will make backup of their DVD? So you need if you have Blu-ray.

Two Kinds Of Disc Backup Solution

GET A FULL COPY OF YOUR DVD DISC

1:1 BD/DVD Discs BackupFull disc copy with original BD/DVD structure with all subs tracks, audio streams and chapter information included  

BD/DVD Video Directly CopyCopy only BD/DVD main movie to local computer or external hard drive and leave out extras.’


Pavtube ByteCopy Powerful Function

Outstanding multi-track output
Lossless backup from Blu-ray/DVD to MKV Backup Blu-ray/DVD to MKV without any quality loss.
Multi-track MP4/MOV output Convert Blu-ray/DVD sources to multi-track MP4/MOV.
3D experience
2D-3D conversion Make 3D videos out of 2D Blu-ray/DVD sources in 3D MKV/MP4/MOV/WMV/AVI formats with side by side, anaglyph and top-bottom effect.
3D-3D backup Keep the same 3D effect with the source 3D Blu-ray videos.
A remarkable video editor & maker
Add SRT/ASS/SSA subtitles to video Pavtube ByteCopy allows you to insert subtitles in SRT/ASS/SSA format to help get a better understanding of the video.
Trim & Crop Get your favorite video clips by trimming and remove black bars and unwanted areas of the video by cropping where you’re also allowed to adjust aspect ratio.
Split & Merge Separate one file into several clips according to quantity, time duration and size by splitting and combine several videos into one as a complete movie by merging.
Extract SRT subtitle Pavtube ByteCopy allows you to extract subtitle in srt format from the source video.
Video preview before conversion A small built-in player allows you to take a preview of your source video first before conversion.
Choose desired subtitle and audio track Select your target subtitle and audio track from your Blu-ray/DVD discs.
Conversion acceleration supported You’re allowed to accelerate the conversion speed with NVIDIA CUDA/AMD APP technology.

Related articles:

Have more questions about Pavtube, please feel free to contact us >> or leave a message at Facebook.


Rip blu-ray to Seagate Backup Plus Desktop Drive (5TB)

The process of ripping content from a blu-ray to your Personal Cloud Storage can be quite an easy task. People are ripping blu-ray to Seagate Backup Plus Desktop Drive (5TB) externally to create video on demand, to create a blu-ray collection, to play blu-ray on a plane while travelling, playback blu-ray videos on smart TV/Apple TV, iPhone, iPad, Android smartphones/tablets, or laptops, while preventing you from searching for the blu-ray you want from shelf to watch everytime and keep blu-rays from scratching. Seagate Backup Plus Desktop Drive (5TB) works as a fast portable drive or as a robust mobile media server for you and all you need is an Internet-connected device to browse and seamlessly enjoy blu-ray content stored on Seagate Backup Plus Desktop Drive (5TB). Now start taking the cinema home or on the go!

In fact, it’s easy to backup blu-ray movies to Seagate Backup Plus Desktop Drive (5TB) as long as you got a blu-ray Ripper in hand. There is a number of blu-ray Ripping software available like Freemake to help you convert blu-ray videos if you want to backup blu-rays to Seagate Backup Plus Desktop Drive (5TB) for playback on your portable device. These software programs vary, so you might be confused when you have to choose one. If so, you are recommended to use Pavtube ByteCopy. It’s rated as the best solution out there to rip blu-ray movies to Seagate Backup Plus Desktop Drive (5TB).For mac users, here is the Pavtube ByteCopy for Mac version.

You have a great many choices only depending on what your purpose of using the output video file.

1. Backup blu-ray to VOB/blu-ray folder: fast speed, original blu-ray quality and structure, convenient for future blu-ray burning;
2. Convert blu-ray to PC/Mac General Video: diversified choices, different formats for various purposes, smaller file size;
3. Rip blu-ray to Device Video: Play blu-ray on iPhone/iPad/Android/Apple TV/Surface/TV/other portable devices in mobile way

Free download and install:

Other Download:
– Pavtube old official address: http://www.pavtube.cn/bytecopy/
– Cnet Download: http://download.cnet.com/Pavtube-ByteCopy/3000-7970_4-76158512.html

Backup blu-ray to Seagate Backup Plus Desktop Drive (5TB)

1. Load blu-ray content

Insert your blu-ray disc into blu-ray drive, Launch the program and click the “Load file(s)” button to import the blu-ray movies. blu-ray, ISO/IFO files are also supported. You can select chapters as you want.

2. Choose output format

Click Format and choose formats video from “Common Video” or “HD Video”, which can be recognized by Seagate Backup Plus Desktop Drive well. If you want to copy blu-ray to Seagate Portable Hard Drive for playback on Samsung Galaxy TabPro/S2, Galaxy Note 5, Galaxy S6 Edge+/S6, Microsoft Surface Pro 4/Book, BlackBerry Priv, Xperia Z5, Apple TV, TV, etc. there are optimized presets for these devices. And then click the Browse button to specify an output folder to save the converted files.

3. Advanced Settings

With the right settings you can retain the quality of the original blu-ray while also saving space. This is particularly helpful when streaming over your network, depending on your network quality. Simply click Settings bar and you can tweak the settings to your satisfaction and even save it as preset.

Step 4. Start converting blu-ray to Seagate Backup Plus Desktop Drive (5TB)

Finally, hit the “Start conversion” button at the bottom of the main interface to start the conversion. It will automatically convert blu-ray to Seagate Backup Plus Desktop Drive (5TB) compatible video files with the best quality. Once the conversion is finished, click “Open” to quickly find the converted movies.

This blu-ray to Seagate ripper is sufficiently powerful to optimize blu-ray to make it perfectly match different uses. It could rip your blu-ray to Seagate Backup Plus Desktop Drive : Central 5TB Personal Cloud Storage compatible H.264 video, MPEG-4, and Motion-JPEG for video, and AAC, MP3, Audible (formats 2, 3, 4), Apple Lossless, AIFF, and WAV for audio with excellent output video quality. You are free to compress a blu-ray to smaller file size and save the space for storage. Best of all, it allows you to copy your blu-ray movies to 5TB with original structure or main movie only. So why not to get the useful software immediately?

Stream blu-ray from Seagate to Devices from Windows/Mac

Please follow this procedure to load content onto your Seagate in Windows:

1. Set up your Seagate by opening the Public folder and clicking on the “Manage the Seagate Central” link.

2. Before you decide to transfer a large amount of files to your Seagate, Seagate recommends you make sure you have the most up-to-date firmware. See the instructions at the end of this article on how to check and update firmware.

3. Open the Start menu, then open (My) Computer or Windows/File Explorer. (In Windows 8: Press the Windows key () + D, then select File Explorer

4. In the left sidebar, click on the triangle icon next to Network to expand the menu

5. Find the Seagate and click on it.

6. The Seagate will appear with the hostname.
Example: Seagate-123456. The Public folder will appear. You may also see folders with titles that correspond with your username and other users you have set up. If you plan to view your content outside of your home using the Seagate Media app, this content must be placed in the Public folder.

7. Open another Windows/File Explorer or (My) Computer window and navigate to the files you would like to add to your Seagate.

8. Select the content you would like to copy and drag and drop the content to the folder of your choice. The private folder’s title is your username. That folder will always require a login and should be used to store files you don’t want readily available on your local network. You can add files to this folder by double-clicking on the folder and providing your credentials. Once you’re logged in, you can manually transfer files to that folder.

How to verify and update firmware

To verify whether you have the latest version of the firmware on the Seagate, open the Public folder and click on the “Manage the Seagate Central” link. Once logged in, go to “Settings” and then click on “Advanced” and “Firmware Update”. On the right-hand side, click on “Check for update” and apply any updates it may find.

Please follow this procedure to load content onto your Seagate from a Mac computer:

1. Set up your Seagate Central by opening the Seagate’s Public folder and clicking on the “Manage the Seagate Central” link.

2. Before you decide to transfer a large amount of files to your Seagate, Seagate recommends you make sure you have the most up-to-date firmware. Check the bottom of this article to see how to verify the firmware on your drive.

3. Open Finder from the Mac desktop.

In the left sidebar under Shared, find your Seagate device listed as Seagate-XXXXXX(where Seagate-XXXXXX is the host name).

4. The public folder will be displayed. You can access it from here if that’s where you want to copy your data. If you want to access your private folder, you will need to click on Connect As, then type in your credentials. Note: The username that is displayed by default is not the username of your Seagate. You will need to clear out that username and then type in the username that you gave the drive during setup.

5. Once you are connected, the private share (titled according to your username) and the public share will display in the left sidebar. Double-click on the desired folder to drag and drop data to it.

If you would like to view your content while outside of your home through the Seagate Media app, please drag and drop your content to the Public folder. The Seagate Media app has a limitation that will only allow you access to your Public Folder.

How to verify and apply firmware on the Seagate

To verify which version of the firmware is on your Seagate, open the Seagate’s Public folder and click on the “Manage the Seagate Central” link. Once logged in, click on the “Settings” tab, then click on “Avanced” on the left-hand side of the window. Click on “Firmware Update.” Click on “Check for update” on the right-hand side and apply any updates it finds.

Related articles

View DVD movies on Zeiss VR One from iPhone 7
How to Convert DVD to LeapPad Ultra Tablet Efficiently for Your Kids
Rip Disney DVD movies on MacOS Sierra/El Capitan
How to rip DVDs with Samsung Galaxy S7 mini lossless
Watch DVD movies on VTech InnoTab Max Kids Tablet
Convert 3D Movies to Rift CV1 on macOS Sierra/El Capitan
HOW TO: Setup Gear VR For Movies Perfectly!
The Best 4K HDR TVs for Your Xbox One S
Transfer Video, Music to Samsung Galaxy note 7
The Support 4K video – Kids Galaxy Tab E Lite 7″ 8GB

Have more questions about Pavtube, please feel free to contact us >> or leave a message at Facebook.

Rip DVD to AirPort Extreme

Except NAS, Personal Cloud Storage, etc, Apple has its own media unit – AirPort Extreme, combining the functionality of a router, network switch,wireless access point and NAS as well as varied other functions. Store your local movies to USB Hard Drive then plug into AirPort Extreme. Then you can watch the moves on your iOS devices easily.

“I have something like 2000 DVDs and Blu Rays I’ve amassed over the years, and now I’d like to start backing them up to my Airport Extreme. what is the best software to rip the blu ray discs, and then convert to .mp4 so I can watch in iTunes and Apple TV. Cheers! – fromReddit.com

Best Software to Rip Blu-ray/DVD discs to AirPort Extreme

Pavtube BDMagic is a professional Blu-ray ripping tool. Preferably one that can also do the DVDs. It can remove the ACSS, BD+, region code, Disney, Sony and other Blu-ray/DVD encryption and convert them to MP4, MOV, M4V, AVI, MKV, etc with original video quality. It has optimized preset for iPhone, iPad, Apple TV to make you get the most compatible format video for your iOS devices.(review)

Free download and install:

Other Download:
– Pavtube old official address: http://www.pavtube.cn/blu-ray-ripper/
– Cnet Download: http://download.cnet.com/Pavtube-BDMagic/3000-7970_4-75922877.html

How to rip Blu-ray/DVD to AirPort Extreme?

Step 1: Add Blu-ray/DVD movies

Download and install Blu-ray/DVD Ripper (Mac version). Click “File” to load your Blu-ray/DVD movies to the program. You can choose your desired subtitle in “Subtitles”.

Step 2: Choose output format

You can select output format from “iPhone”, “iPad”, etc profile to choose the optimized preset. Or just choose “H.264 HD MP4” video for all your Apple devices.

Step 3: Start to backup Blu-ray/DVD

Back to the UI, click “Convert” to start Blu-ray/DVD to MP4 conversion.

Transfer the rips of Blu-ray/DVD to USB Hard Drive then plug it into AirPort Extreme. Now set up AirPort Extreme to get a fast and secure wireless network in your home.

Related articles:

View DVD movies on Zeiss VR One from iPhone 7
How to Convert DVD to LeapPad Ultra Tablet Efficiently for Your Kids
Rip Disney DVD movies on MacOS Sierra/El Capitan
How to rip DVDs with Samsung Galaxy S7 mini lossless 
Watch DVD movies on VTech InnoTab Max Kids Tablet
Convert 3D Movies to Rift CV1 on macOS Sierra/El Capitan
HOW TO: Setup Gear VR For Movies Perfectly!
The Best 4K HDR TVs for Your Xbox One S
Transfer Video, Music to Samsung Galaxy note 7
The Support 4K video – Kids Galaxy Tab E Lite 7″ 8GB

© 2017 Cloud Storage

Theme by Anders NorenUp ↑