Cloud Storage

Save Data Conveniently, Offer Life Convenience

Category: Cloud Storage

Backup American Horror Story TV Series BD/DVD to Personal Cloud Storage

American Horror Story is an American anthology horror television series created and produced by Ryan Murphy and Brad Falchuk. Described as an anthology series, each season is conceived as a self-contained miniseries, following a disparate set of characters and settings, and a storyline with its own beginning, middle, and end. Some plot elements are loosely inspired by true events. In this 2016, American Horror Story Season 6 is released, which makes many people want to review its American Horror Story Season 1/2/3/4/5.

American Horror Story

It is difficult to download the full seasons of American Horror Story online. The best idea is to copy your collected or rented American Horror Story Blu-ray and DVD to personal cloud storage such as WD My Cloud, etc then to view the TV Series on wide screen TV without disturbing. For me, I do like copy some Blu-ray and DVD to my cloud storage for TV streaming. In this case, I don’t need to waste time on ads and pay for any series.

I think there are many people who like me wanting to make a digital copy of Blu-ray and DVD American Horror Story  to personal cloud storage, like the famous WD MyCloud for playback on iPad/TV/Tablet. So I share my Blu-ray ripping experience here. Of course, it is not just for Blu-ray American Horror Story , it is also for your other Blu-ray movies, like Hannibal and other horror Blu-ray discs.

Part 1: Download and Install a Blu-ray Ripper

I chose to use Pavtube BDMagic (review) for its easy-to-use and multifunction feature. It perfectly ripped my Blu-ray American Horror Story  to MP4 without any video quality loss. Of course, it also can rip DVD to personal cloud storage. Since my personal cloud storage had the enough space, so I preserved HD MP4. If your cloud storage has no enough storage space, you can down the video resolution or bitrate in “Settings” to reduce the video size. If you don’t want Pavtube BDMagic, it has other Blu-ray ripper options for Mac and Windows

Free download and install: 
          

Part 2: Rip Blu-ray American Horror Story  to Personal Cloud Storage for iPad/TV/Tablet

Step 1: Import movies to the app

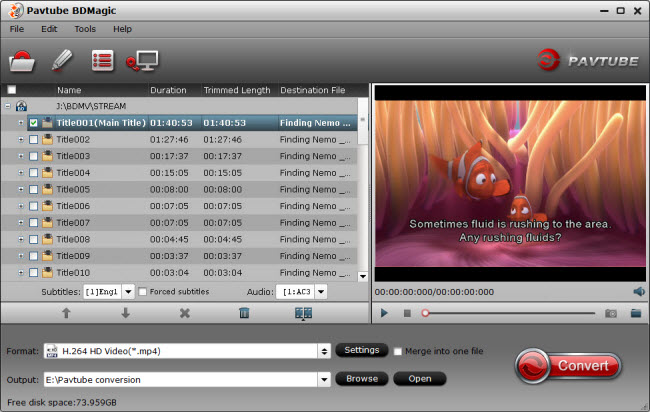
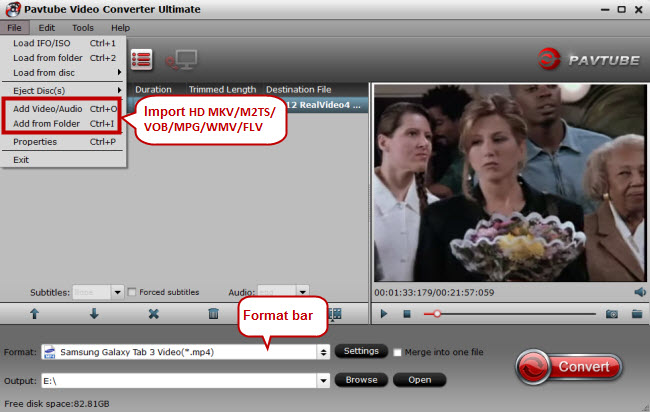
You can click “File” to add the source Blu-ray American Horror Story  movies to the app. Or simply drag and drop the TV shows to the app. It supports batch conversion so you can add more than one chapter at a time.

Step 2: Choose output format

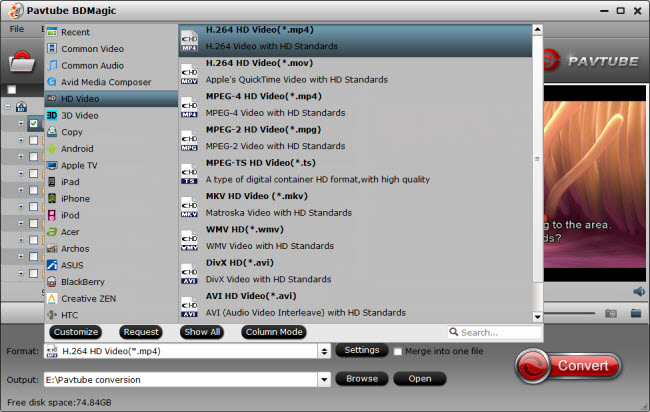
Since I want to watch American Horror Story  on TV/iPad/Tablet via my cloud storage, so I chose the MP4 format that can be supported by all my devices. I chose “H.264 HD MP4(*.mp4)”from “HD Video”because Pavtube BDMagic can offer 6X times Blu-ray ripping speed on Windows by H.264 codec. 

Tip: I have mentioned above that you can reduce the video size in “Settings” if needed. You can preview the video size at the below chart in the widow.

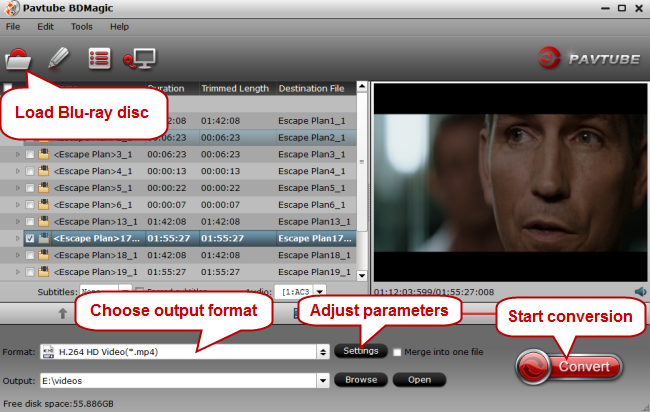
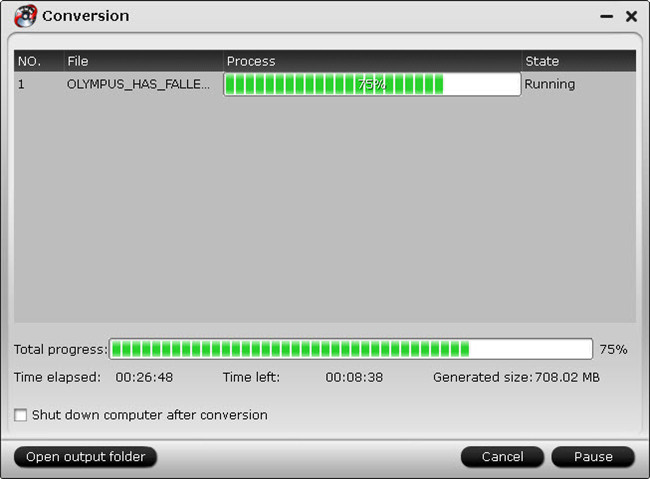
Step 3: Start to backup American Horror Story  

After all settings done, hit on the “Convert” button and Blu-ray American Horror Story  to MP4 for personal cloud storage with the best video quality conversion will get started. After the conversion completes, open output folder and you will find the converted movies.

Now, transfer the TV Series to storage device. You also can use NASSeagate Wireless Plus. If all your devices are Apple product, you still can apply iTunes to store the TV Shows. If you have other excellent Blu-ray/DVD Ripping experience, just share with us at comment area. 

Series overview

Season Title Episodes Originally aired
First aired Last aired
1 Murder House 12 October 5, 2011 December 21, 2011
2 Asylum 13 October 17, 2012 January 23, 2013
3 Coven 13 October 9, 2013 January 29, 2014
4 Freak Show 13 October 8, 2014 January 21, 2015
5 Hotel 12 October 7, 2015 January 13, 2016
6 Roanoke 10 September 14, 2016 November 16, 2016

Related Articles:

Copy DVD Library to Personal Cloud Storage

A Personal Cloud Storage keeps all your data in one safe place at home and allows you access it anywhere. If you want to access your DVD movies anywhere on your portable devices without needing a heavy DVD Player, copying DVD library to Personal Cloud Storage will be a nice idea.

Put DVD library in Cloud Storage

There are various kinds of Personal Cloud Storage. Popular Personal Cloud Storage devices have WD My Cloud, WD My Cloud Mirror, iCloud, Dropbox, Google Drive, etc. Each one enables you to save many DVD rips and get the DVD movies on iPhone, iPad, Tablet, etc. When we put DVD to Personal Cloud Storage, we need a DVD Copier or DVD Ripper (DVD Copier vs. DVD Ripper) cause commercial DVDs have strict copy protection. A DVD Copier/DVD Ripper can remove the DVD copy protection and extract main title of the DVD movie to Personal Cloud Storage.

Popular DVD Ripper to copy DVD to Personal Cloud Storage have Handbrake and Pavtube BDMagic. But Handbrake can’t rip protected DVD to Personal Cloud Storage so here we teach you how to make DVD backups to save in Personal Cloud Storageusing Pavtube BDMagic.

Key Features of Pavtube BDMagic

– Remove DVD encryption including CSS, region code, RCE, Sony ArccOS, UOPs, Disney x-project DRM, etc.

– Full disc copy DVD and directly mian title copy DVD to Personal Cloud Storage.

– Convert DVD to MP4, MKV, AVI, etc multimedia container format to Personal Cloud Storage.

– Rip DVD to iPhone, iPad, PS4, Samsung Galaxy devices, etc preset to Personal Cloud Storage.

– Batch copy DVD to Personal Cloud Storage.

– Also support to decrypt Blu-ray to Personal Cloud Storage.

Pavtube BDMagic Download Link

Make Copies of DVDs to Save in Personal Cloud Storage

Step 1. Run the DVD Ripper for Cloud Storage and click DVD disc icon to load DVD movies for converting. You can also import movies files from DVD folder, ISO image files even Blu-ray movies.

DVD Ripper for Cloud Storage

Step 2. As Cloud Storage is powerful enough to almost all kinds of formats, you can choose the format according to your own needs like MP4, MOV, AVI, MKV, etc.

Cloud Storage supported format

Tip: You can click settings button to customize the output parameters, such as resolution, bitrate, etc, you can also skip this step.

MP4 profile settings

Step 3. After all settings, click convert button to ripconvert DVD to optimized format for Cloud Storage.

Once you’ve liberated your DVD movie library, you’ll make it available for viewing anytime, anywhere just with the help of your Personal Cloud Storage. With this DVD to Personal Cloud Storage Ripper, you can also copy your DVD to OpenDrive,  Amazon Cloud Drive, Skydrive, My Cloud Mirror, etc.

Related Articles:

How to Upload Christmas Videos from iPhone to iCloud?

Most of us like snapping photos and shooting video clips with an iPhone during a travel, in a party or elsewhere. And we often need to move pictures and videos from iPhone to computer. iCloud is so much more than a hard drive in the sky. It’s the effortless way to access just about everything on all your devices. With iCloud, you can sync videos, photos, music, books, apps and so on among multiple iOS devices directly through iCloud, including iPhone 5/5s/6/6s/6s Plus. Here are the steps to upload videos from iPhone to iCloud:

Step 1. Open iPhone

Press the home button for a few seconds to open your iPhone.

Step 2. Connect iPhone to Wi-Fi

Tap Settings from the iPhone’s Homescreen and press Network in the Settings screen. Then tap the WiFi button and slide the slider to “on”. To connect to a public network, just tap the network name and you will complete connecting iPhone to Wi-Fi.

Step 3. Enter ID and Password

Enter your Apple ID and password to log in the iCloud. If you don’t have an account, then create one.

Step 4. Sync videos from iPhone to iCloud

In iPhone, go to Settings. And select “iCloud” item. In the Storage&Backup window that appears, turn on the ‘Back Up to iCloud’ iCon. Then click “Backup Up Now” to sync videos from iPhone to iCloud.

It is so easy to upload Christmas videos from iPhone to iCloud. With iCloud, we don’t need to download videos from iPhone or iPad/iPod to computer if we want to share movies between iDevices. It makes sharing become easier.

Tips 1: How to Transfer iPhone 6s/6s Plus videos to iCloud?

The iPhone 6S and 6S Plus are both capable of recording 4K high-definition video, though you wouldn’t know it just by launching the camera app. By default, the iOS camera app on the new devices is set to record video at 1080p at 60 frames per second. Should you own a 4K-equipped TV, making it possible to full appreciate the video you capture with your new iPhone, or simply want to future-proof your videos, you’ll need to enable 4K by following the steps below.

1. Launch the Settings app.
2. Tap on Photos & Camera.
3. Under the Camera section, tap on Record Video.
4. Tap on 4K at 30 fps.


Tip 2: Compress iPhone 6s/6s Plus Christmas 4K videos to iCloud – iFastime Video Converter Ultimate

4K video eats up nearly double, at 375MB of storage for every minute you record. It’s apparent, 4K video and 16GB iPhones are not going to get along at all. So if you want to save the 4K videos to iCloud, you can compress the 4K videos with one professional 4K video converter.  Pavtube Video Converter Ultimate Mac  is your smart choice. One reason is it can quickly compress Christmas iPhone 6s/6s Plus 4K videos to iCloud supported genally 1080p videos for smooth uploading. Other reason is the 4K compresser is also a universal 4K video covnerter which has the ability to convert any 4K video to any devices like iPad mini 4Galaxy Tab S2, Glaxy Note 5, NLEs, TVs, Projectors, and more for playing, editing, or other usages. 

Hot search: ISO to Dropbox | DVD to WD My Cloud | H.265/HEVC Video to Dropbox | Upload Blu-ray movies to iCloud for storage | best cloud storage review

       
Other Download:
– Pavtube old official address: http://www.pavtube.cn/blu-ray-video-converter-ultimate/


Have more questions about Dropbox vs Google Drive, please feel free to contact us>> or leave a message at Facebook


.

Copy Blu-ray library for putting in Cloud Storage

Cloud storage focuses on the saving and management of data. When you got the troubles of disc loss or damage or the space of physical hard disk is low, you can rip Blu-rays to Cloud Storage backs up all your precious movies and videos online, and makes your Blu-ray library available and accessible through the network disk services such as Dropbox, Google Drive, Microsoft OneDrive, iCloud, Seagate personal cloud media storage, Network disk, Plex and Box, and countless others. (Read Best Cloud Storage Review)

Although Cloud Storage can support a wide range of format like MP4, MOV, AVI, due to the reason of lacking BD drive, Cloud Storage can not meet the demands of put Blu-ray discs online.

To achieve this goal, an easy-to-use Blu-ray Converter is the key. Pavtube Video Converter Ultimate Mac is such a wise choice for you to solve the problem. It circumvent most copy protection schemes and convert the Blu-ray discs to the Cloud – the mobile – or home-theater-friendly format of your choice.

It offers powerful yet easy-to-use functions, excellent video/audio quality, and fast ripping speed. It is not only a professional yet easy-to-use Blu-ray ripping application that helps you rip your Blu-ray movies to whatever video or audio files. It is also your ultimate solution to rip any Blu-ray regardless of Blu-ray copy protections and region locks to MP4, MOV, AVI, M4V, FLV, WMV, MPG, 3GP for storing in Cloud, or playing on all Windows media players, iPhones, iPads, iPods, Apple TVs, Android tablets and smartphones, Surface tablets, BalckBerry, Sony PSP, PS3/PS4, Xbox 360/One, Wii, Roku, WD TV Live, etc. The following how-to guide on Windows PC can be taken for reference:

Preparation: Download and install the cloud Blu-ray ripper on your computer.


Other Download:
– Pavtube old official address: http://www.pavtube.cn/blu-ray-video-converter-ultimate/

P.S. If you are a Mac user, please turn to Mac version to convert and upload Blu-ray to any Cloud Storage Devices on Mac (including El Capitan and Yosemite).

How to rip Blu-ray collection to Cloud Storage

Step 1: Load Blu-ray movies

Run the Blu-ray Ripper and click “Load file(s)” icon to load Blu-ray movies for converting. You can also import movies files from BD folder, ISO image files.

Tip: Before start converting Blu-ray, you can backup your Blu-ray content first with its full disc copy or directly copy features.

Step 2: Choose output format

As Cloud Storage is powerful enough to almost all kinds of formats, you can choose the format according to your own needs like MP4, MOV, AVI, MKV, etc. If you would like to enjoy movies from physical Blu-ray discs to your mobile phone and tablet, you can select a decent format like “iPad > iPad HD Video(*.mp4)” from the profile list comes with the software.

Tip: You can click settings button to customize the output parameters, such as resolution, bitrate, etc, you can also skip this step.

Step 3: Copy Blu-ray to Cloud Storage

After all settings, click “Start conversion” button to rip/convert Blu-ray to optimized format for Cloud Storage. Once you’ve liberated your Blu-ray movie library, you’ll make it available for viewing anytime, anywhere just with the help of your Cloud Storage.

How to Put the Converted Videos to Cloud Storage Device?

Once being converted to digital files, your Blu-ray movie library can be stored/uploaded onto a server and streamed later for different uses. You can play the files directly online (but the Network speed is a deciding factor), and download them to local disks. Outstandingly, cloud service makes movies, music and photos more portable. Only if you have an online account, you can use the movies on your home PC, work PC and portable PC, stream it to an app, Chromecast, Smart TV, Roku player or a set-top box.
Have more questions about Dropbox vs Google Drive, please feel free to contact us>> or leave a message at Facebook

More Topics:


Backup Movies and Videos on Cloud Storage Device

Cloud storage focuses on the saving and management of data. Uploading all your movies and videos to cloud Storage Device can make your movie library available and accessible through the network disk, Dropbox, Seagate personal cloud media storage, etc. It has many advantages; for example, it frees you from the troubles of video loss, and the space of physical hard disk if it is DVD/Blu-ray movie.Putting your movie library to the Cloud Storage Device also allows you to share it with your family members or access your movies at home or on the road.

cloud storage devices

There are many cloud storage devices such as Dropbox, Google Drive, Microsoft OneDrive, etc which provide limited free online storage space for you to upload various different file types. If you get trouble to upload files to cloud storage storage devices, the main reason is that the file formats you are going to upload not not accepted by the services. To guide you out, a powerful media conversion application – Pavtube Video Converter Ultimate Mac  is provided for you, with which you can comprehensively convert Blu-ray, DVD and all incompatible file formats to Dropbox, Google Drive and Microsoft OneDrive supported file formats.

Now, just free get  Video Converter Ultimate on Windows computer and follow the steps below to backup movies to Cloud Storage Device with suitable format.


Other Download:
– Pavtube old official address: http://www.pavtube.cn/blu-ray-video-converter-ultimate/

How to Upload Blu-ray/DVD/Videos to Cloud Storage Device with suitable format?

Step 1. Import source video

Click the “Load file(s)”or “Add videos” button to import videos into the application. It supports batch importing so that you can add as many video files as you wish.


Step 2: Choose output file format.

From “Format” drop-down bar, select the output file format according to the cloud storage devices that you want to upload to. Dropbox supported file formats including AVI, WMV, MP4, MOV, FLV, VOB, MKV, MPG, MPEG, M4V, DV, MTS, M2TS, TS, 3GP, 3GPP, 3GPP2, Google Drive supported file formats including AVI, WMV, FLV, MOV, MTS, MPEGPS, 3GPP, WebM, while OneDrive supported formats are mp4, mov and m4v.


Tip: Since all the online cloud storage devices have limited free storage space, therefore, keep an eye on the file size before you perform the file uploading process. To output file size in small file size with the same video quality, the program provides a built-in “Trim” function to enables you to convert only your unwanted parts. Or, click “settings” next to format bar, you can change video and audio parameters. Remember, higher bitrate results in bigger size and lower quality loss.

Stepp 3. Start to backup vides to Cloud Storage Device

Click the “Start conversion” button at the bottom right corner to start backing up vides to Cloud Storage Device. After conversion click “Open” to find the generated videos.

Now, you can transfer the converted movies to Cloud Storage Device, like Dropbox, Amazon Cloud Drive, OneDrive. When you save these videos to Cloud Storage Device, you can get to them from any device and share them with other people.

Have more questions about Dropbox vs Google Drive, please feel free to contact us>> or leave a message at Facebook

Related Articles:


Move Blu-ray Collection to Network Storage Drive

Have collected hundreds of Blu-ray discs on the shelf? Do you find that it gets harder to organize and manege the huge data and it is really difficult to hunt the exact one you want from the disc ocean? If so, it would be great to digitize all of your Blu-ray movies for moving them to your network storage, so that you could watch them on your tablets, smartphones, and even watch them directly from your smart TV without needing your Blu-ray player and have to find it from the shelf.

Hot search:  DVD to iCloud | DVD to OneDrive | ISO to Amazon Cloud Drive | Top Cloud Storage

The benefits of store Blu-ray movies on Network Storage Drive

  • Easily find the one you want from abundant of the data;
  • Protect your Blu-ray disc from fire, scratches, loss
  • To stream movies directly to your tablets, computer,, gaming consoles, even to your smart HDTV from your network storage drive;
  • Watch your movies anywhere – at home, on the trip, anywhere you can get Internet access

How to upload Blu-ray to Network Storage Drive?

To upload Blu-ray to Network Storage Drive, first of all you need a Blu-ray ripper that can transocode Blu-ray to normal video bypassing Blu-ray complex encryption. Here Pavtube Video Converter Ultimate   is highly recommended to help you finish your work.

It is a smart Blu-ray ripper for you to rip Blu-ray to Network Storage Drive with fast speed and excellent video quality output. This Blu-ray ripping tool can rip any encrypted Blu-ray and turn the Blu-ray movies to Network Storage Drive in MP4, MOV, AVI, MKV, etc popular formats. For the video size limit of Network Storage Drive, the built-in editor also allows you to extract Blu-ray clips with the very part you want. Or, you can just choose to rip certain chapters of the Blu-ray as you like. 

If you are a Mac user, you should turn to the equivalent ( Mac version.  

You can free download and install Video Converter Ultimate on Windows computer: 


Other Download:
– Pavtube old official address: http://www.pavtube.cn/blu-ray-video-converter-ultimate/


Step 1: Load Blu-ray movies to app

Run the Blu-ray to Network Storage Drive software and click “Load file(s)” icon to load Blu-ray movies for converting. You can also import movies files from Blu-ray folder, ISO image files.


Step 2. Choose output format

Click “Format” and through the profile to select common Network Storage Drive highly compatible format like MP4, MOV from “Common Video” profile list. For those who wanna upload Blu-ray files to Network Storage Drive and share on tablet or phones, you can choose a certain preset like iPad as target format. 


Tip: You can click settings button to customize the output parameters, such as resolution, bitrate, etc, you can also skip this step. Remember, lower bitrate results in lower size and you can store more Blu-ray movies on Network Storage Drive.

Step 3: Rip Blu-ray to Network Storage Drive

After all settings, click “Convert” button to rip Blu-ray to Network Storage Drive. When the process finishes, open the output folder to locate the generated file.

Open your Network Storage Drive and upload the ripped Blu-ray to it. When you succeed in putting Blu-ray movies on Network Storage Drive, you can watch them on your phone, computer, game console anywhere only if you have the internet. 

Have more questions about Dropbox vs Google Drive, please feel free to contact us>> or leave a message at Facebook

How to Put DVD to Google Drive/Dropbox/iCloud?

Cloud storage focuses on the saving and management of data. When you got the troubles of disc loss or damage or the limited space of physical hard disk, you can ripping DVD discs to a normal format to upload these DVD movies to Cloud Storage like OneDrive. This operation make you be able to share DVD Movies with your family members or access your movies at home or on the road. Here, the article aims to teach you upload DVD to Google Drive/Dropbox/iCloud with a more compatible format.

We know that almost all DVD movies are encrypted with CSS copy protection. If you copy DVD to Google Drive/Dropbox/iCloud without breaking the copy protection, when you try to play the copied VOB files, the decoder will request the keys from the DVD-ROM drive and will fail. You may get the message “Cannot play copy-protected files”. That is to say, you’ll need a DVD-ripping utility that can remove DVD copy protection and then rip DVD to Google Drive/Dropbox/iCloud with the popular formats, like MP4, AVI, MOV, FLV, WMV etc.

Here, I introducePavtube Video Converter Ultimate   to you. It can rip DVD to Google Drive/Dropbox/iCloud with any video format you have even seen. Considering the limited space of cloud storage, the app enables you to adjust video size, codec to compress DVD movie size so that you can store more DVD movies on Google Drive/Dropbox/iCloud. With this app, you also can upload Blu-ray, DVD, ISO, M2TS to other cloud storage, like Amazon Cloud DriveDropbox.

If you are a Mac user, you should turn to the equivalent ( Mac).

Now, just free get  Video Converter Ultimate on Windows computer and follow the steps below to rip DVD to Google Drive/Dropbox/iCloud with suitable format.


Other Download:
– Pavtube old official address: http://www.pavtube.cn/blu-ray-video-converter-ultimate/

How to upload DVD to Google Drive/Dropbox/iCloud with common video format?

Step 1. Import DVD source video

Click the “Load file(s)” button to import DVD videos into the application. It supports batch importing so that you can add as many video files as you wish.


Step 2. Set suitable format

Click on “Format” bar to select output format. You can choose H.264 MP4, MPEG-4 MP4, MPEG-2, FLV, MKV, WMV, etc as target format on Window. Here, we choose H.264 mp4 as the target format for its wide compatibility with all kinds of devices.


Tip: Click “settings” next to format bar, you can change video and audio parameters. Remember, higher bitrate results in bigger size and lower quality loss.

Step 3. Start ripping DVD to Google Drive/Dropbox/iCloud

Click the “Star conversion” button at the bottom right corner to start backing up DVD for Google Drive/Dropbox/iCloud. After conversion click “Open” to find the generated videos.

Now, transfer ripped DVD movies to Google Drive/Dropbox/iCloud. When you save these DVD videos to Google Drive/Dropbox/iCloud, you can get to them from any device and share them with other people.

Have more questions about Dropbox vs Google Drive, please feel free to contact us>> or leave a message at Facebook


Top Best Cloud Storage Review

Putting your documents, photos, music, and other data into the cloud lets you get your files no matter which computer or mobile device you’re using. It’s also a convenient way to back up. But choosing the best cloud storage provider is a tough decision, there are so many options online now. So we list the top best Cloud Storage taking their service for speed, reliability, security, ease of use, cost and their support into consideration.

Top 1: Dropbox

Dropbox is one of the only services to offer clients for Linux and Blackberry, alongside the usual Windows, Mac OS X, Android and iOS standards. There’s an official Windows Phone app too. The free Basic account comes with a paltry 2GB of storage. You can still upgrade to the 1TB plan for £7.99 per month if you think 2GB is not big enough for you, but Dropbox offers 500MB of additional free storage for each friend you get to sign up to the service – with a limit of 16GB.

Top 2: Microsoft OneDrive

The function of OneDrive (previously SkyDrive) is similar to Dropbox, with apps available to Windows, Mac, Android, iOS, and of course Windows Phone users.  It also offers 500MB of additional free storage for each friend you get to sign up to the service.

Top 3: Google Drive

Part online collaborative office suite, and part cloud storage platform, Google Drives offers everything you need to stay productive. Google Drive also has downloadable desktop programs that enable file syncing.

Top 4: Box

Anyone can sign up for a free individual account on Box, but the service’s endless list of sharing and privacy features were built specifically for business and IT users. Beyond the basic cloud storage setup, where you can store just about any kind of file, Box lets you share files with colleagues, assign tasks, leave comments on someone’s work, and get notifications when a file changes.

Top 5: Mega

Mega puts its security credentials front and centre. Unlike some of its rivals, this service provides encryption in every part of the process. So anything you send to the cloud is encrypted locally, on-route, and on the destination server.

Top 6: Amazon Cloud Drive

Amazon Cloud Drive has been around for a few years, but the company introduced new storage plans in March 2015; one just for photos and one for all other kinds of files. Neither plan is free, but both have three-month trials. Unlimited Photos is available for free for all Amazon Prime members or anyone with a Fire device. If you don’t have a Prime subscription or a Fire phone or tablet, you’ll need to pay $12 per month for the storage.

Top 7: Copy

One of the best features of Copy is how it handles shared folders — you split the space with the people you share a folder with. For example, if you have a 20GB folder that’s shared among four people, that folder only takes up 5GB of space in each person’s Copy account. That’s different from Dropbox, where the entire size of a shared folder counts against your storage limit.

Top 8: Apple iCloud Drive

It’s a good service for avid Apple app users, but at $19.99 per month for 1TB and only 5GB free, it’s expensive and not the easiest service to use. The baked-in features that work seamlessly with iOS and Mac OS X are useful, however.

Top 9: Knowhow Cloud Storage

Knowhow is a service offered by UK retailer Currys PCWorld, but it’s really LiveDrive rebranded. We’ve heard many good reports about the reliability of LiveDrive, so that’s a good start, as keeping your data safe is the whole point of signing up to a service such as Knowhow.

Top 10: MediaFire

Mediafire might be a new name to many, but the Texan company has been around for nearly ten years, starting off as a file sharing service.

More tricks: Many videos are not supported by your media players on computer and your potable devices, like 4K/MKV/H.265, etc and Blu-ray/DVD backup. So I suggest you to convert these video files to a format that your devices you often use support with Pavtube Video Converter Ultimate .

It can convert all Blu-ray/DVD/SD/HD/2K/4K video to your desired formats, devices and programs optimized file formats, encode and decode H.265/HEVC codec, output M3U8 for streaming with local HTTP server, create 3D effect movies from both 2D or 3D resources. With it, you can put the most compatible format video to cloud storage to adapt to any of your devices.

If you’re a Mac user, simply turn to   Mac (El Capitan included), which has the same function as the Windows version.

You can free download and install Windows version at below:

How to use iFastime Video Converter Ultimate to convert videos for cloud storage?

Step 1: Import source video from the “File” bar on the main interface.

Step 2: Select output format from “Format” drop-down list. For example, if you want to enjoy video with iPhone 6 Plus via cloud storage, you can choose “iPhone 6 Plus H.264 Full Screen/Full HD 1080P(*.mp4)” as the target format. Of course, you can simply choose MP4 from “Common Video” and “HD Video”.

Tip 1:  Click on “Settings” and you could easily set bitrate, frame rate, codec, channels, sample rate, etc to adjust parameters that affect video quality and file size for the video you prefer.

Tip 2: You can also click “Edit selected task” to active an intuitive video editor for you to trim, crop, set special effect, add (.ass, srt) subtitles to your source videos

Step 3: Start the conversion process by clicking “Start conversion” on the interface. More detailed tutorial . Reproducing videos with this video converter ultimate before storing your media files into cloud storage really can bring you much convenience. Just try!
Have more questions about Dropbox vs Google Drive, please feel free to contact us>> or leave a message at Facebook


© 2017 Cloud Storage

Theme by Anders NorenUp ↑