You can store and protect all the Video_ts files, photos and music from your PC and Mac computer in My Cloud NAS in your home. Then you can play Video_ts anytime anywhere via Plex (Plex organizes your entire media collection with one simple interface and keeps it beautiful by adding descriptions, plot summaries, posters and album covers). It seems a little difficult to let it come true. 
Since Video_TS are actually DVD videos, to convert DVD Video_TS folder to MP4, we need to get a DVD file converter. Searching online, more than one people recommend Pavtube Video Converter Ultimate ( Mac) to change Video_TS format to My Cloud NAS and Plex acceptable one.
This video app works as the best software to convert Video_TS files to My Cloud NAS and Plex friendly format MPEG-4, etc with least quality loss. Moreover, this program also comes with optimized format presets for almost all popular multimedia devices including iPhone, iPad, Android, TV, PSP, PS4, XboX etc. With it, you should be able to open, play, edit, upload the new file without any hassle. And you could get wonderful output files and never worry about out of audio/video sync. Now just get the right version and follow the steps below to encode Video_TS for adding to My Cloud NAS for playing via Plex Media Sever.


Other Download:
– Pavtube old official address: http://www.pavtube.cn/blu-ray-video-converter-ultimate/
How to Convert Video_TS to My Cloud NAS for playback with Plex?
Step 1. Run the program and click “Load Disc” button to select and load the Video_TS folder to the program. As you can see, added files will be displayed on the left source pane and can be previewed on the right preview window. By clicking the dropdown list of “Subtitles”, you can select your preferred subtitles while viewing your Video_ts movie.
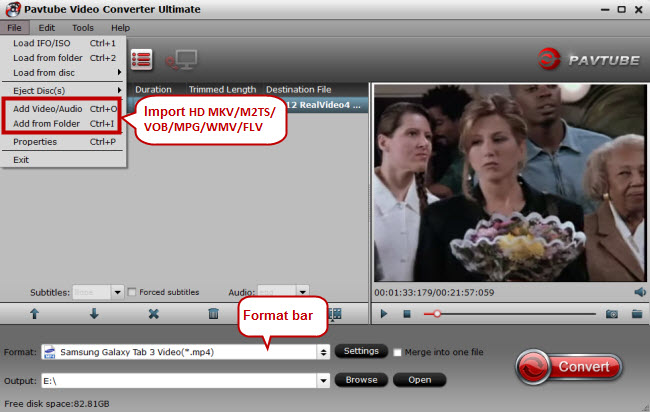
Step 2. Set right output format. Click “Format” bar, and select .mp4 from “Common video” or “HD video” to fit My Cloud NAS and Plex for storing and playing.
Tips: The default settings may not satisfy you, and you can click the “Settings” button to change the settings by yourself including video resolution, bit rate, audio sample rate, audio channel etc. for full screen playback smoothly. Or keep no changes, which is also a good choice.
Step 3. Click the “Start conversion” button on the main interface and the software will start to convert Video_TS to MP4 format immediately. When the conversion finishes, click “Open” to find the converted video files. Then you can effortless transfer the video files to My Cloud NAS for playback via Plex.
Have more questions about Dropbox vs Google Drive, please feel free to contact us>> or leave a message at Facebook
More Topics:
- Play MKV movies on LG TV via 2TB WD My Book
- Store downloaded 3D MP4 on Samsung TV from My Book Live
- Possible to play VOB on Samsung LED/LCD/3D/4K TV from WD My Cloud?
- Store Music Online with Amazon Cloud Drive
- Save DVDs to FreeNAS cloud server for streaming via Plex on TV
- Add 4K H.265 movies to Microsoft OneDrive


Comments