Cloud Storage

Save Data Conveniently, Offer Life Convenience

Page 5 of 10

Transfer and sync files between Dropbox, OneDrive, Google Drive

Why you should sign up to multiple cloud storage services?

Transferring and syncing files between cloud storage accounts is worthwhile. In this tutorial we show how you can transfer files quickly and easily between different accounts and we also reveal how to sync folders across cloud services such as Dropbox, OneDrive and Google Drive.

Note: the method shown below will only fully sync cloud storage services when your host PC is turned on.

If you have read our ‘What’s the best cloud service?’ article, you’ll know that the current cloud storage limits and compatibility options vary wildly. As a result, we suggest – if you haven’t already – to download and start using as many different cloud accounts as possible.

Not only will this keep your files backed up to the hills – as they’re saved in multiple locations – but you’ll have more storage space too. Plus, if you follow the method below, you’ll be able to sync folders and have them up to date and readily accessible from any of your cloud services.

How to transfer files between Dropbox, OneDrive and Google Drive?

Step one

In order to be able to sync your files and folders across multiple cloud services, you first have to download the respective PC programs. To do this, simply go to the websites of Dropbox, OneDrive or Google Drive and follow the links to download the EXE files.

Step two

Once you’ve downloaded and installed the programs, cloud storage folders will be automatically created for you in Windows Explorer | Computer | Favourties.

Dropbox OneDrive Google Drive transfer

From here you can simply drag and drop (copy and paste) the content you wish to transfer from one account to another; the services will then auto-sync in the background both to your PC and in the cloud.

How to sync folders between Dropbox, OneDrive and Google Drive?

If you’d like to sync files between cloud accounts, there’s a free Chrome extension called cloudHQ that can help you.

It’s a service that lets you sync up to 50 files between two specific folders in different cloud accounts for free (less than 2GB).

Should that number exceed 50 files in two folders, you’ll have to part with your credit card out. Prices start from $9.90 a month.

Using cloudHQ is a fairly straightforward affair of entering your login details, allowing the app access to your cloud services and then selecting the folders you’d like to sync.

Find below a step-by-step to ensure you set up your cloud sync properly.

Step one

Go to the cloudHQ app and click on the blue “+ FREE” button located in the top right of the window.

Step two

You now need to click on your Chrome browser’s new cloudHQ shortcut, which can be found on the far right-hand side of the Bookmarks bar, and follow the link to the configuration page.

Next you’ll be presented with a grid full of cloud storage logos – click on the service from which you’d like to being your sync.

Note: for the purpose of this tutorial, Dropbox will be used as the primary share folder.

Step three

i) If you’re not already logged into Dropbox, you’ll need to click on the yellow “Add Dropbox” button found at the bottom of the page.

ii)If you are logged in, click on the yellow “Select” button.

Step four

Your Dropbox folders will now be presented to you in a file explorer-style window; click on the folder you wish to sync and then press the yellow “Select” button.

Step five

Repeat the process with your desired secondary cloud service and folder that you’d like to sync via cloudHQ.

Once selected, you’ll see a page that gives you the option to “Synchronize Continuously” or “Synchronize Once”;select as appropriate and cloudHQ will start work right away.


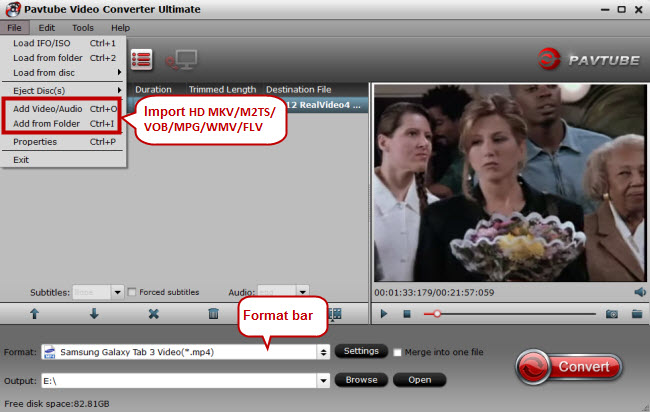
Tips: How to Transfer DVD/Blu-ray/H.265 to Dropbox, OneDrive, Google Drive?

Dropbox, OneDrive, Google Drive are top cloud storages in the world. Many people like to store their movies to Dropbox, OneDrive, Google Drive. Generally you can upload any videos and movies to these cloud storages, but some movies are not uploaded onto Dropbox, OneDrive, Google Drive, like DVD/Blu-ray/H.265/MKV/AVI, etc. So in order to make you transfer and upload your DVD/Blu-ray/H.265/MKV/AVI to Dropbox, OneDrive, Google Drive smoothly, you can usePavtube Video Converter Ultimate Macto help you rip your DVD, Blu-ray to Dropbox, OneDrive, Google Drive, and convert H.265/MKV/AVI/Tivo etc to Dropbox, OneDrive, Google Drive for storage.

Hot search: DVD ISO to Google Drive | AVI Movies to iCloud | YouTube to Dropbox | ISO to Dropbox |DVD to Google Drive/Dropbox/iCloud | 4K H.265 to OneDrive


Other Download:
– Pavtube old official address: http://www.pavtube.cn/blu-ray-video-converter-ultimate/

Have more questions about Dropbox vs Google Drive, please feel free to contact us>> or leave a message at Facebook

More Topics:

Save DVDs to FreeNAS cloud server for streaming via Plex on TV

FreeNAS is a free and open-source software network-attached storage (NAS) system that supports sharing files across Windows, Max OS X and Linux-like systems. It is an excellent choice if you want to use Samba (SMB) protocol to share files. With it, you can back up your local machines and store a few video files. So if you are also seeking for a way to backup DVD to FreeNAS for viewing via Plex on TV as above thread mentioned, just keep reading to find the best solution.

It is a really fact FreeNAS doesn’t support DVD. If you have some wonderful DVD movies and want to save them to FreeNAS for streaming via Plex and playback on TV, you’d better convert DVD to format like MP4, MKV or other format compatible with FreeNAS.  Pavtube Video Converter Ultimate Mac a professional DVD ripper which can convert DVD movies to FreeNAS cloud server supported videos and then you can stream them via Plex for playing on TV.

More features of the best DVD to FreeNAS converter:

  • Covnert DVD and Blu-ray, DVD/Blu-ray ISO to FreeNAS supported MP4 videos
  • Rip DVD to FreeNAS, and WD My Cloud, Dropbox, My Cloud Mirror (Gen 2), Amazon Cloud Drive, Google Drive, iCloud, etc
  • Batch convert DVD, Blu-ray, ISO to common MP4 format for various uasges
  • Convert DVD to popular portable devices including iPhone 6s, iPad Pro, iPad Air 2, iPad mini 4, Samsung Galaxy TabPro S, Galaxy Tab S2, Surface Pro, etc
  • Batch conversion and super fast conversion speed
  • Easy-to-use DVD ripper with simple clear interface
  • Regular updates provided for registered users without extra charge for lifetime

          
Other Download:
– Pavtube old official address: http://www.pavtube.cn/blu-ray-video-converter-ultimate/

How to Convert DVDs to FreeNAS for streaming via Plex on TV?

Step 1. Load DVD movies

Insert the DVD disc into your computer’s DVD drive and run DVD Ripper. You can click the “Load DVD” button to load the DVD files to the program. DVD ISO/IFO, VIDEO_TS folder are supported also.

Step 2. Specify output format

Click “Format” bar, and select .mp4, .mkv from “Common video” or “HD video”, in order to make you Save DVDs to FreeNAS cloud server for streaming via Plex on TV, so here you can also select the TV format from ” TVs” .


Step 4. Start converting DVD to FreeNAS

When all these settings are ready, you can click the “Start Conversion” button to begin the DVD to FreeNAS conversion. When the ripping is done, you can click on “Open” button to locate the ripped videos, and then stream them via Plex for playing on home TV.

Tips: 5 Fun Things to Do with FreeNAS

If I asked the average user how they use FreeNAS, they’d probably answer “back up and store files”. While that’s both practical and important, it’s also a bit boring. The software is designed for small and home offices but if you’ve got a system at home, you’re probably wondering what kind of fun you can have with it.

To that end, we’ve rounded up five of the more interesting ways you can use FreeNAS. Some of the tutorials I’ll link to make the assumption you’ve already built and set up your system. If you need some help with that, check out our official FreeNAS guide to hardware design and the FreeNAS YouTube channel.

Many of these projects make extensive use of the plugins system. An overview of plugins and a full list of the ones available can be found in the FreeNAS documentation. The guides range from a simple plugin installation to some command line hacking so make sure you’re comfortable with the difficulty level before attempting any tutorial.

1. Set Up the Ultimate Entertainment Device

Media Streaming

FreeNAS is a file server by nature—in order to turn it into a media server, you’ll need to install a few plugins to allow the system to download and stream media.

There are several combinations of plugins you can install depending on the type of media you’ll be using—the most popular being Transmission (torrenting) and Plex Media Server (streaming). However, there are many other plugins that specialize in specific media types such as Firefly (music), Mylar (comic books), Sickbeard (TV shows), and CouchPotato (NZB/torrents).

If you need to stream to a DLNA device such as a PS3 or XBox One, you can install MiniDLNA by following this tutorial from joeschmuck of the FreeNAS forums.

2. Host a Personal Cloud

OwncloudWith some of the horror stories out there about privacy breaches, some people are understandably on edge about handing over their documents and photos to a third-party. Now you can set up a secure personal cloud on FreeNAS that only you and authorized users have access to. Once you get OwnCloud set up, it’s like having a personal Dropbox. The easiest way to do this is through the official plugin located in the Plugin tab.

For more control, you can also configure OwnCloud manually—there are several ways to do that. Here’s a video tutorial from DrKK of the forums for his method and the corresponding forum thread.

Here’s an alternative method from Josh Parker Ruehlig who wrote many of the FreeNAS plugins.

3. Share and Distribute Files Privately

In a similar vein, you can also use FreeNASbittorrent-sync-logo to share files and pictures with friends and family with the Bittorrent Sync plugin. It functions a bit like Dropbox but BTSync is a peer-to-peer sharing application—unlike the cloud, all the files are stored locally on each device and updated when changes are made. This is useful for sharing photos or files across several computers regardless of size. Because you’ll be downloading from many sources, it’s also vastly faster than a cloud.

Here’s our official video tutorial for setting up BTsync. It’s relatively straightforward, and it explains in step-by-step detail how to configure FreeNAS first and then set up the plugin.

4. Set up a Private Voice Chat Server

mumbleYou can configure a FreeNAS system with Mumble. If you’re not familiar with Mumble, it’s an Open Source voice over IP application that enables you to voice chat with friends over a private and secure system. There’s no limit to how many people can join a particular chat; the maximum depends on the particular server.

This particular project takes some effort to set up. This tutorial again comes courtesy of DrKK and demonstrates how to set up your own Murmur server using FreeNAS.

5. Deploy a Minecraft Server

minecraftLove Minecraft? You’ll be happy to know you can configure your FreeNAS system to host a Minecraft server. Josh Parker Ruehlig, the person responsible for the FreeNAS MineOS plugin, created a video and forum thread to demonstrate how to set it up. As he points out, the MineOS plugin gives you the advantage of being able to manage your servers via a web UI.

Prior to the plugin, you had to install Minecraft from scratch into a jail. Alternatively, you can do just that as community member Cyberjock demonstrates in this tutorial.

A Few Final Notes

First and foremost, it’s up to you to secure your system, follow best practices, and make sure your data recovery plan is adequate. None of these projects mean very much if your files are compromised or corrupted by malware.

For more project ideas, I highly recommend browsing the FreeNAS forums and signing up for an account. It’s a huge repository of great information. If you’re confused about a topic, post or do a search in the forums. Chances are you’ll find something or someone to help you.

This is just the beginning of what you can do with FreeNAS. The DIY aspect of FreeNAS means that there are literally thousands of iterations of hardware combinations and use cases. Keep in mind the FreeNAS plugin system is based on FreeBSD jails and the PBI system from PC-BSD which means advanced users can install any software they want using the FreeBSD package tools, opening up even more possibilities for your NAS.

Have more questions about Dropbox vs Google Drive, please feel free to contact us>> or leave a message at Facebook

More Topics:


Add 4K H.265 movies to Microsoft OneDrive

Even if you don’t have Microsoft Office, you can access, share, and collaborate on documents using a pared-down version of the suite when you’re online with OneDrive. You can use OneDrive from any platform, be it Windows, iOS, or Android. If you’re looking for lots of storage space, you might consider adding Windows 365 to your account. So if you have some 4K H.265 videos by some cameras or 4K H.265 movies from online websites, you can upload them to Microsoft OneDrive for nice storage. Today we will share you the method of uploading 4K H.265 movies to Microsoft OneDrive quickly.

It seems that it is a little difficult to add 4K H.265 movies to Microsoft OneDrive due to the particularity of 4K H.265. But with the help of Pavtube Video Converter Ultimate Mac , you can easily add 4K H.265 movies to Microsoft OneDrive supported videos and then you upload them to Microsoft OneDrive freely. (read review to learn more)

With it, you can also convert any videos like DVD, Blu-ray, H.265, AVI, MKV, Tivo, etc to  Microsoft OneDrive supported videos for smooth uploading. Now first free download the best 4K H.265 to Microsoft OneDrive converter and learn how to add 4K H.265 movies to Microsoft OneDrive with iFastime Video Converter Ultimate.

       
Other Download:
– Pavtube old official address: http://www.pavtube.cn/blu-ray-video-converter-ultimate/

How to Convert 4K H.265 movies to Microsoft OneDrive?

Step 1. Click “Add video” button to add your 4K H.265 video files to the program. Or directly drag the video you want to convert to the left item bar.

Step 2. Set right output format. Click “Format” bar, and select .mp4 from “Common video” or “HD video” to fit Microsoft OneDrive.

Tips: The default settings may not satisfy you, and you can click the “Settings” button to change the settings by yourself including video resolution, bit rate, audio sample rate, audio channel etc. for full screen playback smoothly. Or keep no changes, which is also a good choice.

Step 3. Click the “Start conversion” button on the main interface and the software will start to convert 4K H.265 to Microsoft OneDrive friendly video formats immediately. When the conversion finishes, click “Open” to find the converted video files. Then you can effortless transfer the video files to Microsoft OneDrive for playback on the go.

More Topics:

.

How to Upload DVD to Skydrive quickly?

For whatever reason that you want your DVD collection in digital files, mine is that I can store those files on a server and stream them anytime, from anywhere. NAS offers a local way to stream DVDs but I am looking to download a DVD onto my Windows 10 and then compress the file so that I can upload it to my Skydrive. I will then be looking to share those files with others or steam them myself. In reviewing other DVD rippers, it sounds like I can rip and convert DVDs no problem but before I rip DVDs to digital formats that Skydrive supports, I’d like to know if the DVD ripping software does the job of compressing DVDs down to a reasonable file size that can be uploaded to cloud for sharing or remoted access? And, there is no better ripping solution than iFastime Video Converter Ultimate as it offers clean way to customize your own profile and it accurately estimates the output file size, where you can see if it fits your needs.


iFastime Video Converter Ultimate Helps You to Rip DVD Library to the Cloud

To convert DVD to Skydrive format on Windows 10, here Pavtube Video Converter Ultimate Mac  is highly recommended. The program provides good quality output regardless of the end device that you are going to use. It can convert DVD to Skydrive supported MP4 videos in simple steps. The clean UI clearly shows the estimation of output file size and you will see if it is a reasonable size before ripping and you’re free to customize any profile and save it as your own so that you can rip your DVD collections to store or share on Google Drive, DropBox, OneDrive, iCloud, Amazon Cloud Drive and other cloud storage.

Besides, you can crop the black bars, add special video effects, split or merge videos, etc. as you like with the built-in editor. Just get it and rip videos from DVD disc to Skydrive supported videos for storing, syncing or playback without hassle.

Free download the best DVD to Skydrive Converter for Windows:

      
Other Download:
– Pavtube old official address: http://www.pavtube.cn/blu-ray-video-converter-ultimate/


How to Rip DVD to Skydrive with iFastime Video Converter Ultimate?

Step 1. Insert the DVD disc into your computer’s DVD drive and run the best DVD Ripper. You can load the DVD movies by clicking the disc button on the top left. This DVD converter also supports ripping ISO and IFO files.


Step 2. Set right output format. Click “Format” bar, and select .mp4 from “Common video” or “HD video” to fit Skydrive for smooth storing.


Step 3. Click the “Start conversion” button on the main interface and the software will start to convert DVD to Skydrive friendly video formats quickly. When the conversion done, click “Open” to find the converted video files. Then you can effortless transfer the video files to Skydrive freely, have a try.

Have more questions about Dropbox vs Google Drive, please feel free to contact us>> or leave a message at Facebook

More Topics:

.

Share downloaded 1080p movies on ownCloud

What’s that you say? You don’t like trusting your data to Apple, Google, Microsoft or anyone else? Well you can always try the do-it-yourself way to have cloud storage. That’s to use ownCloud to set up your own cloud storage either on an office server or off your own external service. There are ownCloud desktop clients for Linux, Mac OS X, and Windows and mobile apps for Android and iOS. You can also use the WebDAV protocol, an HTTP extension, to directly integrate ownCloud drives into your local file system. Maybe you have downloaded 1080p movies from some online websites like YouTube, IMDB, Vimeo, etc and want to upload them to ownCloud smoothly, just keep reading to get the smart method.

Using Pavtube Video Converter Ultimate Mac  is the best way, it can convert any downloaded 1080p movies to ownCloud – the mobile – or home-theater-friendly format of your choice. (read best digital formats for storing movies)

The best 1080p movie to ownCloud converter offers powerful yet easy-to-use functions, excellent video/audio quality, and fast ripping speed. It is not only a professional yet easy-to-use  ownCloud application that helps you convert your downloaded movies to whatever video or audio files. It is also your ultimate solution to convert any videos and movies like DVD, Blu-ray, H.265, AVI, MKV, MP4, Tivo, etc for storing in ownCloud and other Cloud storages like Dropbox, Google Drive, Sky Drive,  iCloudAmazon Cloud DriveBox Cloud Storage,, etc, or playing on all Windows media players, Apple iPhones, iPads, iPods, Apple TVs, Android tablets and smartphones, Surface tablets, BalckBerry, Sony PSP, PS3/PS4, Xbox 360/One, Wii, Roku, WD TV Live, etc. (Read Review to learn more.)

Free download the best movie to ownCloud converter for Windows:

       
Other Download:
– Pavtube old official address: http://www.pavtube.cn/blu-ray-video-converter-ultimate/

How to Share downloaded 1080p movies on ownCloud perfectly?

Step 1. Click “Add video” button to add your video files to the program. Or directly drag the video you want to convert to the left item bar.


Step 2. Click “Format” bar, and select .mp4 from “Common video” or “HD video” to fit ownCloud for smooth storing and sharing.


Tips: The default settings may not satisfy you, and you can click the “Settings” button to change the settings by yourself including video resolution, bit rate, audio sample rate, audio channel etc. for full screen playback smoothly. Or keep no changes, which is also a good choice.

Step 3. Click the “Start conversion” button on the main interface and the software will start to convert downloaded 1080p movies to ownCloud friendly video formats immediately. When the conversion done, click “Open” to find the converted video files. Then you can effortless transfer the video files to ownCloud easily.

More Tips: Cloud backup vs. cloud syncing

Cloud backup is exactly what it sounds like. Your data is stored in an online repository, where it’s accessible to you when you need it. It works like this: You download a desktop client to your PC, select the folders you want to back up, and that data uploads to the service on a set schedule. Then if catastrophe strikes, such as a house fire or robbery, you have a clean, up-to-date copy of your data stashed on a server somewhere, all safe and sound.

Cloud backup does not eliminate the need for a local backup on an external hard drive of some sort, but it provides an easy solution for keeping another backup off-site. Your other options are to circulate a few hard drives that you keep in a safe at the office (a pain to remember), or run a remote server (technically challenging). Pay a few bucks a year to store your hard drive data online with a third-party provider is the easiest choice for most people.

Finding a service is easy enough, too. There’s Backblaze (the service I currently use), Carbonite (a service I have used), Mozy, SpiderOak (another service I’ve used), and many others.

The hard part is understanding how to use cloud storage and familiarizing yourself with some of the details you might not think about.

It’s important to clarify the difference between a cloud backup service and a sync service like Dropbox or Google Drive. If you need a few files always in sync among multiple PCs or mobile devices, you’d be better off relying on a sync service. With a backup service, you could definitely pull out individual files in a pinch, but the user interface is usually a little cumbersome for grabbing files compared to, say, Dropbox’s.

Most mainstream cloud storage backup services offer what’s essentially unlimited backup, though limits of some sort will apply. The only exception to that rule is SpiderOak, which sets data storage limits but offers a higher degree of encryption and security than most services. Skip any cheap service that limits your data to 500GB or 1TB.

Take the time to figure out what the rules are for your backup service. In general, online backup services let you save any personal files on your PC. Some services also let you back up connected drives as part of the price, while others will charge extra for it.

Even if your plan does allow external hard drives, that doesn’t mean you can back up home servers or RAID boxes with multiple hard drives. You’ll also have to reconnect your external hard drives regularly to avoid having your saved content deleted from your cloud backup.

Have more questions about Dropbox vs Google Drive, please feel free to contact us>> or leave a message at Facebook

More Topics:

.

How to Upload recorded videos to Amazon Cloud Drive?

Upload a File or Folder Using the Cloud Drive Website

You can upload files and folders to Amazon Cloud Drive using a web browser on your computer, tablet, or mobile device.

You can upload your documents, spreadsheets, and other files to Amazon Cloud Drive using a compatible web browser. For system requirements, go to About Uploading Files and Folders Using the Cloud Drive Website.
For file requirements, go to Cloud Drive Files File Requirements.

Note:

The Cloud Drive web uploader requires HTML5, which is supported on Internet Explorer version 10 or greater, Firefox 4, Chrome, Safari (desktop) 6, Safari (mobile) 6.1, Opera (desktop) 12, Opera (mobile) 12, and Android 3. Upgrade to the latest version of your favorite browser to take advantage of the full features of Amazon Cloud Drive.
At this time, the option to upload entire folders through a web browser is only available for Google Chrome (version 21 and above.)

To upload your files and folders:

1. Go to Amazon Cloud Drive.
2. Select the All Files tab in the header.
3. Click Add Files.
4. Drag and drop files into the window that opens, or click Select Files to browse your files.
5. Choose a destination folder for your files or create a new folder.
Note: You can move your files into a different folder once your upload is complete.
6. Click Add to [folder name].

Tip: For information about uploading files using the Cloud Drive Desktop application, go to About Cloud Drive Desktop.


Tip 1. How to Solve can’t Upload recorded videos to Amazon Cloud Drive?

Amazon Cloud Drive is your place for everything digital. Cloud Drive offers free mobile apps, secure access from any computer, and it’s built in to your Amazon devices—so you can access your digital content everywhere you are. You can upload some videos like recorded videos by some cameras or smartphones to Amazon Cloud Drive for storage or other usages, but sometimes you can encounter some troubles due to incompatibility issues. In this case, what you need to do is to convert the videos to Amazon Cloud Drive supported videos on your computer and then transfer them to your Amazon Cloud Drive smoothly. With  Pavtube Video Converter Ultimate Mac, you can easily convert any videos including DVDBlu-rayISO, H.265, MKV, AVI, etc to Amazon Cloud Drive for storing.

Free download the best video to Amazon Cloud Drive video converter for Mac:


Other Download:
– Pavtube old official address: http://www.pavtube.cn/blu-ray-video-converter-ultimate/

– Cnet Download: http://download.cnet.com/Pavtube-Video-Converter-Ultimate/3000-2194_4-75938564.html

Step 1. Click “Add video” button to choose your recorded video files to the program .


Step 2. Set right output format. Click “Format” bar, and select .mp4 from “Common video” or “HD video” to upload videos to Amazon Cloud Drive nicely.


The default settings may not satisfy you, and you can click the “Settings” button to change the settings by yourself including video resolution, bit rate, audio sample rate, audio channel etc. for full screen playback smoothly. Or keep no changes, which is also a good choice.

Step 3. Click the “Start conversion” button on the main interface and the software will start to convert any videos to Amazon Cloud Drive friendly video formats immediately. When the conversion done, click “Open” to find the converted video files. Then you can effortless transfer the video files to Amazon Cloud Drive easily. 

Tip 2. How to get 6 months of unlimited Amazon cloud storage for free?

There are two words we just never get tired of hearing: “unlimited” and “free.” That’s right, no matter how often these words get tossed around, we can never get enough of them. And in the rare cases where these two magic words appear together, it almost always brings a smile to our faces.

Here’s a good example: Right now for a limited time, you can get 6 months of unlimited Amazon cloud storage for free, and we’ll tell you how.

Amazon always runs promotions for its popular cloud storage service. There are two main kinds of cloud solutions offered to end users by Amazon. One is unlimited photo storage, which is just $9 per year or completely free for Amazon Prime members, and the second is unlimited file storage.

The company typically charges $45 per year for unlimited cloud storage for all of your files, which is a darn good deal when you consider how expensive rival services are. But right now, you can get 6 months of unlimited cloud storage for your files for free. Simply visit this page and spend at least $19.99 in Amazon’s office supplies and electronics sections, and you’re good to go.


Other Download:
– Pavtube old official address: http://www.pavtube.cn/blu-ray-video-converter-ultimate/

Have more questions about Dropbox vs Google Drive, please feel free to contact us>> or leave a message at Facebook

More Topics:


Backup DVD ISO to Google Drive for watching on mobile devices

Google Drive is a safe place for all your files and puts them within reach from any smartphone, tablet, or computer. Files in Drive – like your videos, photos, and documents – are backed up safely so you can’t lose them. Once there, you can easily invite others to view, edit, or leave comments on any of your files or folders. If you have some DVD ISO images and want to put them to Google Drive for watching on your mobile devices, just keep reading to get the solution.

As you know, Google Drive does not support DVD ISO files, so what you need to do is to convert DVD ISO to Google Drive supported videos for smooth storage and then you can transfer them to your any mobile devices. Using  Pavtube Video Converter Ultimate Mac to help you which is a professional ISO converter in market today. With it, you can convert DVD/Blu-ray ISO, DVD, Blu-ray, H.265, AVI, MP4, and more videos and movies to Google Drive supported MP4 videos quickly.

More features of the best DVD ISO to Google Drive converter

  • Convert ISO to Google Drive, Dropbox, Amazon Cloud Drive, iCloud, and more cloud storage
  • Convert ISO to various popular devices including iPhone 6s, iPhone 6s Plus, iPad Pro, iPad Air 2, iPad mini 4, Samsung Galaxy TabPro, Samsung Galaxy Note 5, Galaxy S6, etc
  • Batch conversion and super fast conversion speed
  • Easy-to-use DVD ISO video converter with simple clear interface
  • Regular updates provided for registered users without extra charge for lifetime
  • Support Windows(10, 8.1, 8, 7, XP, etc)

Free download the best DVD ISO to Google Drive video converter for Windows:

      
Other Download:
– Pavtube old official address: http://www.pavtube.cn/blu-ray-video-converter-ultimate/

How to Convert DVD ISO files to Google Drive supported videos for watching on mobile devices?

Step 1. Load DVD ISO

Click the “Load file(s)” button to load the DVD ISO files to the program. DVD ISO/IFO, VIDEO_TS folder are supported also.

Step 2. Set right output format. Click “Format” bar, and select .mp4 from “Common video” or “HD video” to fit Google drive.

Step 3. Click the “Start conversion” button on the main interface and the software will start to convert DVD ISO to friendly video formats immediately. When the conversion finished, click “Open” to find the converted video files. Then you can effortless transfer the video files to Google drive for playback on mobile devices.

Have more questions about Dropbox vs Google Drive, please feel free to contact us>> or leave a message at Facebook

More Topics:

.

Read 10 Tips before choosing the best Cloud Storage

When it comes to a cloud storage comparison, there are so many vendors to choose from that it can be hard to decide which option to choose. For those attempting to do so, here are some tips from experts in this field of cloud evaluation and deployment.

Head to the Cloud

Most analysts agree that a headlong rush to the public cloud is not a good idea for every organization and every workload. But it works well for many storage use cases. So regardless of the various cautions, Andy Walls, IBM Fellow, CTO and Chief Architect at IBM, believes more companies will look to the cloud for their storage needs.

“The storage of data online in the cloud, where a company’s data is stored and accessible from multiple distributed and connected resources will become huge in 2016,” he said. “Storage will become an enabler to high performance cloud computing. Storage is a major component to the cloud and will continue to be a fundamental driver of performance.”

Alignment with Internal Storage

A vital aspect of cloud storage is to establish some unity between internal and cloud storage. At the same time, IT has to retain control over the data.

“Enterprises should find out if cloud storage aligns with existing infrastructure and protocols,” said Andres Rodriguez, president and CEO of Nasuni. “It’s important to avoid any cloud storage deployments that create parallel systems and infrastructure for IT to manage or that minimize its control over files and data.”

Avoid Consumer-Level Tools

There are a lot of consumer-based cloud storage products available. And a surprisingly number of enterprises are currently running them. Perhaps a department manager sent a few files to the cloud for the sake of convenience, or a sales team decided to back up their laptops to the cloud. However it happened, such small beginnings can quickly spread. And others are silly enough to try to save a few dollars by using a consumer cloud product enterprise-wide.

“During the evaluation process, find out if it is a true enterprise storage solution or merely a sync-and-share offering that harnesses the cloud,” said Rodriquez.

Employee Buy In

Robert Baesman, Head of Product, Dropbox Business, believes that the best approach to cloud storage is to consult the users. Employee adoption is one of the most critical factors to consider when selecting the appropriate cloud collaboration platform.

“If employees won’t embrace the tools being offered, the deployment won’t scale company-wide and you’ll be left looking for another provider,” said Baesman.

Think Integration

Cloud storage is one thing, but it has to integrate properly with other applications. Microsoft recommends that potential buyers closely consider requirements related to geo availability, scalability, performance and integration with existing solutions like backup, disaster recovery, and tiered hybrid storage.

Match Storage and Workload

Selecting a cloud storage solution really depends on the type of workload, advised Scott Whitright, Senior Product Marketing Manager for the Public Cloud at Rackspace. For example, Standard SATA volumes work well for everyday file system needs, while solid state drive (SSD) volumes deliver higher performance for databases and I/O-intensive apps. In some cases, therefore, it is important to pick a provider that offers different levels of storage service.

Go Hybrid

Part of the attractiveness of public cloud storage is that it can cost as little as a few cents per GB per month. The downside, though, can be added costs for such items as network transit, retrieval, and security or performance add-ons. Depending on the use case and organization, the overall price tag can spiral out of control. Care therefore, should be taken in determining what to put in the public cloud and what to leave in-house – perhaps in a private cloud.

“Hot and warm data will remain in private clouds, while older, colder data gets migrated to public clouds,” said Avinash Lakshman, Founder and CEO of Hedvig. “However, these solutions need to be smart enough to do this dynamic migration automatically.”

Cloud Security

Some cloud products appear cheap but skimp badly on key areas. With so many high-profile hacks of large enterprises, it is a false economy.

“In this day and age, it’s imperative that all cloud storage solutions reflect the most stringent requirements for security,” said Rodriquez. “Enterprises should demand military-grade encryption and stipulate that only they have access to the encryption keys.”

Go All In

Some say it is possible to go all in when it comes to the cloud. For those considering this option, the evaluation process has to be severe in terms of requirements. Kevin Liebl, vice president of marketing, Zadara Storage, believes that it is possible to run primary storage applications in the cloud without migration efforts or painful rewrites.

“Ensure that the cloud storage is data center grade by establishing a punch list of features to expect from a traditional SAN or NAS deployment and make sure to get them with any cloud offering,” he said.

For primary storage in the cloud, that punch list should include iSCSI block storage and NFS file storage, thin provisioning, snapshots, clones, replication, online migration, encryption, SSD caching, support for clustered servers and databases, and predictable performance. And it must be configurable to your needs, where you can specify drives, memory, RAID and other features.

Test the Waters

Even when an enterprise is looking at going all cloud, it doesn’t have to be accomplished all at once. Liebl advised a phased approach, taking advantage of free trials.

“Start small, prove the benefits and grow as needed,” he said.

These then are some of the vital factors to consider in any cloud storage comparison. Such a comparison is not just between vendors. It should also compare public versus private versus hybrid cloud and consider which types of storage and applications should or should not be run in the cloud

More Tips: How to Solve the problem of can’t upload the videos to Cloud Storage?

iCloud, Dropbox, Google Drive, Sky Drive, etc are all the popular cloud storages today. Generally you can upload the videos to them for some storage and management. But sometims some videos are not supported by cloud storage due to the DVD/Blu-ray drive issues or the compatibility issues, for example, AVI to iCloud, Blu-ray to Dropbox, DVDs to Google Drive, and more. Using Pavtube Video Converter Ultimate Mac  to help you to convert the videos and movies to iCloud, Dropbox, Google Drive, Sky Drive supported videos for smooth storage. (read best digital formats for storing movies).

Other Download:
– Pavtube old official address: http://www.pavtube.cn/blu-ray-video-converter-ultimate/

Have more questions about Dropbox vs Google Drive, please feel free to contact us>> or leave a message at Facebook

More Topics:


Stream music and videos from SugarSync with iPhone and iPad

SugarSync. Unlike most other cloud services, SugarSync lets you back up and sync entire file folders. But also unlike others, there’s no free option. You can elect the 100GB plan for $7.49 a month or 1TB for $9.98 a month. You can generate private or public links to share your files, and remotely wipe items if one of your devices is lost or stolen. Data is stored using 256-bit encryption.

SugarSync has a built in music player to stream your music files to your iPhone, iPad, or iPod Touch. “Streaming” means the music buffers and plays as the file downloads, so you don’t have to wait for the download to finish before listening or watching your files. While your music or video plays in the background, you can use other apps on your device.


Other Download:
– Pavtube old official address: http://www.pavtube.cn/blu-ray-video-converter-ultimate/


To stream a music or video file on your iPhone or iPad mobile device:

1. From the main SugarSync screen, tap , and then navigate to the folder that contains the song or video you want to play.


2. Tap to open the song or video file to play it. SugarSync opens the built in music player and begins buffering the file to play as it downloads. When the selected file completes, the music player will continue to the next file in the folder.


Note: Only file types supported by Apple will play. The SugarSync Music Player cannot play DRM-protected music files. 

Streaming Versus Syncing:

When you stream music or videos, each file is downloaded and cached for a period of time (for how long depends on the available memory on your phone). As long as the files are “cached,” meaning temporarily saved, you can stream them again without network charges. Eventually the cache will be deleted. The songs and videos will be downloaded again the next time you play to them. If you are trying to keep your network charges low, you can sync the files to your device instead. When you sync the files to your device, they are downloaded only once. After the files are synced, they are always available so you can play them anytime, even when you are offline.


More Topics:
 

.

How to Upload GoPro Hero 4 4K Video to DropBox?

The action camera market is expanding at blinding speed, and the best known name in this sector is GoPro. GoPro’s new Hero 4 black edition camera has the sharpest footage and is the most user-friendly version. When you got some 4K clips from GoPro, maybe you are seeking for the way to upload GoPro Hero 4K video to DropBox for enjoyment.

DropBox is a mobile document and media storage tool that allows you to sync you files online for backup. Anything like movies and music you save to your computer can be saved to your DropBox. As we all know, currently, most 4K videos are recorded in MXF/RAW/XAVC/XAVC-S format, while none of them is supported by DropBox. 

So if you have some nice GoPro Hero 4K videos and want to add to DropBox for streaming and playback on iPhone, iPod, Galaxy Tab, Kindle Fire HD and more media devices, you’d better convert GoPro Hero 4 4K video to other format like MP4, MOV or other format compatible with DropBox. To get that done, GoPro Hero 4K video to DropBox Converter is essential. Here Pavtube Video Converter Ultimate Mac  is recommended to you which can quickly convert any GoPro Hero 4 4K Video to DropBox supported videos on your computer.

Hot search: ISO to Dropbox | H.265 to Dropbox | YouTube to Dropbox 

If you are a Mac user, please turn to  Mac. Thanks to the built-in video editor, you can trim, crop and retouch your videos in clicks. Overall, no matter what versions, this program is a completely professional converter, editor and player.

Free download the top video converter for Windows:


Other Download:
– Pavtube old official address: http://www.pavtube.cn/blu-ray-video-converter-ultimate/

How to Convert GoPro Hero 4 4K Video to DropBox for uploading?

Step 1. Load 4K video

Launch the 4K to DropBox Converter; click “Add Video” button to import GoPro Hero 4 4K videos into the program. Loaded videos can be previewed in the right preview window.


Step 2. Decide on output format

Click the drop down box of “Format”, through which it is possible to select Dropbox highly compatible format like MP4, MOV from “Common Video” profile list. For those who wanna upload 4K video files to Dropbox and share on tablet or phones, you can choose a certain preset like iPad as target format.


Tip: If you need, you can also click “Settings” to modify parameters of your output profile to meet your professional needs: bit rate, frame rate, aspect ratio, etc.

Step 3. Start ripping GoPro Hero 4 4K Video to Dropbox

The final step is to tap “Start conversion” button and commence converting GoPro Hero 4 4K Video videos to Dropbox. After the conversion,you can click on “Open” button to locate the ripped videos.

How to uploaded converted GoPro Hero 4 4K video to Dropbox?

1. Sign in to the Dropbox website.

2. Click the Upload button from the very top of the window. The upload button

3. A window will appear. Click the Choose File button and then select the file on your computer that you’d like to add to your Dropbox.

4. Choose as many files as you like, and then click the Start Upload button.

5. The window will disappear, your files will start uploading, and you’ll be shown a progress indicator. That’s it, you’ve added files to your Dropbox!


Have more questions about Dropbox vs Google Drive, please feel free to contact us>> or leave a message at Facebook

More Topics:

.

« Older posts Newer posts »

© 2017 Cloud Storage

Theme by Anders NorenUp ↑