Cloud Storage

Save Data Conveniently, Offer Life Convenience

Author: Lauren Brown (page 9 of 10)

Put Blu-ray Movies to OneDrive

Microsoft OneDrive, as one of the top Cloud Drive providers, enables you to access OneDrive files from a different account in Windows, Mac, Android, iOS, and of course Windows Phone only if you have the account. If you have a bunch of Blu-ray movies and wanted to upload them to the cloud. Uploading Blu-ray to OneDrive will be nice for you to search through OneDrive library for movies to watch.

Like other cloud storage services, Microsoft OneDrive can’t read Blu-ray disc format. If you wish to upload Blu-ray to OneDrive for sharing and accessing on your iPhone 6S, iPad Mini 4, Galaxy Note 5 or Surface Pro Tablet, you will need to rip Blu-ray to OneDrive compatible MP4, QuickTime mov or m4v file formats. (Tips: DRM-protected video files can’t be played on OneDrive.)

Here, I introduce Pavtube Video Converter Ultimate Mac  to you. It can extract Microsoft OneDrive supported file from Blu-ray, DVD, Video_TS folders or IFO and ISO image files. Considering the limited space of OneDrive, the app enables you to adjust video size, codec to compress DVD movie size so that you can store more Blu-ray movies on OneDrive. With this app, you also can upload Blu-ray, DVD, ISO, M2TS to other cloud storage, like Amazon Cloud Drive, Dropbox, Google Drive, Box.

Now, just free get iFastime Video Converter Ultimate on Windows computer and follow the steps below to upload Blu-ray to OneDrive with suitable format.


Other Download:
– Pavtube old official address: http://www.pavtube.cn/blu-ray-video-converter-ultimate/

How to upload Blu-ray to OneDrive with suitable video format?

Step 1. Import Blu-ray source video

Click the “Load file(s)” button to import Blu-ray videos into the application. It supports batch importing so that you can add as many video files as you wish.

Step 2. Set suitable format

Click on “Format” bar to select output format. You can choose H.264 MP4, MPEG-4 MP4, MPEG-2, FLV, MKV, WMV, etc as target format on Window. Here, we choose H.264 mp4 as the target format for its wide compatibility with all kinds of devices.

Tip: Click “settings” next to format bar, you can change video and audio parameters. Remember, higher bitrate results in bigger size and lower quality loss.

Step 3. Start ripping Blu-ray to OneDrive

Click the “Star conversion” button at the bottom right corner to start backing up Blu-ray for Microsoft OneDrive. After conversion click “Open” to find the generated videos.

Step 4: Upload ripped Blu-ray to OneDrive

1. On the Start screen, tap or click OneDrive to open theOneDrive app.
2. Tap or click folders to browse to the location onOneDrive where you want to add the files.
3. Swipe in from the top or bottom edge of the screen or right-click to open the app commands, and then tap or click Add files.

4. Browse to the files you want to upload, tap or click to select them, and then tap or click Copy to OneDrive.

Or you can use other methods to transfer ripped DVD movies to OneDrive. When you save these DVD videos to OneDrive, you can get to them from any device and share them with other people.

Have more questions about Dropbox vs Google Drive, please feel free to contact us>> or leave a message at Facebook

Related Articles:

.

Rip DVD to Box Cloud Storage

DVDs are so analog. Sure, they‘re digitally encoded versions of your favorite movies and TV shows, but they’re trapped on physical platters. If you want to watch something, you have to find the disc, slide it into a DVD player. If you put DVD collection, like Box Cloud Storage, you can save the time of searching for the one you want to see.

Hot Search: DVD to OneDrive, DVD to Dropbox,

Box Cloud Storage is one of the top Cloud Storage. It, as same as other Cloud Storage, can’t accept DVD directly. So if you want to put DVD onto Box Cloud Storage, you also need to rip DVD to a normal format in advance so that your multimedia players can play the DVD video.

To do so, a DVD ripping software is essential. Here Pavtube Video Converter Ultimate  is recommended to you. This DVD ripping tool can rip any encrypted DVD and convert DVD to MP4, MOV, AVI, MKV, etc popular formats. For the video size limit of Box site, the built-in editor also allows you to extract DVD clips with the very part you want. Or, you can just choose to rip certain chapters of a DVD as you like.

If you are a Mac user, please turn to( Mac). Now download the right version of the program and follow the guide below.


Other Download:
– Pavtube old official address: http://www.pavtube.cn/blu-ray-video-converter-ultimate/

How to Rip DVD to Box Cloud Storage with DVD Ripper?

Step 1. Load your DVDs.

Launch the DVD ripping software, click “Load File” on the interface, and you can add any or your source discs. More surprisingly, you are allowed to directly rip DVD folders or ISO image files from your hard drive to Box supported format.


Step 2. Choose right output format for Box cloud storage.

The selection of output format depends on your specific need: If you need to rip DVD to iCloud, simply choose Apple device compatible formats. If the quantity of DVDs to be saved is large, try to choose the output format with comparatively low quality (for small output size), and oppositely, choose the high quality. If you desire to play the converted DVDs on Apple TV, iPad, iPhone Samsung table, PS4, Xbox One and any of other portable device, you can choose directly from the device profile listed in the “Format”.


Step 3. Start ripping DVD to Box

Click the “Start conversion” button at the bottom right corner to start backing up DVD for Box Cloud Storage. After conversion click “Open” to find the generated videos.

Step 4: Upload ripped DVD to Box

1. On the Start screen, tap or click Box to open the Box app.
2. Tap or click folders to browse to the location on Box where you want to add the files.
3. Swipe in from the top or bottom edge of the screen or right-click to open the app commands, and then tap or click Add files.
4. Browse to the files you want to upload, tap or click to select them, and then tap or click Copy to Box.

After this process, you can play the files directly online (but the Network speed is a deciding factor) with your iPhone 6S, iPad Mini 4, Samsung Note 5, etc. Outstandingly, Box cloud service makes movies, music and photos more portable. Only if you have an online account, you can use the movies on your home PC, work PC and portable PC, stream it to an app, Chromecast, Smart TV, Roku player.

Have more questions about Dropbox vs Google Drive, please feel free to contact us>> or leave a message at Facebook

Related Articles:

.

Backup Movies and Videos on Cloud Storage Device

Cloud storage focuses on the saving and management of data. Uploading all your movies and videos to cloud Storage Device can make your movie library available and accessible through the network disk, Dropbox, Seagate personal cloud media storage, etc. It has many advantages; for example, it frees you from the troubles of video loss, and the space of physical hard disk if it is DVD/Blu-ray movie.Putting your movie library to the Cloud Storage Device also allows you to share it with your family members or access your movies at home or on the road.

cloud storage devices

There are many cloud storage devices such as Dropbox, Google Drive, Microsoft OneDrive, etc which provide limited free online storage space for you to upload various different file types. If you get trouble to upload files to cloud storage storage devices, the main reason is that the file formats you are going to upload not not accepted by the services. To guide you out, a powerful media conversion application – Pavtube Video Converter Ultimate Mac  is provided for you, with which you can comprehensively convert Blu-ray, DVD and all incompatible file formats to Dropbox, Google Drive and Microsoft OneDrive supported file formats.

Now, just free get  Video Converter Ultimate on Windows computer and follow the steps below to backup movies to Cloud Storage Device with suitable format.


Other Download:
– Pavtube old official address: http://www.pavtube.cn/blu-ray-video-converter-ultimate/

How to Upload Blu-ray/DVD/Videos to Cloud Storage Device with suitable format?

Step 1. Import source video

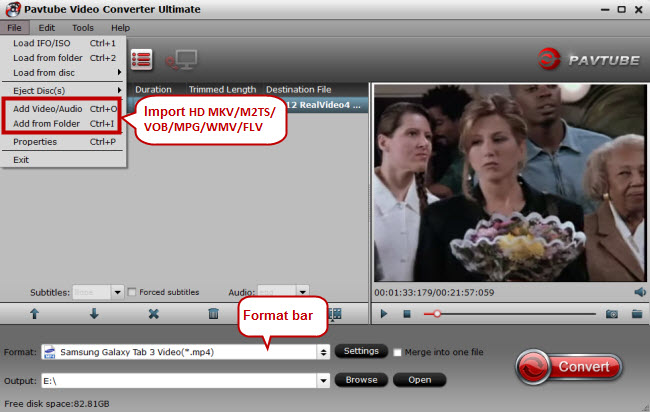
Click the “Load file(s)”or “Add videos” button to import videos into the application. It supports batch importing so that you can add as many video files as you wish.


Step 2: Choose output file format.

From “Format” drop-down bar, select the output file format according to the cloud storage devices that you want to upload to. Dropbox supported file formats including AVI, WMV, MP4, MOV, FLV, VOB, MKV, MPG, MPEG, M4V, DV, MTS, M2TS, TS, 3GP, 3GPP, 3GPP2, Google Drive supported file formats including AVI, WMV, FLV, MOV, MTS, MPEGPS, 3GPP, WebM, while OneDrive supported formats are mp4, mov and m4v.


Tip: Since all the online cloud storage devices have limited free storage space, therefore, keep an eye on the file size before you perform the file uploading process. To output file size in small file size with the same video quality, the program provides a built-in “Trim” function to enables you to convert only your unwanted parts. Or, click “settings” next to format bar, you can change video and audio parameters. Remember, higher bitrate results in bigger size and lower quality loss.

Stepp 3. Start to backup vides to Cloud Storage Device

Click the “Start conversion” button at the bottom right corner to start backing up vides to Cloud Storage Device. After conversion click “Open” to find the generated videos.

Now, you can transfer the converted movies to Cloud Storage Device, like Dropbox, Amazon Cloud Drive, OneDrive. When you save these videos to Cloud Storage Device, you can get to them from any device and share them with other people.

Have more questions about Dropbox vs Google Drive, please feel free to contact us>> or leave a message at Facebook

Related Articles:


Upload Blu-ray to Google Drive With Suitable Format

Blu-rays are digitally encoded versions of your favorite movies and TV shows. Their playing are trapped on physical platters. If you want to watch something, you have to find the disc, slide it into a Blu-ray player and flip your TV to the proper input.If the Blu-ray players or Blu-ray drive happen to be not in work, you will lose your Blu-ray playback. It is the time to backup your a bunch of Blu-ray to Google Drive, the top Cloud Storage

As a bonus, ripping your Blu-ray to Google Drive with a common video format extends your viewing options to your phone, tablet, Roku box, game console, and more. So how to convert your Blu-ray movie library to digital files for uploading to Google Drive?  

Each such conversion will cost you a few bucks, however, the paid way can enable you to  convert some movies which has studio-imposed restrictions. The free way like using Handbrake will make you trapped in the encryption Blu-ray discs.Get ripping Blu-ray before uploading to Google Drive

Considering the price and the integrated functions, Pavtube Video Converter Ultimate  is no doubt the best choice. This Blu-ray ripper can turn a real-world Blu-ray into a digital file with H.265, M3U8, MKV, AVI, MP4, etc for uploading to Google Drive. For the video size limit of Google Drive, the built-in editor also allows you to extract Blu-ray clips with the very part you want. Or, you can just choose to rip certain chapters of the Blu-ray as you like. Mac users should use ( Mac).

Learn More: Blu-ray to Dropbox | DVD to Google Drive

Get the right version app on your computer to start to rip Blu-ray to Google Drive:

Other Download:
– Pavtube old official address: http://www.pavtube.cn/blu-ray-video-converter-ultimate/

step 1: Load Blu-ray movies to app

Run the Blu-ray to Google Drive software and click “Load file(s)” icon to load Blu-ray movies for converting. You can also import movies files from Blu-ray folder, ISO image files.

Step 2. Choose output format

Click “Format” and through the profile to select Google Drive highly compatible format like MP4, MOV from “Common Video” profile list. For those who wanna upload Blu-ray files to Google Drive and share on tablet or phones, you can choose a certain preset like iPad as target format.

Tip: You can click settings button to customize the output parameters, such as resolution, bitrate, etc. Lower bitrate will result in smaller size.

Step 3: Rip Blu-ray to Google Drive

After all settings, click “Start conversion” button to rip Blu-ray to Google Drive. When the process finishes, open the output folder to locate the generated file.

Get uploading ripped Blu-ray to Google Drive

To upload files using Google Drive:

1. Go to drive.google.com.
2. On the left, click New.
3. Select File upload.
4. Select the file you want to upload. To select multiple files, press Ctrl (PC) or Command (Mac) and click all the files to upload.
5. You’ll see a box that shows the progress of your file upload. To open the file, click the filename. To close the box, click the X.Then, wait for your files to upload. The speed of your internet connection will determine how long the upload takes. If a file upload fails, Drive displays a “Retry” option next to the failed file or folder. Select “Retry,” and the failed files will be re-uploaded. This works even for folders filled with hundreds of files.Once you’ve liberated your Blu-ray movie library and upload the ripped Blu-ray to Google Drive, you’ll have made it available for viewing anytime, anywhere—not just on the PC that houses the files.

Have more questions about Dropbox vs Google Drive, please feel free to contact us>> or leave a message at Facebook

Related Articles:


Move Blu-ray Collection to Network Storage Drive

Have collected hundreds of Blu-ray discs on the shelf? Do you find that it gets harder to organize and manege the huge data and it is really difficult to hunt the exact one you want from the disc ocean? If so, it would be great to digitize all of your Blu-ray movies for moving them to your network storage, so that you could watch them on your tablets, smartphones, and even watch them directly from your smart TV without needing your Blu-ray player and have to find it from the shelf.

Hot search:  DVD to iCloud | DVD to OneDrive | ISO to Amazon Cloud Drive | Top Cloud Storage

The benefits of store Blu-ray movies on Network Storage Drive

  • Easily find the one you want from abundant of the data;
  • Protect your Blu-ray disc from fire, scratches, loss
  • To stream movies directly to your tablets, computer,, gaming consoles, even to your smart HDTV from your network storage drive;
  • Watch your movies anywhere – at home, on the trip, anywhere you can get Internet access

How to upload Blu-ray to Network Storage Drive?

To upload Blu-ray to Network Storage Drive, first of all you need a Blu-ray ripper that can transocode Blu-ray to normal video bypassing Blu-ray complex encryption. Here Pavtube Video Converter Ultimate   is highly recommended to help you finish your work.

It is a smart Blu-ray ripper for you to rip Blu-ray to Network Storage Drive with fast speed and excellent video quality output. This Blu-ray ripping tool can rip any encrypted Blu-ray and turn the Blu-ray movies to Network Storage Drive in MP4, MOV, AVI, MKV, etc popular formats. For the video size limit of Network Storage Drive, the built-in editor also allows you to extract Blu-ray clips with the very part you want. Or, you can just choose to rip certain chapters of the Blu-ray as you like. 

If you are a Mac user, you should turn to the equivalent ( Mac version.  

You can free download and install Video Converter Ultimate on Windows computer: 


Other Download:
– Pavtube old official address: http://www.pavtube.cn/blu-ray-video-converter-ultimate/


Step 1: Load Blu-ray movies to app

Run the Blu-ray to Network Storage Drive software and click “Load file(s)” icon to load Blu-ray movies for converting. You can also import movies files from Blu-ray folder, ISO image files.


Step 2. Choose output format

Click “Format” and through the profile to select common Network Storage Drive highly compatible format like MP4, MOV from “Common Video” profile list. For those who wanna upload Blu-ray files to Network Storage Drive and share on tablet or phones, you can choose a certain preset like iPad as target format. 


Tip: You can click settings button to customize the output parameters, such as resolution, bitrate, etc, you can also skip this step. Remember, lower bitrate results in lower size and you can store more Blu-ray movies on Network Storage Drive.

Step 3: Rip Blu-ray to Network Storage Drive

After all settings, click “Convert” button to rip Blu-ray to Network Storage Drive. When the process finishes, open the output folder to locate the generated file.

Open your Network Storage Drive and upload the ripped Blu-ray to it. When you succeed in putting Blu-ray movies on Network Storage Drive, you can watch them on your phone, computer, game console anywhere only if you have the internet. 

Have more questions about Dropbox vs Google Drive, please feel free to contact us>> or leave a message at Facebook

How to Put DVD to Google Drive/Dropbox/iCloud?

Cloud storage focuses on the saving and management of data. When you got the troubles of disc loss or damage or the limited space of physical hard disk, you can ripping DVD discs to a normal format to upload these DVD movies to Cloud Storage like OneDrive. This operation make you be able to share DVD Movies with your family members or access your movies at home or on the road. Here, the article aims to teach you upload DVD to Google Drive/Dropbox/iCloud with a more compatible format.

We know that almost all DVD movies are encrypted with CSS copy protection. If you copy DVD to Google Drive/Dropbox/iCloud without breaking the copy protection, when you try to play the copied VOB files, the decoder will request the keys from the DVD-ROM drive and will fail. You may get the message “Cannot play copy-protected files”. That is to say, you’ll need a DVD-ripping utility that can remove DVD copy protection and then rip DVD to Google Drive/Dropbox/iCloud with the popular formats, like MP4, AVI, MOV, FLV, WMV etc.

Here, I introducePavtube Video Converter Ultimate   to you. It can rip DVD to Google Drive/Dropbox/iCloud with any video format you have even seen. Considering the limited space of cloud storage, the app enables you to adjust video size, codec to compress DVD movie size so that you can store more DVD movies on Google Drive/Dropbox/iCloud. With this app, you also can upload Blu-ray, DVD, ISO, M2TS to other cloud storage, like Amazon Cloud DriveDropbox.

If you are a Mac user, you should turn to the equivalent ( Mac).

Now, just free get  Video Converter Ultimate on Windows computer and follow the steps below to rip DVD to Google Drive/Dropbox/iCloud with suitable format.


Other Download:
– Pavtube old official address: http://www.pavtube.cn/blu-ray-video-converter-ultimate/

How to upload DVD to Google Drive/Dropbox/iCloud with common video format?

Step 1. Import DVD source video

Click the “Load file(s)” button to import DVD videos into the application. It supports batch importing so that you can add as many video files as you wish.


Step 2. Set suitable format

Click on “Format” bar to select output format. You can choose H.264 MP4, MPEG-4 MP4, MPEG-2, FLV, MKV, WMV, etc as target format on Window. Here, we choose H.264 mp4 as the target format for its wide compatibility with all kinds of devices.


Tip: Click “settings” next to format bar, you can change video and audio parameters. Remember, higher bitrate results in bigger size and lower quality loss.

Step 3. Start ripping DVD to Google Drive/Dropbox/iCloud

Click the “Star conversion” button at the bottom right corner to start backing up DVD for Google Drive/Dropbox/iCloud. After conversion click “Open” to find the generated videos.

Now, transfer ripped DVD movies to Google Drive/Dropbox/iCloud. When you save these DVD videos to Google Drive/Dropbox/iCloud, you can get to them from any device and share them with other people.

Have more questions about Dropbox vs Google Drive, please feel free to contact us>> or leave a message at Facebook


How to Add DVD Movies to Microsoft OneDrive?

The function of Microsoft OneDrive (previously SkyDrive) is similar to Dropbox, with apps available to Windows, Mac, Android, iOS, and of course Windows Phone users. If you got a pretty extensive DVD collection, and there’s some movies you replay a lot. I’d like to suggest you to copy these DVD to OneDrive to prevent the DVD from unexpected damages. This operation also bring you much convenience on DVD playback on your various devices. 

Maybe, you will worry that Microsoft OneDrive doesn’t support DVD video format. But if you really want to add some nice DVD movies to Microsoft OneDrive for streaming and playback on iPhone, Galaxy Tab, Kindle Fire HD and other media devices, you can rip DVD to other format like MP4, MOV or other format compatible with OneDrive .

Here, I introduce Pavtube Video Converter Ultimate Mac  to you. It can extract Microsoft OneDrive supported file from DVD disc, Video_TS folders or IFO and ISO image files. Considering the limited space of cloud storage, the app enables you to adjust video size, codec to compress DVD movie size so that you can store more DVD movies on OneDrive. With this app, you also can upload Blu-ray, DVD, ISO, M2TS to other cloud storage, like Amazon Cloud DriveDropbox.  

If you are a Mac user, you should turn to the equivalent Mac version.  

Now, just free get iFastime Video Converter Ultimate on Windows computer and follow the steps below to rip DVD to OneDrive with suitable format. 


Other Download:
– Pavtube old official address: http://www.pavtube.cn/blu-ray-video-converter-ultimate/


How to upload DVD to Microsoft OneDrive with common video format?

Step 1. Import DVD source video

Click the “Load file(s)” button to import DVD videos into the application. It supports batch importing so that you can add as many video files as you wish.


Step 2. Set suitable format

Click on “Format” bar to select output format. You can choose H.264 MP4, MPEG-4 MP4, MPEG-2, FLV, MKV, WMV, etc as target format on Window. Here, we choose H.264 mp4 as the target format for its wide compatibility with all kinds of devices.


Tip: Click “settings” next to format bar, you can change video and audio parameters. Remember, higher bitrate results in bigger size and lower quality loss. 

Step 3. Start ripping DVD to OneDrive

Click the “Star conversion” button at the bottom right corner to start backing up DVD for Microsoft OneDrive. After conversion click “Open” to find the generated videos.

Step 4: Upload ripped DVD to OneDrive

1. On the Start screen, tap or click OneDrive to open theOneDrive app.
2. Tap or click folders to browse to the location onOneDrive where you want to add the files.
3. Swipe in from the top or bottom edge of the screen or right-click to open the app commands, and then tap or click Add files.


4. Browse to the files you want to upload, tap or click to select them, and then tap or click Copy to OneDrive.


Or you can use other methods to transfer ripped DVD movies to OneDrive. When you save these DVD videos to OneDrive, you can get to them from any device and share them with other people. 

Have more questions about Dropbox vs Google Drive, please feel free to contact us>> or leave a message at Facebook


Add Blu-ray to Dropbox With Suitable Format

Dropbox is, as one of the top Cloud Storage, a storage document that can synchronizes your files online and across computers. Only if you have a Dropbox client portal on your computer, moblie phone and tablet that has an internet connection, you can access the stored videos, musics and photos from Dropbox whenever and wherever. So if you have a large of Blu-ray library, uploading these Blu-ray to Dropbox can save your shelf space and make Blu-ray movie organization and storage convenient. But adding Blu-ray to Dropbox for storing and sharing, it has some preparation job need to do. 

Dropbox can support many kinds of videos like 3GP, AVI, MOV, WMV, M4V, MKV, etc, but it can’t put Blu-ray disc online for lacking of Blu-ray drive. So for uploading Blu-ray to Dropbox for sharing and playing, a Blu-ray Ripper is needed to rip Blu-ray to Dropbox accepted format. 

Pavtube Video Converter Ultimate Mac is a smart Blu-ray ripper for you to rip Blu-ray to Dropbox with suitable format. This Blu-ray ripping tool can rip any encrypted Blu-ray and turn the Blu-ray movies to Dropbox in MP4, MOV, AVI, MKV, etc popular formats. For the video size limit of Dropbox site, the built-in editor also allows you to extract Blu-ray clips with the very part you want. Or, you can just choose to rip certain chapters of the Blu-ray as you like. 

Hot search: H.265 to DropBoxGoPro Hero 4 4K Video to DropBoxiPhone/iPad/Android phone to DropBox


You can free download and install  Video Converter Ultimate on Windows computer:


Other Download:
– Pavtube old official address: http://www.pavtube.cn/blu-ray-video-converter-ultimate/


How to upload Blu-ray to Dropbox with suitable format?

Step 1: Load Blu-ray movies to app

Run the Blu-ray to Dropbox software and click “Load file(s)” icon to load Blu-ray movies for converting. You can also import movies files from Blu-ray folder, ISO image files.


Step 2. Choose output format

Click “Format” and through the profile to select Dropbox highly compatible format like MP4, MOV from “Common Video” profile list. For those who wanna upload Blu-ray files to Dropbox and share on tablet or phones, you can choose a certain preset like iPad as target format. 


Tip: You can click settings button to customize the output parameters, such as resolution, bitrate, etc, you can also skip this step.

Step 3: Rip Blu-ray to Dropbox

After all settings, click “Convert” button to rip Blu-ray to Dropbox. When the process finishes, open the output folder to locate the generated file.

Upload ripped Blu-ray to Dropbox

1. Sign in to the Dropbox website.
2. Click the Upload button from the very top of the window. The upload button
3. A window will appear. Click the Choose File button and then select the file on your computer that you’d like to add to your Dropbox.
4. Choose as many files as you like, and then click the Start Upload button.
5. The window will disappear, your files will start uploading, and you’ll be shown a progress indicator. That’s it, you’ve added the converted Blu-ray files to your Dropbox!

Once you’ve added ripped Blu-ray files to Dropbox, now you’ll make it available for viewing on other computers, Android, Apple devices anytime, anywhere just with the help of your Dropbox. 

Have more questions about Dropbox vs Google Drive, please feel free to contact us>> or leave a message at Facebook

Related Articles:


40% OFF Upgrade iFastime Video Converter Ultimate for Win/Mac

Good News! iFastime has recently made great upgrades to version 4.8.6.5 with supporting Blu-ray/DVD/Video to H.265 MKV/Prores/TV encoding.


Version number: 4.8.6.5

What’s new in this upgrade?

1. Add Apple Prores as output on Windows. 
2. Support encoding to H.265 MKV. 
3. Compatible with Sony/LG/Samsung/Panasonic TVs.

All upgraded products are listed below:

Pavtube Video Converter Ultimate Mac

Many media converting tool still haven’t made a move to set profile preset. That is to say, they don’t enable users to encode TV playable format directly. They have to set complicated video audio settings to make videos fully compatible with Sony/LG/Samsung/Panasonic TVs which is really one big headache. Plus, many users are searching for a H.265 MKV encoder and solution for creating Apple Prores on Windows. 

Good news is that the upgraded iFastime version 4.8.6.5 is proved to be able to directly rip any Blu-ray/DVD movies and common SD/HD/4K movies for usage on Sony/LG/Samsung/Panasonic TV with amazing editing functions, high speed and flexible settings. In addition, it can transcode media files to Apple Prores for importing to Windows Editors and encode all movie files to H.265 MKV with smaller file size and better quality. And more versatile and beneficial functions can be found in the review.

It’s worth mentioning that, for all Windows/Mac users, iFastime Video Converter Ultimate/Video Converter Ultimate for Mac is offerred with only $27.57 at Facebook with a lifetime free upgrade. 

Pick up the best new-brand launching 40% OFF gift righ now! Never miss!!!

For users who has no Facebook account, here gives the 40% OFF Coupon below:

Special for Windows:


Special for Mac:


All these items are available until the end of Sep. 15th, 2015. Grab the chance to get this powerful multimedia app right now! Lowest Price Ever! Order Today While You Still Can! Or contact us>> or get more coupon!

More Topics:

For more info about this iFastime update, just visit: http://www.ifastime.com/ifastime-video-tools-upgrade.html

Source: http://itunesky.com/ifastime-video-tools-upgrade/.

Upload/Attach ISO file to Amazon Cloud Drive

Speaking of top cloud storage providers, Amazon must take up one position. Amazon Cloud Drive is rough around the edges but definitely has potential. It provides cost-efficient plans, widespread file support and a built-in music player. If you have media files, like ISO images, how to upload these ISO files to Amazon Cloud Drive? 

How to get started with attaching ISO to Amazon Cloud Drive?

To get you started with the Amazon Cloud Drive application, here is a step-by-step guide:

Step 1: Download the app and install it.

Download PC/Mac version on your computer. On PCs, it places a small cloud icon in the system tray in the lower-right corner. On Macs, the cloud icon appears in the menu bar at the top of your display.


Step 2: Log in to your Amazon account.

After installing the app, a log-in window appears; you need an Amazon account to use Cloud Drive.

Step 3: Let the uploading begin.

You can simply drag a file, a folder, or multiple files or folders to the cloud icon to upload them to your Amazon Cloud Drive. Or, right-click on a file or folder to upload it. On Macs, choose the “Upload to Cloud Drive” menu option. On PCs, choose Send to > Amazon Cloud Drive.

The steps are easy just like other cloud storage application method.

Suggestion: Before putting ISO images and other formats with low frequency of usage, you’d better transform them to a common format, that the multimedia players you often use can support them.

How to transcode ISO to a popular format before attach these ISO image to Amazon Cloud Storage?


To convert ISO file for Amazon Cloud Storage, you can use Pavtube Video Converter Ultimate . It can work in nearly all kinds of videos like Blu-ray/DVD/4K/SD/HD and change them to H.265, MP4, M3U8, MKV, AVI, MOV, M4V, etc. For saving the space of cloud storage, you can adjust the video/audio parameters in profile settings window. Lower bitrate and resolution leads smaller size. Mac users can turn to ( Mac).

You can simply download and install Windows version at below:


Other Download:
– Pavtube old official address: http://www.pavtube.cn/blu-ray-video-converter-ultimate/

Step 1. Import ISO video files

Click the “Add video” button to import ISO files into the application. It supports batch importing so that you can add as many video files as you wish.


Step 2. Set output format

Click on “Format” bar to select output format. Here you can choose H.264 MP4, MPEG-4 MP4, MPEG-2, FLV, MKV, WMV, MP3, FLAC, OGG, WMA, etc as target format on Window. Here, we choose H.264 mp4 as the target format for its wide compatibility with all kinds of devices.


Step 3. Start transcoding ISO file

Click the “Star conversion” button at the bottom right corner to start transcoding ISO file for Amazon Cloud Storage. After conversion click “Open” to find the generated videos.

With ISO conversion process, you can watch them on you various portable devices or media players via Amazon Cloud Storage. So just try the video conversion operation before putting ISO to Amazon Cloud Drive for your better entertainment.

Have more questions about Dropbox vs Google Drive, please feel free to contact us>> or leave a message at Facebook

Older posts Newer posts

© 2017 Cloud Storage

Theme by Anders NorenUp ↑