Cloud Storage

Save Data Conveniently, Offer Life Convenience

Author: Lauren Brown (page 3 of 10)

Dropbox vs Google Drive

With “cloud giants” everywhere, it can be tough to tell if a number one company is top dog because they deserve to be, or if the title has been conveyed because they are among the oldest and most well-known. To help settle the debate, we decided to pit two of the oldest and easiest to recognize businesses head-to-head in order to figure out the answer. When it comes to Dropbox vs Google Drive, who is the best cloud provider

Dropbox 

Dropbox was founded by Drew Houston and Arash Ferdowsi in 2007. The company came about not because they thought it would be a great business idea. Instead, it was developed out of need. Necessity is often the mother of invention and that’s what happened here. 

The pair, tired of emailing themselves documents when they were going to be working at different computers than the ones the files were created on, got to work creating an efficient file sharing system. By setting up a secure folder on a server, they were able to access files no matter where they were. The idea took off and quickly spread through the university. 


Today, Dropbox is probably one of the best known cloud storage and sharing providers. With over 300 million active users worldwide, it’s easy to see why some would consider it the number one platform. 

In addition to offering personal space to share and save files and photos, Dropbox also offers a business level platform. This package gives users additional features to help their company grow. 

Google Drive 

Dropbox wasn’t the first to develop the idea of shared storage. Google began working on an online storage platform as early as 2006. Sadly, it took the search engine giant an additional six years before their idea was ready to be used by the world. Google Drive made its official debut on April 24, 2012. 

Like its competitor, Google Drive offers consumers a place to store and share files, videos, and photos. With an average of 240 million active users each month, world-wide, this cloud storage platform has the right to claim top status as well. 


In addition to being a storage platform, Google Drive offers users a host of office tools, allowing them to edit and collaborate on stored files without leaving the cloud site, even with recent changes. 

Round One: Ease of Use 

Any program has a learning curve. However, you don’t want to fight with a difficult to use interface. So, when it comes to the battle of Dropbox vs. Google Drive, which one is simplest? 

Dropbox 

When it comes to ease of use with Dropbox, it all boils down to whether or not you understand the syncing procedure. You can also add files and folders via the web browser. However, the upload button may be a little obscure to some users. 

Instead, Dropbox uses a dedicated syncing folder that is added to the desktop or mobile device. You must then place each file or folder inside. Once there these documents automatically since with the online account. However, a large initial upload can be time consuming. 

The actual options from within the web application are fairly straightforward. Files are sorted into folders for you, based on type and sharing is simple as making a few selections. 

Google Drive 

Google Drive is not without fault. While it does have the option to upload documents from within a web browser (something we couldn’t find on Dropbox), it is far from perfect. As should be expected from a cloud storage application, it dumps everything into one central location. The only folders made are the ones you create yourself. 

When reviewing the Google Drive site, we found the buttons along the top were not always intuitive. While it may be obvious to some what the icons mean, the share option could be confusing to those who are looking at it for the very first time. We found it easier to share folders by right clicking the desired file and selecting “share with.” 

However, despite the problematic buttons, we did find that there were more options than simply sharing and saving. Users can create documents within their cloud folder and color code their icons to help set them apart from the rest. Again, we must complain that finding these features lacks the simplicity many users are interested in. 

Winner: Google Drive, for the extra options and ability to upload directly from the web browser. 

Round Two: Reliability 

While being easy to use is important, being reliable is equally critical. A cloud storage site does users little good if information goes missing or is inaccessible for hours at a time. So, who has better reliability– Dropbox or Google Drive? 

Dropbox 

According to a study reported on in March 2013, BoxFreeIT spent six months testing and monitoring Dropbox to find out exactly how reliable the company really was. They tracked the server for over 264,000 minutes. During that time, the cloud storage provider had approximately 412 minutes of down time, just under seven hours. Not a bad score for half a year. 

However, they were concerned with determining whether or not there were any “unconfirmed” downtime events. When checked, they found an additional 574 minutes of abnormal recordings. These could be explained as downtime that was less than 10 minutes, and generally ignored as true offline instances. The company could have also been performing scheduled maintenance which they would also ignore in their reporting. 

Even with including these new occurrences, Dropbox has an average uptime of 99.65 to 99.83%. These figures do take into account that Dropbox runs on Amazon S3 servers. 

With that being said, there have been some issues lately with Dropbox’s sync folder not properly adding files, causing people to think things are backed up when they are not. The cloud company has supposedly fixed the issue, but not before many customers lost precious folders that they cannot get back. That incident alone would make some users question the reliability of their software. 

Google Drive 

When it comes to uptime reliability, Google Drive can easily go toe-to-toe with Dropbox. While we didn’t find a study that was as extensive as the other survey, we did manage to find some information on how good Google is about staying online. 

In a study conducted by Pingdom, the group monitored Google Drive and some of their competitors over a 30 day period. During this time, the cloud storage company only experienced one minute of downtime. Because of the insignificant amount of time it was unavailable to clients, they awarded them with a 100% rating. (Dropbox was included in this study and they experienced 13 minutes of down time.) 

Again, however, uptime isn’t the only thing that is considered a reliability issue. Google Drive has also experienced unexplained loss of files from their servers. Many users have complained that files were removed from their accounts without their knowledge. Seems like Google has a memory issue. 

Winner: Dropbox, only because the lost files were due to syncing problems. Not the loss of currently residing data. 

Round Three: Speed 

Uploading, downloading, opening and sharing all need to happen as quickly as possible. When it comes to getting information, consumers want it fast. Speed is important, especially when trying to save a file to the cloud or trying to restore data from online. That’s why it was necessary to grade Dropbox and Google Drive on how speedy they were. 

Dropbox 

We tested how fast Dropbox uploaded files. In our test, we used a folder with 359 pictures and an overall file size of 42.2 MB. Despite being known for taking extra time to save an initial load of files, this trial only took approximately three minutes to transfer. We then took the same file and downloaded it to the desktop. The task was completed in a matter of seconds. 

In the past, consumers have complained the process does not allow them to see files as they were uploading and downloading. In fact, if the folder wasn’t completely saved, no part could be retrieved to a local drive. This has changed recently and all documents or pictures can be viewed as they are being transferred to and from the Dropbox folder. 

Google Drive 

When it comes to speed, Google is the proverbial turtle in the race. Slow and steady may win some prizes, but when it comes to saving information, it’s not a quality often desired. 

To keep the playing field even, we used the same exact file that we tested on Dropbox. File size was still 42.2 MB and there were still 359 pictures. However, when the transfer began, Google Drive indicated it was only uploading 356 files. After seven minutes of working, only three pictures had supposedly been saved. To be honest, we gave up staring at the screen at this point and canceled the transaction. 

We had saved other files in the past, so we tried downloading one of these files, again similar in size to the one we tested Dropbox with. Sadly, this process also took several minutes because Google had to determine if the data could be compressed into a file 2GB or smaller. Once the analysis was done, it still took several minutes to put the information into a .zip file and transfer it to our local drive. 

Winner: Dropbox. 

Round Four: Features 

Features play an important part in helping to determine which cloud company you should go with. Once all the other options are weighed, sometimes it’s the extra highlights that can make or break any decision. But who has the best options; is it Dropbox or Google Drive? 

Dropbox 

Dropbox’s personal accounts aren’t feature heavy. Which doesn’t mean there are no offerings, it is just a very basic program. This could actually be a selling point for many clients who want something that doesn’t have a lot of bells and whistles. 

Account size, while not necessarily considered one of these important features, should be taken into consideration here. Free service only gains you 2GB of storage space. Additional room can be purchased starting at $9.99 a month. 

Dropbox allows you to check files anywhere. Because files transfer quickly, they are accessible almost instantly. In addition, the program works with all devices– including: 

Windows 
Mac 
Linux 
iPhone 
iPad 
Blackberry 
Android 

Dropbox also allows you to share with and invite friends in a simple manner. A single click or two allows you to share or send links to any folder or file in your account. You can choose to edit files on a phone or other mobile devices. They also keep a one-month history and changes are easily undone. 

In addition, Dropbox has very widespread third-party integration. Consumers like the fact they can create files in some of the applications and upload them directly to their cloud storage account. 

Google Drive 

When it comes to features, Google Drive does seem to have a leg up on the competition. To begin with, you should notice the difference in free account size. This cloud storage platform offers a free 15 GB to users. Additional storage can be purchased if desired for as little as $1.99 a month. 

Other features include: 

Create documents, spreadsheets, and presentations 
Works with products such as Gmail and Google+ 
Search tools 
View over 30 file types including Adobe Illustrator and Photoshop 
Files are saved are saved for 30 days automatically 
Start a discussion 
Having the ability to create different types of documents allows simultaneous collaboration, an added plus for many consumers. It allows them to start tasks in their cloud drive and not on their local disks, which can save time when sharing information. 

Winner: Google Drive, based on the amount of features. 

Round Five: Security 

Security is probably the thing most people will look at when trying to decide where they should store information. You want to make sure that your documents and files are safe without having to worry about someone stealing the data. This has been an area where many cloud companies take a hit. So, who keeps your documents safer? 

Dropbox 

Dropbox guarantees that your files will be protected by AES-256 bit encryption. However, this hasn’t kept the service from being used against customers. In the past few months, the service has been the victim of several phishing scams. These vicious attacks tricked users into giving up their usernames and passwords by making them think someone has shared a file. What made it so bad was the fact the links would take them to a legitimate looking Dropbox site. 

Additionally, the service has been subject to a glitch which allowed private information to be searchable by a third-party. This problem was patched quickly, however many sensitive documents were leaked online before the issue was caught. 

Google Drive 

Like its counterpart, Google offers AES-256 bit encryption for their customers. Like the competition, this promise of security doesn’t keep Drive from having its share of problems. However, problems aren’t just about phishing schemes and other external factors. They are more internal. 

Google was one of the companies outed when Edward Snowden spread the word about NSA. Apparently, the search engine giant was caught over-reaching their terms of service. Instead of protecting their users, employees were able to access private files and disseminate them as they chose. 

The NSA is also accused of gaining access to Google Drive files. The intelligence agency claims they were only taking data from foreign countries. However, there is no way to guarantee that there was no American information taken during this time. 

Neither Google Drive nor Dropbox support local encryption of files. Both cloud storage providers encrypt data in transit and while saved on their servers. 

Winner: Dropbox only because their breaches were mainly external not internal security issues. 

Summary: 

Choosing a cloud storage provider is a personal decision. Some users like the fact that Google Drive allows the creation of files and simultaneous collaboration on documents. Others like the third-party integration Dropbox offers. 

While it was quite difficult to figure out who the clear winner is, we have to go with Dropbox. One of the tipping points being the security issues that Google has suffered. In addition, while they are equally reliable on their uptime and downtime, Dropbox lost less files that were already on their servers. 

How to Upload DVD movies to Dropbox and Google Drive? 

Both Dropbox and Google Drive focus on the saving and management of data. When you got the troubles of disc loss or damage or the space of physical hard disk is low, you can ripping DVDs to cloud lets you upload a personal DVD to Dropbox and Google Drive personal cloud media storage, enable you can share DVD Movies with your family members or access your movies at home or on the road. 

Almost all movies are encrypted with CSS copy protection. Decryption keys are stored in the normally inaccessible lead-in area of the disc. You’ll usually get an error if you try to copy the contents of an encrypted DVD to Dropbox and Google Drive and other Cloud Storage devices. However, if you have used a software player to play the movie it will have authenticated the disc in the drive, allowing you to copy without error, but the encryption keys will not be copied. If you try to play the copied VOB files, the decoder will request the keys from the DVD-ROM drive and will fail. You may get the message “Cannot play copy-protected files”. 

Now that it doesn’t work to directly copy DVDs to Dropbox and Google Drive. To turn a real-world DVD into a digital file that you can stream to the viewing platform of your choice, you have to rip it from the disc. As with ripping DVDs, you’ll copy the contents of a DVD to a Cloud-friendly format. In order for this to work, obviously, you must have access to a PC with a DVD drive. 

One quick caveat: Though the police won’t break your door down for ripping DVDs that you already own, the process does technically violate copyright law. Still, as long as you’re not sharing movies on BitTorrent or selling copies on the street, it qualifies as fair use – just as ripping CDs (which is technically legal) does. 

That said, you’ll need a DVD-ripping utility that can remove DVD protections and then rip DVDs to Dropbox and Google Drive support MP4, AVI, MOV, FLV, WMV etc. video files. 

But you’ll find that almost all commercial DVD discs failed to load with Handbrake. Now that Handbrake doesn’t work to directly copy DVDs to Cloud, using iFastime Video Converter Ultimate (Mac) is the best way, it circumvent most copy protection schemes and convert the DVD discs to the Cloud – the mobile – or home-theater-friendly format of your choice. 

The best DVD to Cloud converter offers powerful yet easy-to-use functions, excellent video/audio quality, and fast ripping speed. It is not only a professional yet easy-to-use DVD ripping application that helps you rip your DVD movies to whatever video or audio files. It is also your ultimate solution to convert DVD, Blu-ray, BD/DVD ISO, and any SD/HD/4K videos to Dropbox/ Google Drive friendly formats for smooth uplaoding. 

Upload videos to Dropbox: 

  1. DVD to Dropbox
  2. Blu-ray to Dropbox
  3. ISO to Dropbox
  4. H.265/HEVC Video to Dropbox
  5. YouTube to Dropbox
  6. iPhone/iPad/Android phone videos to DropBox


Upload videos to Google Drive: 

  1. DVDs to Google Drive
  2. ISO to Google Drive
  3. transfer and sync files between Dropbox, OneDrive, Google Drive

Free download and install
       

Other Download:
– Pavtube old official address: http://www.pavtube.cn/blu-ray-video-converter-ultimate/
– Cnet Download: http://download.cnet.com/Pavtube-Video-Converter-Ultimate/3000-2194_4-75938564.html

Have more questions about Dropbox vs Google Drive, please feel free to  contact us  >> or leave a message at  Facebook.

Compress movies to My Cloud Mirror (Gen 2) for streaming

Unlike public clouds, My Cloud Mirror personal cloud storage allows you to keep all your content in one safe place on your home network, so there’s no mystery about where your data is located. Plus, you get all the storage you need with no monthly fees. My Cloud Mirror personal cloud storage comes equipped with two hard drives and is set to Mirror Mode (RAID 1), so your irreplaceable content is stored on one drive and automatically duplicated onto the second drive. In the unlikely event that one drive fails, you can rest assured knowing your data is safe and sound on the other drive. You can Back up and organize all your family’s photos, videos and music in one secure place, and seamlessly stream them to all of your devices. 


When you have a large local movie collections likeBlu-ray, DVD , 4K/SD/HD, why not convert them into .MP4, so that you can store large local movie collection onto WD 4TB My Cloud Mirror (Gen 2) for better playing and sharing. If are you confusing about how to convert large local movie collection to WD 4TB My Cloud Mirror (Gen 2), just read below article and you will find an easy way. As a common cloud storage, WD 4TB My Cloud Mirror (Gen 2) can support a wide range of format like MP4, MOV, AVI, due to the reason of lacking BD/DVD drive, WD 4TB My Cloud Mirror (Gen 2) can not meet the special demands of put Blu-ray/DVD movie collection online. And the important one also includes the complicated formats/codecs. So to achieve this goal, an easy-to-use Video Converter is needed. 

According to many tests, Pavtube Video Converter Ultimate ( Mac will be a good choice to remove Blu-ray/DVD copy protection and change all your large local movies collection to WD 4TB My Cloud Mirror (Gen 2) with the best video quality in H.265, M3U8, MP4, MKV, AVI, MOV, etc. If you have many Blu-ray/DVD to rip, don’t worry, it can provide you with 6X time Blu-ray/DVD ripping speed with GPU acceleration on Windows by H.264 codec.

Plus, this powerful video converter also can convert DVD, Blu-ray, SD/HD/4K movies to various cloud storages like DropBox, Amazon Cloud Drive, Google Drive, Sky Drive, etc. 

Hot search: Blu-ray movies to iCloudDVD to Amazon Cloud DriveH.265/HEVC Video to DropboxDVD ISO to Google Drive 

Free download and install
    

Other Download:
– Pavtube old official address: http://www.pavtube.cn/blu-ray-video-converter-ultimate/
– Cnet Download: http://download.cnet.com/Pavtube-Video-Converter-Ultimate/3000-2194_4-75938564.html

How to Compress Large Local Movie Collection to WD 4TB My Cloud Mirror(2)? 

Step 1: Add source video 

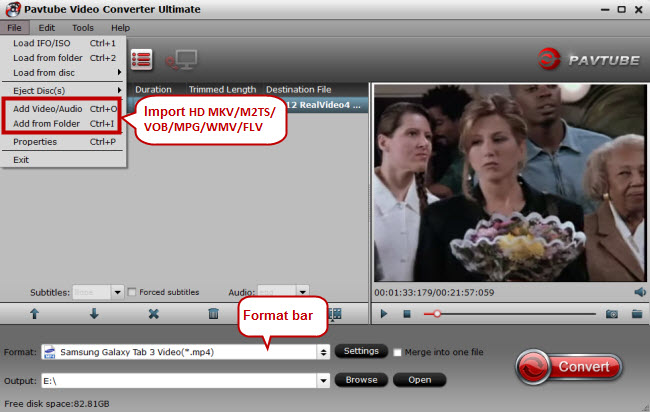
Open the program, click “File” menu, from its drop-down option, select “Add Video/Audio” or “Load Disc” to add your local movie collection to the program. 


Step 2: Choose output file format. 

From “Format” bar drop-down list, choose the formats that you want to output for later use. For compatibility consideration, it is idea for you to choose “Common Video” > “H.264 HD Video (*.mp4)” as output file format. 


Tips: You can go to “Settings” on the main interface and lower the bitrate. Comparing with “Size” spec, bitrate is the main reason to affect the video size. You can preview the size at the below chart. 

Notice: Bitrate also influences video quality. So don’t ignore video quality while pursuing the smaller size. 

Step 3: Start to compress movie collection 

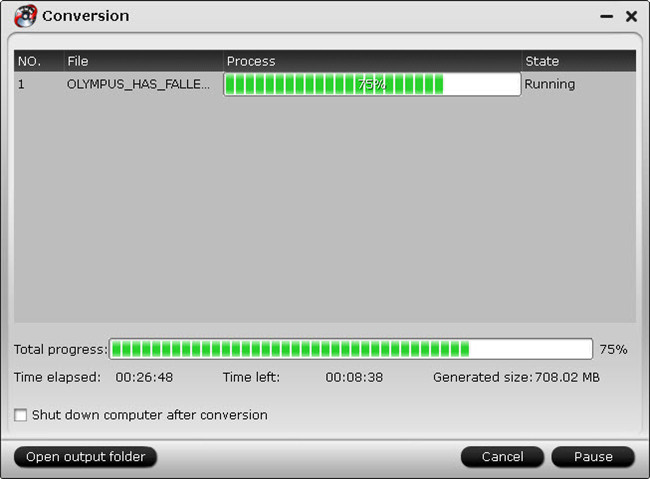
After all the settings is completed, hit right-bottom “start conversion” button to start to compress large local movie collection to WD 4TB My Cloud Mirror in MP4 format. Then you can locate the video in output folder. 

Now, you can move your compressed local movie collection to WD 4TB My Cloud Mirror. 

Have more questions about Dropbox vs Google Drive, please feel free to contact us>> or leave a message at  Facebook


More Topics: 


How to Upload movies and videos onto Amazon S3?

What Is Amazon S3? 

Amazon Simple Storage Service is storage for the Internet. It is designed to make web-scale computing easier for developers. 

Amazon S3 has a simple web services interface that you can use to store and retrieve any amount of data, at any time, from anywhere on the web. It gives any developer access to the same highly scalable, reliable, fast, inexpensive data storage infrastructure that Amazon uses to run its own global network of web sites. The service aims to maximize benefits of scale and to pass those benefits on to developers. 

This guide explains the core concepts of Amazon S3, such as buckets and objects, and how to work with these resources using the Amazon S3 application programming interface (API). 


How to Upload Objects into Amazon S3 quickly? 

When you upload a folder, Amazon S3 uploads all the files and subfolders from the specified folder to your bucket. It then assigns a key value that is a combination of the uploaded file name and the folder name. For example, if you upload a folder /images containing two files, sample1.jpg and sample2.jpg, Amazon S3 uploads the files and then assigns the corresponding object key names images/sample1.jpg, and images/sample2.jpg. Note that the key names include the folder name as a prefix. 

If you upload one or more files that are not in a folder, Amazon S3 uploads the files and assigns the file names as the key values for the objects created. 

This section explains how to use the AWS Management Console to upload one or more files or entire folders into Amazon S3. Amazon S3 stores all files in the specified bucket. 

To upload files and folders into Amazon S3 

1. Sign in to the AWS Management Console and open the Amazon S3 console at https://console.aws.amazon.com/s3/. 

2.In the buckets list, click the name of bucket where you want to upload an object and then click Upload. 


3. (Optional) In the Upload – Select Files wizard, if you want to upload an entire folder, click Enable Enhanced Uploader to install the necessary Java applet. After you choose the Enhanced Uploader, if the uploader is not ready to use after two minutes, you might need to change your platform (Windows or Mac) or browser configuration to get the Java applet to work. For instructions on changing your platform and browser configuration, see Using the Enhanced Uploader. 

You only need to do this step once per console session. After you click Enable Enhanced Uploader and then don’t want to use it, you can either refresh the browser, or close and reopen the browser to reset the uploader to the default. 

The Enhanced Uploader uses a Java applet. 

Note 
If you are behind a firewall, you will need to install your organization’s supported proxy client for the Java applet to work. 

4.Click Add Files. 


5.In the dialog box that appears, click the file or files that you want to upload, and then click Open. 

If you enabled the advanced uploader in step 2, you see a Java dialog box titled Select files and folders to upload, as shown. 
If not, you see the File Upload dialog box associated with your operating system. 

6. If you are ready to upload the object immediately, without providing further details about the object, click Start Upload. Otherwise, click Set Details. 

7.The Set Details dialog box gives you the options to set the storage class and choose whether to encrypt your object with server side encryption (SSE). 

Each object in Amazon S3 has a storage class associated with it. For information on Amazon S3 storage classes, see Storage Classes in the Amazon Simple Storage Service Developer Guide. 


When using server-side encryption (SSE) Amazon S3 encrypts your data at the object level as it writes it to disks in its data centers and decrypts it for you when you access it. For more information about using SSE in Amazon S3 go to Protecting Data Using Server-Side Encryption in the Amazon Simple Storage Service Developer Guide. 

A.If you select Use Server Side Encryption you have two SSE options; Use the Amazon S3 service master key or Use an AWS Key Management Service master key. 


Selecting the AWS Key Management Service option enables you to select the Master Key from a dropdown list with the following options: 

aws/s3 (default)— This is the default AWS KMS master key. 
Enter a key ARN— You can give external accounts the ability to use this object protected by a AWS KMS key. To do this, you’ll need to provide the Amazon Resource Name (ARN) for the external account in the ARN / ID field. Administrators of an external account that have usage permissions to an object protected by your AWS KMS key can further restrict access by creating a resource-level IAM policy. The other options in this dropdown list are all AWS KMS master keys that you have previously created. For more information about creating a AWS KMS key, go to Creating Keys in the AWS Key Management Service Developer Guide. 
Note 
Only keys in the same region as this bucket are available for encrypting objects in this bucket. 

B. When you’ve finished setting the object details, click Set Permissions. 

8.In the Set Permissions dialog box, do the following: 

Select (the default) or clear the Grant me full control check box. 
To grant read access to anonymous requests, select the Make everything public check box on the Upload – Set Permissions panel. By default, the check box is cleared, so no access is granted. 
Note 
By default, the owner of the upload has full control over all uploaded objects. 


9.To grant access to other users and groups for the objects you are uploading, click Add more permissions. 

In the grantee row that appears: 

For each permission you grant, an entry is made in the object’s Access Control List (ACL). For more information, see Using ACLs in the Amazon Simple Storage Service Developer Guide. 
If you click Add more permissions, a new Grantee row appears. Each Grantee row maps to a grant in the Access Control List (For more information, see Using ACLs) associated with the object. You can grant permission to a user or one of the predefined Amazon S3 groups. 

10. There are built-in groups that you can choose from the Grantee box: 

Everyone—Use this group to grant anonymous access. 
Authenticated Users—This group consists of any user that has an Amazon AWS Account. When you grant the Authenticated User group permission, any valid signed request can perform the appropriate action. The request can be signed by either an AWS Account or IAM User. 
Log Delivery—This group grants write access to your bucket when the bucket is used to store server access logs. For more information, see Managing Bucket Logging. 
Me—This group refers to your AWS root account, and not an IAM user. 

You can grant permission to an AWS account by entering the accounts canonical user ID or email address in the Grantee field. The email address must be the same one they used when signing up for an AWS account. You can grant a grantee any of the following permissions: 

Open/Download—Enables the account to access the object when they are logged in 
View Permissions—Can view the permissions associated with the object 
Edit Permissions—Can edit the permissions associated with the object 

11.To set metadata, click Set Metadata. 

In the Upload – Set Metadata do the following: 

If you want the Amazon S3 to infer the content type of the uploaded objects, select the Figure out content types automatically check box (default). 

To add custom metadata, click Add more metadata and enter the key-value pairs that you want. 

Amazon S3 object metadata is represented by a key-value pair. User metadata is stored with the object and returned when you download the object. Amazon S3 does not process custom metadata. Custom metadata can be as large as 2 KB, and both the keys and their values must conform to US-ASCII standards. Any metadata starting with prefix x-amz-meta- is treated as user-defined metadata. When you add user-defined metadata, select x-amz-meta- from the Key box and then append the metadata name to it. 


12.Click Start Upload. 

You can watch the progress of the upload from within the Transfers panel. 

Tip: To hide the Transfer panel, click None. To open it again, click Transfers. 

When objects upload successfully to Amazon S3, they appear in the Objects and Folders list. 

To view file content and properties 

Do either or both of the following: 

To view the file content, in the Objects and Folders list, double-click the object. 
To view object properties, in the Objects and Folders list, choose the object and then choose Properties. 


Note 

By default your Amazon S3 resources are private. Only the object owner can click the object link and view the object. If you share this link with others, for example add this link to your web pages, Amazon S3 will deny access. The clickable links on your webpage will work only if you make the object public (see Editing Object Permissions) or you use a pre-signed URL for the clickable link. For more information about pre-signed URL, go to Share an Object with Others in the Amazon Simple Storage Service Developer Guide. 

How to Upload DVD, Blu-ray, ISO to Amazon S3? 

Here we firstly take DVD as an example: 

Almost all movies are encrypted with CSS copy protection. Decryption keys are stored in the normally inaccessible lead-in area of the disc. You’ll usually get an error if you try to copy the contents of an encrypted DVD to Amazon S3s. However, if you have used a software player to play the movie it will have authenticated the disc in the drive, allowing you to copy without error, but the encryption keys will not be copied. If you try to play the copied VOB files, the decoder will request the keys from the DVD-ROM drive and will fail. You may get the message “Cannot play copy-protected files”. 

Now that it doesn’t work to directly copy DVDs to Amazon S3 and other Cloud Storage devices. To turn a real-world DVD into a digital file that you can stream to the viewing platform of your choice, you have to rip it from the disc. As with ripping DVDs, you’ll copy the contents of a DVD to a Cloud-friendly format. In order for this to work, obviously, you must have access to a PC with a DVD drive. 

One quick caveat: Though the police won’t break your door down for ripping DVDs that you already own, the process does technically violate copyright law. Still, as long as you’re not sharing movies on BitTorrent or selling copies on the street, it qualifies as fair use – just as ripping CDs (which is technically legal) does. 

That said, you’ll need a DVD-ripping utility that can remove DVD protections and then rip DVDs to Cloud supports MP4, AVI, MOV, FLV, WMV etc. video files. 

A free option works nearly as well: perennial favorite HandBrake. It, too, converts DVDs, though it needs a little help to remove copy protection. After installing the program, you have to obtain a file called libdvdcss-2.dll, which you can download from this public archive site. After downloading libdvdcss-2.dll, copy it to the folder where you installed HandBrake—usually C:\Program Files\Handbrake. Now you’re ready to migrate your movies into the all-digital future. Load up HandBrake, and insert one of your DVDs into the PC. Then click the Source button, and choose the location of your disc – on my PC it’s the D: drive. Be patient – it may take a few minutes for HandBrake to read the contents of the DVD. But you’ll find that almost all commercial DVD discs failed to load. 

Now that Handbrake doesn’t work to directly copy DVDs to Cloud, using  Pavtube Video Converter Ultimate Mac  is the best way, it circumvent most copy protection schemes and convert the DVD, Blu-ray, ISO and other formats like H.265, MOV, MKV, AVI, MP4, VOB, MTS, Tivo etc to the Cloud – the mobile – or home-theater-friendly format of your choice. 

The best DVD to Cloud converter offers powerful yet easy-to-use functions, excellent video/audio quality, and fast ripping speed. It is not only a professional yet easy-to-use DVD ripping application that helps you rip your DVD movies to whatever video or audio files. It is also your ultimate solution to rip any DVD regardless of DVD copy protections and region locks, including DVD CSS, region code, RCE, Sony ArccOS, UOPs, Disney X-project DRM to MP4, MOV, AVI, M4V, FLV, WMV, MPG, 3GP for storing in Cloud, or playing on all Windows media players, Apple iPhones, iPads, iPods, Apple TVs, Samsung Galaxy S7/S7 Edge, Surface tablets, BalckBerry, Sony PSP, PS3/PS4, Xbox 360/One, Wii, Roku, WD TV Live, etc. 

Read the best video converter for Cloud Storage device review to learn more. 

Hot search: DVD to Amazon Cloud DriveiPhone video to BoxISO files to iCloudBlu-ray Collection to Cloud StorageDVDs to Google Drive 


Free download and install

Other Download:
– Pavtube old official address: http://www.pavtube.cn/blu-ray-video-converter-ultimate/
– Cnet Download: http://download.cnet.com/Pavtube-Video-Converter-Ultimate/3000-2194_4-75938564.html

Have more questions about Dropbox vs Google Drive, please feel free to contact us>> or leave a message at Facebook

How to upload videos from iPhone to Box?

Box Inc. (formerly Box.net) is a cloud storage service & secure content sharing website which allows you to backup photos, videos & files to access them from anywhere in the world. Box has the ability to create new folders and upload photos and videos to your Box account directly from your iPhone. Box offers 10GB of free storage space. Those who need a larger storage space can upgrade to various available paid plans. Their plans start from 100GB for $5/user/month with 2GB file upload size limit and customized unlimited plan for $35/user/month with 5GB file upload size limit. Uploading videos from your iPhone to your Box account is very easy. In just few clicks you can easily save & backup videos to Box. 


Here are the step to upload videos from iPhone to Box: 

Go to https://www.box.com/ & sign in to your account. If you don’t have an account, then create one. 
If you have ‘Box app’ installed on your iPhone, launch it. Or else download it from the Apple App store. 
Tap “Box app” on your iPhone. 
Tap “All Files” located at bottom of the screen. 
Tap “+” icon from the action menu located at the bottom of the screen. 
Tap “Choose from library” option to upload the videos. 
Grant access to your photos & videos (To upload your photos & videos, Box will require access to your Media library). Tap “Ok” button. 
You will see “Camera Roll”, select the videos that you wish to upload. 
Tap “Upload” button to upload the selected videos to Box. 
All your videos now will be uploaded to Box. 

How to Upload DVD, Blu-ray, ISO, H.265, SD/HD/4K video files to Box? 

Firstly we take DVD as an example: 

Almost all movies are encrypted with CSS copy protection. Decryption keys are stored in the normally inaccessible lead-in area of the disc. You’ll usually get an error if you try to copy the contents of an encrypted DVD to Cloud Storage devices – Box. However, if you have used a software player to play the movie it will have authenticated the disc in the drive, allowing you to copy without error, but the encryption keys will not be copied. If you try to play the copied VOB files, the decoder will request the keys from the DVD-ROM drive and will fail. You may get the message “Cannot play copy-protected files”. 

Now that it doesn’t work to directly copy DVDs to Box. To turn a real-world DVD into a digital file that you can stream to the viewing platform of your choice, you have to rip it from the disc. As with ripping DVDs, you’ll copy the contents of a DVD to a Cloud-friendly format. In order for this to work, obviously, you must have access to a PC with a DVD drive. 

In addition to DVD and Blu-ray, some complicated formats and new codecs are not supported by Box. So in order to make you upload all video files to Box, you can use   Pavtube Video Converter Ultimate Mac  to convert your DVD, Blu-ray, ISO, SD/HD/4K MP4, MKV, H.265 etc to Box more friendly H.264 MP4 format for smooth uploading. This powerful video converter for cloud storage also can convert all videos and movies to iCloud, Dropbox, Google Drive, Amazon Cloud Drive, Sky Drive, Microsoft OneDrive etc formats for uploading without any problems. 

Hot search: upload videos from iPhone/iPad/Android phone to DropBoxDVD to SkydriveDVD ISO to Google Drive for DVD to Amazon Cloud DriveBlu-ray movies to iCloud 

Free download and install

Other Download:
– Pavtube old official address: http://www.pavtube.cn/blu-ray-video-converter-ultimate/
– Cnet Download: http://download.cnet.com/Pavtube-Video-Converter-Ultimate/3000-2194_4-75938564.html

Have more questions about Dropbox vs Google Drive, please feel free to contact us>> or leave a message at Facebook 

More Topics: 

How can I cast unsupported files from WD MyCloud to Chromecast?

“Hey guys.

Is there a way to transcode unsupported files (avi. for example) on my “WD my cloud 2tb” and stream to chromecast without using a pc? Official android WD My Cloud app suports only mp4 but there is a twonky media server installed on the device, why can’t it do the job?”


This is a question rom a reddit forum. Also want to cast unsupported files from WD MyCloud to Chromecast? Or Stream unsupported files from other places to Chromecast? Next we will have a talk with this topic.

Many people like to store their videos including various formats like AVI, 3GP, FLV, MP4 etc to WD MyCloud for convenience. And some people would like to cast files from WD MyCloud to Chromecast, but how to cast unsupported files from WD MyCloud to Chromecast? The smart way is converting the unsupported files from WD MyCloud to Chromecast supported formats for smooth streaming. Maybe you will ask how to convert? Any professional video converter for  Chromecast? 


Yes, you can have a try –  Pavtube Video Converter Ultimate Mac. With it, you can easily convert any unsupported files like H.265, AVI, MP4, MOV, VOB, 3GP, MKV, ISO and audios like AC3, FLAC etc from WD MyCloud to Chromecast supported MP4 format with only three steps. What’s more, it also can rip DVDBlu-ray discs to Chromecast formats for more usages. First free download the top video converter for Chromecast :

Free download and install

Other Download:
– Pavtube old official address: http://www.pavtube.cn/blu-ray-video-converter-ultimate/
– Cnet Download: http://download.cnet.com/Pavtube-Video-Converter-Ultimate/3000-2194_4-75938564.html


How to Convert unsupported files from WD MyCloud to Chromecast?

Step 1. Click “Add video” button to add your WD MyCloud video files to the program. Or directly drag the WD MyCloud video you want to convert to the left item bar. 


Step 2. Set right output format. Click “Format” bar, and select .mp4 from “Common video” or “HD video” to fit Chromecast.
  

Tips: The default settings may not satisfy you, and you can click the “Settings” button to change the settings by yourself including video resolution, bit rate, audio sample rate, audio channel etc. for full screen playback smoothly. Or keep no changes, which is also a good choice.

Step 3. Click the “Start conversion” button on the main interface and the software will start to convert videos to Chromecast friendly video formats immediately. When the conversion finishes, click “Open” to find the converted video files. Then you can effortless transfer the video files to Chromecast for playback on HD TV.

Tips: If you want to upload DVDBlu-ray, ISO, H.265, any SD/HD/4K videos to WD MyCloud, you can also use   Pavtube Video Converter Ultimate  to help you by converting them to WD MyCloud more friendly MP4 or AVI for smooth uploading and storing. 

7 essential Google Chromecast tips: get more from your streaming

The Chromecast has been a big success for Google: cheap, simple to use and a no-nonsense way of getting all your favourite content from your smartphone up on a big screen of your choice. The first one launched in July 2013 with its successor appearing in September 2015.


If you’ve got your hands on one of these second-generation Chromecasts (with the flexible HDMI cable and circular body) then we’re here to tell you how to get the best out of it: from turning on your TV automatically to changing the backdrop and everything in between.

1. Mirror your smartphone’s screen

If you’ve got a smartphone or tablet running Android 4.4.2 or later then you can cast the entire display over to your TV: install the official Chromecast app, then choose Cast screen/audio from the app’s menu. Choose your Chromecast from the list and you’re away.

It’s a handy way of beaming content to a bigger screen from apps that don’t support casting natively (though the lag is perhaps a little too much to play any intense games). What’s more, the mirrored screen adapts to show portrait or landscape orientation as required.

2. Open the Chromecast up to guests

Don’t keep your Chromecast all to yourself: by turning on the straightforward guest mode you can give your pals the opportunity to beam content over to the dongle without having to faff around with Wi-Fi passwords or any other complicated setup procedures.

From inside the Chromecast app on Android or iOS, tap the menu button (three dots) on the Chromecast in question and choose Guest Mode. A PIN is displayed to allow guests to connect – but for now they must be using Android devices for the feature to work.

3. Pick up special offers

Google likes to throw some attractive deals towards Chromecast users, which you can find from the Offers entry in the app menu: at the time of writing we can see offers for Now TV, Google Play Music and Spotify Premium, but they change around on a regular basis.

These offers aren’t just for new Chromecast owners but they do usually have an expiry date – make sure you check in on the deals page inside the app every now and again to make sure you’re not missing out on anything of note that Google has decided to give away.

4. Turn on your TV with your Chromecast

Thanks to a protocol known as HDMI-CEC (or High Definition Multimedia Interface Consumer Electronics Control) you can have your Chromecast automatically wake up your television set whenever you start beaming some video or other content over to it.

How this works depends on your TV set, so dig the manual out (or just browse through the menus): make sure it’s HDMI-CEC compatible (most new-ish sets are, though a different term is sometimes used) and make sure the feature is enabled in the TV settings.

5. Hook up an Ethernet adapter

The Chromecast works like a charm over Wi-Fi, but there may be rooms in your house where the wireless signal is a little patchy – and constant buffering can really get in the way of you enjoying a good old Netflix binge. Fortunately, there is an official solution.

Google now sells a Chromecast Ethernet adapter (£15), so if you can get an Ethernet cable to the room in question then you can enjoy a rock-solid web connection for your apps. The adapter sold by Google works with both the original and the newer Chromecast models.

6. Cast your local files

Streaming video or music from the web is all well and good, but what happens when you want to watch something stored on your computer’s hard drive? There are a number of apps that will work as the middleman between your media library and the HDMI dongle.

Perhaps the best option is Plex, though there are other alternatives such as LocalCast and AllCast. These apps all work in a similar way: a desktop client serves up the content from your computer hard drive, and a smartphone app sends it to a connected Chromecast.

7. Add your own photos as a screensaver

The default screensaver that appears when the Chromecast isn’t being used displays a collection of eye-catching pictures pulled from various places on the web – if you open up the Chromecast app you can find out more about the image currently on screen.

To add your own images, tap Edit Backdrop from the Devices tab in the Chromecast app, then make your choices. Your Chromecast can pull in pictures from Google Photos, Facebook, Flickr, and various other sources, and the slideshow speed can be adjusted too.

Have more questions about Dropbox vs Google Drive, please feel free to  contact us>> or leave a message at  Facebook 

More Topics:

Xbox One Cloud VS PS4 Cloud

Over the last few days, I’ve been trying to gather more information on Microsoft’s Cloud that they keep bringing up in discussions over the Xbox One. “Cloud Cloud Cloud – Power of the Cloud Rawrrrrr”.  The gaming community has poked fun and I’ve heard many people say that the cloud is nothing but a buzzword and a PR gimmick.

But is it?

If Sony and Microsoft both have cloud technology – why is Microsoft making such a big deal about theirs?

Since at least 2009, Microsoft has been pouring billions of dollars into building their cloud infrastructure. They’ve been throwing up data centers up left and right and taking aim at Amazon who currently is #1 as far as cloud providers. Just in the year 2011 – Microsoft spent $8.6 Billion in research and development on the cloud.  And they aren’t planning on slowing down anytime soon. Earlier this month, Microsoft reported that they will be opening 25 new data centers in 2013 in multiple locations around the globe. They also just announced coverage for Japan, China, and Austraila. And a few hours ago, they announced a $700 million investment into their datacenter in Iowa to increase their ability with the cloud.


Why does this matter to gamer’s?

Because Xbox Live will be running from Microsoft’s Azure Cloud platform. And it will also be powering the games.

Here is an excerpt from a Wired Article

Perhaps most intriguing, however, is that Xbox One gives game developers the ability to access Microsoft’s Azure cloud computing platform. That leads to a few obvious and immediate applications; stable, dedicated servers for every multiplayer game rather than the notoriously fragile practice of hosting matches on one participant’s console.

Does this mean that every single game will features dedicated servers?? REALLY??

So I reached out to the author of the Wired article, Peter Rubin and asked him how this would work. Do developers have to rent out the servers? Do they just have access to them etc. Here is his reply.

“Microsoft is subsidizing cloud utility for developers—essentially, it will cost developers nothing to build on/access the Azure platform. So while I don’t believe it’s mandatory for a title to offer dedicated servers, there wouldn’t be any investment on the dev side to do so, which means…  Yup, dedicated servers for everything. (Certainly for marquee MP experiences like BF3/4, COD, Titanfall, Destiny, etc). This is a huge part of why “persistent online world” was such a buzzphrase at E3 this year.”

There have also been a few interesting comments from the team behind Titanfall, EA’s Respawn. Here are some excerpts from an article that an Engineer wrote titled, “Let’s talk about the Xbox Live Cloud”

Okay, so player-hosted servers have a lot of downsides. So why do so many games use them? They have one really big upside – it doesn’t cost money to run the servers! Running hundreds of thousands of servers can be extremely expensive. EXTREMELY expensive. Like “oh my god we can’t afford that” expensive. So your player experience gets compromised to save (large amounts of) money.

But it costs a LOT of money.

This is something I have worked on for years now, since coming to Respawn. A developer like Respawn doesn’t have the kind of weight to get a huge price cut from places like Amazon or Rackspace. And we don’t have the manpower to manage literally hundreds-of-thousands of servers ourselves. We want to focus on making awesome games, not on becoming giant worldwide server hosting providers. The more time I can spend on making our actual game better, the more our players benefit.

I personally talked to both Microsoft and Sony and explained that we need to find a way to have potentially hundreds-of-thousands of dedicated servers at a price point that you can’t get right now. Microsoft realized that player-hosted servers are actually holding back online gaming and that this is something that they could help solve, and ran full-speed with this idea.

The Xbox group came back to us with a way for us to run all of these Titanfall dedicated servers and that lets us push games with more server CPU and higher bandwidth, which lets us have a bigger world, more physics, lots of AI, and potentially a lot more than that!

What is the Cloud?

Amazon has a cloud that powers websites. Sony has a cloud that streams game video so you can play a game that you don’t have on your machine. Now Xbox Live has a cloud that somehow powers games. Cloud doesn’t seem to actually mean anything anymore, or it has so many meanings that it’s useless as a marketing word.

Let me explain this simply: when companies talk about their cloud, all they are saying is that they have a huge amount of servers ready to run whatever you need them to run. That’s all.
So what is this Xbox Live Cloud stuff then?

Microsoft has a cloud service called Azure (it’s a real thing – you can go on their website right now and pay for servers and use them to run whatever you want). Microsoft realized that they could use that technology to solve our problem.

So they built this powerful system to let us create all sorts of tasks that they will run for us, and it can scale up and down automatically as players come and go. We can upload new programs for them to run and they handle the deployment for us. And they’ll host our game servers for other platforms, too! Titanfall uses the Xbox Live Cloud to run dedicated servers for PC, Xbox One, and Xbox 360.

But it’s not just for dedicated servers – Microsoft thought about our problem in a bigger way. Developers aren’t going to just want dedicated servers – they’ll have all kinds of features that need a server to do some kind of work to make games better. Look at Forza 5, which studies your driving style in order to create custom AI that behaves like you do. That’s totally different from what Titanfall uses it for, and it’s really cool! So it’s not accurate to say that the Xbox Live Cloud is simply a system for running dedicated servers – it can do a lot more than that.

How is this different from other dedicated servers?

With the Xbox Live Cloud, we don’t have to worry about estimating how many servers we’ll need on launch day. We don’t have to find ISPs all over the globe and rent servers from each one. We don’t have to maintain the servers or copy new builds to every server. That lets us focus on things that make our game more fun. And best yet, Microsoft has datacenters all over the world, so everyone playing our game should have a consistent, low latency connection to their local datacenter.

Most importantly to us, Microsoft priced it so that it’s far more affordable than other hosting options – their goal here is to get more awesome games, not to nickel-and-dime developers. So because of this, dedicated servers are much more of a realistic option for developers who don’t want to make compromises on their player experience, and it opens up a lot more things that we can do in an online game.

This is a really big deal, and it can make online games better. This is something that we are really excited about. The Xbox Live Cloud lets us to do things in Titanfall that no player-hosted multiplayer game can do. That has allowed us to push the boundaries in online multiplayer and that’s awesome. We want to try new ideas and let the player do things they’ve never been able to do before! Over time, I expect that we’ll be using these servers to do a lot more than just dedicated servers. This is something that’s going to let us drive all sorts of new ideas in online games for years to come.

And then there was this Interview with Giantbomb and the Titanfall team

If Microsoft’s Cloud is nothing more than a PR Gimmick. Then it has to be one of the largest gimmicks in recorded history. Adding up to a total that goes well beyond $10 Billion so far. It sounds as if this could actually be a system that could provide a lot of flexibility for the future of the Xbox One. And if dedicated servers are available to all developers. That is probably going to be a nice selling point for both game developers and players.

And Developers are already talking about the power of the cloud. One of the year’s most anticipated titles, Ubisoft’s Watch Dogs, the developer just told NowGamer that the Xbox One city will be more dynamic than any other version of the game.

“There are quite a few, obviously there are the graphics but you don’t need me to tell you, but there’s also everything related to the dynamism of the city,” continued Guay. “For example, we’re able to simulate the water in full 3D, if you go on a boat the waves that form will affect other boats. We’re also able to spend more time giving brains to the other people on the streets so that they can basically be smarter, andthere can be more of them. It’s what I call dynamism; basically, the way the city reacts to you, we are able to push further on the Xbox One.”

Tips: Uploading video files to Xbox One Cloud and PS4 Cloud 

If you have recorded some videos by camera or downloaded movies from websites, you can upload them to Xbox One Cloud and PS4 Cloud. But DVD, Blu-ray, and some complicated formats codecs and 4K resolution videos are not supported by Xbox One Cloud and PS4 Cloud. So you can use   Pavtube Video Converter Ultimate Mac to convert your incompatible videos to Xbox One Cloud and PS4 Cloud compatible formats qucikly. Besides, it also can convert DVD, Blu-ray, ISO, SD/HD/4K videos to other cloud storages like iCloud, DropBox, Amazon Cloud Drive, OneDrive etc. 


Have more questions about Dropbox vs Google Drive, please feel free to contact us>> or leave a message at Facebook 

Related Topics:

How to Upload videos from iPhone/iPad/Android phone to DropBox?

Part 1. How to backup iPhone videos to DropBox?

There are different ways to backup videos to Dropbox. The Dropbox mobile app makes it easy to backup your iPhone videos. Once videos are uploaded, they will sync with Dropbox on your computer and all your other devices.

Here is a quick guide on how to backup iPhone videos to Dropbox

1. Download the Dropbox app first and create an account if you don’t already have one.

2. Launch the Dropbox app

3. In the Dropbox app, go to Settings > Camera Upload > On.

4. Select whether you want Dropbox to only upload videos & photos while on Wi-Fi (recommended) or while or Wi-Fi+cellular (not recommended if you have a capped data plan).

5. Tap ‘Enable’. Dropbox will ask permission to access your videos & photos. Say ‘OK’. The app will then start uploading all your Videos & photos to DropBox cloud storage.

6. It also allows you to manually upload one by one instead of uploading all at once.

7. So, if you wish to upload just some videos, manually select them and click ‘Upload’.


Part 2. How to upload videos from Android phone to DropBox?

DropBox is the premier photo backup, sync and sharing service provided by DropBox Inc. DropBox offers 2GB of free storage space, which is pretty useful for storing photos, videos and documents. You can upgrade your free 2GB account to a paid monthly subscription plan for more storage space. DropBox offers 100GB space for $9.99/month and 500GB space for $49.99/month.

There are 2 ways upload videos from Android phone to DropBox:

A: Upload videos from Android phone to DropBox via DropBox App:

1. Go to https://www.dropbox.com/ & sign in to your account. If you don’t have an account, then create one.

2. If you have ‘DropBox app’ installed on your Android phone, launch it. Or else download it from the App store.

3. Tap “DropBox app” on your Android phone.

4. Tap “Photos or videos” button from the menu.

5. Select the videos that you want to upload from photo and video gallery.

6. Tap “Upload” button to upload the selected videos to DropBox.

B) Upload videos from Android phone to DropBox via share button on your phone:

1. Go to your phone “Gallery” and select video(s) that you wish to upload.

2. Once selected, click share button and you will see a set of options to upload videos.

3. From the options, tap “DropBox” icon. Your video upload process will start.

4. The time taken to upload videos depends on your internet connection speed & the amount of videos you upload.

5. All your videos will now be uploaded to DropBox.

Part 3. How to Upload Files From Your iPad on Dropbox?

While Dropbox is a convenient application that lets you access your files from any device or computer that has Internet access, the iPad version of the Dropbox app doesn’t include the ability to automatically share your photos, videos and other files to your Dropbox account from the “Share” menu. However, you can upload files from your iPad in one of two ways: you can upload them manually to your Dropbox folders or enable automatic uploads from your iPad’s camera.

Manual Upload

Step 1. Launch the Dropbox app on your iPad, and sign in to your Dropbox account if prompted.

Step 2. Navigate to the folder on your Dropbox account to which you’d like to upload a file. If you’d like to create a new folder for your files, tap the plus sign at the top of the left column and then tap “Create Folder.” Enter the name of the folder, and tap the “Create” button to create your new folder.

Step 3. Tap the plus sign at the top of the left column, and then tap the “Upload Here” button.

Step 4. Tap all of the files you’d like to upload to your Dropbox, as you can upload multiple files at once. A blue check appears in the upper right corner of the files you’ve selected.

Step 5. Tap the “Upload” button to upload the files to your Dropbox folder.

Automatic Upload with Camera Upload

Step 1. Launch Dropbox on your iPad, and log in to your Dropbox account if prompted.

Step 2. Tap the gear in the lower right corner of the left column to visit your Dropbox settings.

Step 3. Tap the “Camera Upload” tab, and then switch the button from “Off” to “On.” Your photos and videos automatically upload to Dropbox from your iPad’s storage.

Solve can’t upload iPhone/iPad/Android phone to DropBox

Sometimes you can’t upload the videos from iPhone/iPad/Android phone to DropBox due to the complicated formats and codecs. In order to make you have no troubles in uploading iPhone/iPad/Android phone to DropBox, you can use  Pavtube Video Converter Ultimate Macto help you convert iPhone/iPad/Android phone videos to DropBox friendly formats for smooth uploading. Besides, it also has the ability to convert DVDBlu-rayISOH.265 etc to DropBox formats with super fast speed. 

Free download and install
 

Other Download:
– Pavtube old official address: http://www.pavtube.cn/blu-ray-video-converter-ultimate/
– Cnet Download: http://download.cnet.com/Pavtube-Video-Converter-Ultimate/3000-2194_4-75938564.htm

Have more questions about Dropbox vs Google Drive, please feel free to contact us>> or leave a message at Facebook


More Topics:

5 Best NAS Backups for 2016

NAS, or network attached storage, is primarily used as a way of keeping files secure in a personal Cloud – but if you want to add an extra layer of security to the proceedings, then some online backup providers let you upload data from a network storage device as well as from your PC. Others also allow you to sync files between your NAS and Cloud storage providers such as Dropbox, Google Drive, and Box – so that your updates stay consistent across platforms. For the uninitiated, we’ve come up with a handy guide to getting started with NAS – or keep reading for our rundown of the 5 best NAS backups for 2016.

The list below is primarily concerned with backup providers that have native apps for devices by NAS giants QNAP, Synology and Netgear, but if you’re more interested in the DIY approach, scroll down to find out which other services let you run NAS backups in different ways.  

Best Backups for NAS Summary

ElephantDrive makes it to the top of the list because, simply, it’s all about NAS. As well as offering a standard range of backup services including sync and share options, automatic backups, and archiving, ElephantDrive has successfully cornered the market in NAS backups. As a result, you’ll find native ElephantDrive apps available from not just QNAP, Netgear, and Synology, but also Western Digital, Drobo, D-Link Vault, Thecus, and Seagate – and extensive support on offer for all of them.

This makes ElephantDrive one of the most easy-to-use providers when it comes to NAS backups, as it’s pretty much all done for you and there are plenty of experts on hand to help you out with any problems. It’s also compatible with many devices suitable for personal (rather than business) users, so is a great choice if you just want to keep your files extra safe at home.

ElephantDrive offers six different subscriptions, starting at $7 per month for 100GB of storage, and there’s a free trial available too if you’d like to start by taking it for a spin.

Top 1. ElephantDrive

ElephantDrive makes it to the top of the list because, simply, it’s all about NAS. As well as offering a standard range of backup services including sync and share options, automatic backups, and archiving, ElephantDrive has successfully cornered the market in NAS backups. As a result, you’ll find native ElephantDrive apps available from not just QNAP, Netgear, and Synology, but also Western Digital, Drobo, D-Link Vault, Thecus, and Seagate – and extensive support on offer for all of them.

This makes ElephantDrive one of the most easy-to-use providers when it comes to NAS backups, as it’s pretty much all done for you and there are plenty of experts on hand to help you out with any problems. It’s also compatible with many devices suitable for personal (rather than business) users, so is a great choice if you just want to keep your files extra safe at home.

ElephantDrive offers six different subscriptions, starting at $7 per month for 100GB of storage, and there’s a free trial available too if you’d like to start by taking it for a spin.

Top 2. IDrive

As well as being one of our favourite all-round backup services, IDrive is also pretty good for NAS users. Amongst its long list of features, it counts not just the ability to backup from mapped drives, but also apps for Synology, QNAP and Netgear ReadyNAS. IDrive’s new and improved customer support system is also on hand to help out with any NAS-related issues, and there are some introductory guides in their FAQ to help you get set up.

With IDrive, 1TB of online storage space comes at a generous $3.71 per month (paid in a yearly lump sum) – although be warned that this will increase to $4.95 per month once you reach your second year. You’ll also get flexible backup and restore options for your money, as well as sync and share features, and the ability to backup from an unlimited number of devices. There’s even a 5GB free account can give you a taste of what’s on offer.

Top 3. Dropbox

Dropbox works in a slightly different way to the backup providers discussed so far. That’s because, rather than being a traditional online backup service that focuses on storing your data for retrieval in emergencies, it’s a Cloud storage provider, so much more concerned with file sharing and remote access.

So how does this work with NAS? Rather than backing up files from network storage devices like IDrive and ElephantDrive, Dropbox comes as part of more general Cloud Sync applications that allow you to sync the files saved on your NAS with multiple Cloud storage services. In this respect, you end up with something like a Cloud storage manager – a centralised service that keeps all of your files organised and up to date.

Top 4. CrashPlan

One for the more adventurous amongst you! CrashPlan is an excellent backup service, offering unlimited storage space and top-notch security for a very reasonable price. While most of the software is pleasantly easy to use, however, its NAS options are a bit of a mixed bag.

QNAP users have it easiest, with a dedicated app on offer that’s simple to download and run, and Mac and Linux users shouldn’t encounter too many problems either, as they can easily process backups from mounted drives.

Surprisingly, it’s Windows users that really suffer, as a limitation built into the Windows OS means that CrashPlan isn’t able to support backups from mounted drives. However, they do offer a useful list of unofficial mounting methods for anyone willing to put in the time and effort – and as one of the best and most affordable backup services around, we think that it’s time well spent.

Top 5. HiDrive

With both a Synology app and the option to store files from mounted drives, HiDrive is a solid choice for NAS backups, although their software can be a little confusing in places. Luckily, a great forum full of guides and troubleshooting suggestions should help you to overcome any hurdles along the way, and you’ll get some great extra features for your money too.

HiDrive is likely to appeal most to users without very large quantities of files to backup online, as storage space is fairly limited, with 100GB available for $6.30 per month, and 500GB for $13.60. However, if you’re just looking to keep your data extra secure, then it’s a great choice, with other benefits including built-in FTP access, an image sharing gallery, and email uploads.

Business & enterprise users

NAS is a very popular storage solution for small businesses as well as home users, so you’ll find QNAP, Synology and Netgear offering plenty of apps for NAS backups from more heavy-duty storage providers too.

Microsoft Azure, Amazon Glacier, Google Cloud Storage, and Symform all work with NAS providers – making it easier for organisations to keep their data as safe as possible both locally and online.

DIY NAS backups

If you’re more interested in creating your own NAS than shelling out for a pre-made box, then you won’t have access to apps – but there are still plenty of ways to store your data online. Providers including SOS, Acronis, MyPCBackup, JustCloud, BackupGenie, and ZipCloud all let you backup from a NAS device simply by selecting it as a file location, although all members of the MyPCBackup canon (aka. MyPCBackup, JustCloud, BackupGenie and ZipCloud) will charge you $99.95 per year for the privilege.

In addition to this, you can also run backups of network drives using SpiderOak, Memopal, and LiveDrive – all of which require you to map the drive before it can be recognised. Fortunately, this is a simple process, and our walkthrough guide can help you get set up in just a matter of minutes!

NAS backups conclusion

NAS backups are a great way of keeping your network’s data safe not just in a personal cloud, but also online. Whether you’d like a simple app, or want to try your hand at setting up a NAS and backing it up solo, there’s an online backup provider out there for you – and our list should give you an excellent place to start!

Solve Can’t Put videos and movies to NAS

You can store your movies to various NAS for playing via TV, portable device etc. But not all movies are imported onto NAS like DVD, Blu-ray, ISO, and some complicated formats. So if you want to have no problems in storing movies to NAS, you can choose one professional video converter –  Pavtube Video Converter Ultimate Mac)。 With it, you can convert any SD/HD/4K movies and DVD/Blu-ray/ISO to NAS supported formats on your computer for your smooth streaming. Besides, it also provide output format for various device like iPhone, iPad, Apple TV,Samsung/LG/Sony/Panasonic TV, PS3, PS4, Xbox 360, Xbox One and some NLEs including FCP, iMovie, Premiere Pro, Windows Movie Maker, Sony Movie Studio 13, etc. 


Other Download:
– Pavtube old official address: http://www.pavtube.cn/blu-ray-video-converter-ultimate/
– Cnet Download: http://download.cnet.com/Pavtube-Video-Converter-Ultimate/3000-2194_4-75938564.htm

Have more questions about Dropbox vs Google Drive, please feel free to contact us>> or leave a message at Facebook .

More Topics:

Can’t Play videos on Microsoft OneDrive?

OneDrive indeed brings us many conveniences for storing files photos and videos together with a capacity of 15GB storage, as well as specifies a brief way to quick access what you have stored via OneDrive app for iOS, Android, Windows Phone and Xbox. Next we will share you how to upload iPhone/Android/computer videos to OneDrive quickly:

iPhone:

1. First go to the Apple App store and download the Microsoft OneDrive app.

2. If you didn’t already know, you have a Microsoft 365 account with your student login. The email will be your username with ‘@stanly.edu’ at the end of it. For example if my username was jsmith1234 then my OneDrive email would be jsmith1234@stanly.edu. If prompted, tap ‘OneDrive for Business.’


3. Once signed in, tap the menu button in the top right corner of the app.


4. Next tap ‘Add Items.’


5. Next either tap, ‘Take a Photo or Video,’ or ‘Choose Existing.’


6. Next find and select the video on your iPhone and then click ‘Upload.’


7. OneDrive will then show your file uploading. It will let you know as soon as your file has been uploaded. This may take some time depending on the length of the video and your connection speed.


8. After your video has been uploaded you will then be able to access it through the OneDrive site on your computer.


Android:

1.First navigate to the Google Play store and search for and download Microsoft OneDrive.

2.Sign in using your Stanly Community College username and password.

3.Select ‘Sign into OneDrive for Business’ and use your Stanly Community College username and password once again.

4.To upload files from your phone or tablet to your SCC OneDrive account, select ‘files’ and then click on the Orange ‘+’ in the bottom right corner.

5.To upload files from your phone or tablet to your SCC OneDrive account, select ‘files’ and then click on the Orange ‘+’ in the bottom right corner.

PC & Mac:

1. First go to your computer and go to onedrive.live.com and login. If you didn’t already know, you have a Microsoft 365 account with your student login. The email will be your username with ‘@stanly.edu’ at the end of it. For example if my username was jsmith1234 then my OneDrive email would be jsmith1234@stanly.edu. Once you type your email click ‘Next.’

2. If prompted, click ‘OneDrive for Business.’

3. If you are using your school login, you will be directed to a Stanly Community College login screen where you will enter your password. Then just click ‘Sign in.’

4. Once logged in click ‘Upload.’

5. Next just select the video from your computer and click ‘Open.’

6. Next your video will start to upload. The progress will be shown at the top of the page. (Note: It may take some time depending on how long your video is and the speed of your internet connection. You may have to start the upload then come back to it later).

7. Once it has finished uploading your video will show up within the list of the other items in your OneDrive account.

Everything seemingly goes well, but OneDrive video playback error involves users who would like to view video on OneDrive in troubles. How to solve the problem of ‘cannot play video on OneDrive’? Though OneDrive enables us to upload videos in any formats, it only supports playback of a few formats. MP4, MOV and M4V videos are proved to be playable video formats on OneDrive in most web browsers. However, the DRM-protected iTunes M4V video cannot be played directly with any browser. Obviously, we cannot play video on OneDrive if the video file is excluded from the three file types.

How to Solve ‘Cannot Play Video on OneDrive’ issue?

Suggestions probably tells that the perfect plan to play video on OneDrive is to download video from this cloud storage and play with a video player. It is quite helpless for users who want to watch video on OneDrive directly without space occupied especially on portable devices. Thus, the smart way to solve OneDrive video playback error is to convert incompatible videos, for example DVDBlu-ray, ISO, H.265, 1080P HD MKV, M2TS/MTS, HEVC, AVI, WMV, FLV, to MP4 and then upload to OneDrive with above methods for an undisturbed playback on PC/Mac and various devices.

 Pavtube Video Converter Ultimate Mac is the top-rated video converter capable of converting any video formats to MP4 for OneDrive retaining vivid images and nearly lossless audio quality at a high speed. Next, let’s go to convert videos to MP4 for fixing the ‘cannot play video on OneDrive’ error.
       

Other Download:
– Pavtube old official address: http://www.pavtube.cn/blu-ray-video-converter-ultimate/
– Cnet Download: http://download.cnet.com/Pavtube-Video-Converter-Ultimate/3000-2194_4-75938564.htm

Save DVD to HC500 External Hard Drive for use on TV

HC500 external hard drive is made of sturdy metal material. In addition to being a portable storage device, it also supports smart TV programmable recording functions. The HC500 comes with user-friendly personal cloud backup software. Access data on your hard disk anytime, anywhere – the ultimate in convenience for personal storage applications. Of course, you can save your DVDs to HC500 external hard drive for personal storage or for playing on TV. This article show you some tricks about uploading DVD to HC500 External Hard Drive for playing via TV with one easy way, just keep reading.


Ripping DVD to an external hard drive, hard disk drive (HDD) or thumb drive is extremely easy if you have downloaded and installed Pavtube Video Converter Ultimate Mac . Still have no this ripper? Download it Now.

You may be confused about how to choose an output format since there is no direct profile(s) named “Hard Drive” . Indeed, you have a great many choices only depending on what your purpose of using the output video file.

1. Convert DVD to PC/Mac General Video: diversified choices, different video formats for different purposes and acceptances, convert DVD to AVIMP4, MOV, WMV, MPEG, etc with smaller file size

2. Rip DVD to Device/Web Video: convert DVD to mobile/web videos, make DVDs playable on the Apple/Android/Microsoft/Sony/other portable devices in mobile way, or compatible with YouTube, Facebook, general webs, etc.

We recommend MP4 as the output format when ripping DVD to HC500 External Hard Drive and other external drive/thumb drive with comparatively well preserved video quality, small file size and wide uses


Other Download:
– Pavtube old official address: http://www.pavtube.cn/blu-ray-video-converter-ultimate/


How to Add DVD to HC500 External Hard Drive for use on TV?

Step 1. Insert the DVD disc into your computer’s DVD drive and run the best DVD ripper. You can click the “Load file(s)” button to load the DVD files to the program. DVD ISO/IFO, VIDEO_TS folder are supported also.
  

Step 2. Click “Format” bar, and select .mp4 from “Common video” or “HD video”. Or select the formats from ” TVS”.


Tips: The default settings may not satisfy you, and you can click the “Settings” button to change the settings by yourself including video resolution, bit rate, audio sample rate, audio channel etc. for full screen playback smoothly. Or keep no changes, which is also a good choice.

Step 3. Click the ” conversion” button on the main interface and the software will start to convert DVD to MP4 immediately. When the conversion finishes, click “Open” to find the converted video files. Then you can effortless transfer the video files to HC500 External Hard Drive for playback on TV perfectly.

Useful Tips:

Supports TV Recording Functions

The emerging popularity of smart TVs and high-definition video bring features that help you address the problems of a modern busy life. When you have no time to watch your favorite TV programs when they play, simply use your ADATA HC500 external hard drive with supported smart TVs to record hours of programs to enjoy later.

Personal Cloud Storage

Set up your Choice HC500 Hard Drive as a personal data cloud! Use NTI MiST personal cloud software for easy access to your external hard drive from any location. MiST is available for Windows and Mac OS PCs, and Android and iOS mobile devices. 

Easily Set Up Your Data Backup

The HC500 comes with Windows-compatible NTI Backup Now EZ, a convenient, intuitive software package that allows you fingertip backup and restoration of your important data. Combine this with MiST Personal Cloud Storage to easily perform cloud backups.

G Shock Sensor Protection

G Shock Sensor Protection helps protect your data. If your HC500 suffers a severe shock from being struck, G Shock Sensor Protection automatically starts up and displays a flashing red light. When the shock has passed, a solid or flashing blue light displays indicating normal operation has resumed.

Rugged Metal Finish

The HC500 2.5″ external hard drive features an attractive sandblasted metallic finish. Whether next to your TV or PC, its compact design takes up little desk space. When you’re on the go, a special side-panel groove makes your HC500 easy to pick up and carry away.

Super-Speed USB 3.0

With Super-speed USB 3.0, you can connect to your smart TV and enjoy simultaneous recording and playing of your favorite shows and movies. Backwards compatibility with USB 2.0 ensures connectivity with most video capable TVs and consumer electronics devices.

Have more questions about Dropbox vs Google Drive, please feel free to contact us>> or leave a message at Facebook

More Topics:
Older posts Newer posts

© 2017 Cloud Storage

Theme by Anders NorenUp ↑