iCloud connects you and your Apple devices in amazing ways. It makes sure you always have the latest versions of your important information—like documents, photos, notes, and contacts—on whatever device you’re using. It lets you easily share photos, calendars, locations, and more with friends and family. It even helps you find your device if you lose it.
So if you want to transfer movies to iCloud on computer, you might wanna use iCloud to do the work. But iCloud does not support all videos formats, for some Incompatible with iCloud movies, you need to convert them to iCloud supported movies. To do this task, just let Pavtube Video Converter Ultimate ( Mac) help you.
This is a professional video converter, which can convert any movies like DVD, Blu-ray, H.265, etc to iCloud more friendly .mp4 videos on Mac or Windows. The entire conversion is safe, clean, and quick. Recently we have a Christmas special offer, you can read to get the nice Christmas gift. Next i will show you how to transfer/upload movies to iCloud on Mac with the excellentg iFastime Video Converter Ultimate for Mac.
Free download the best movies to iCloud converter for Mac:


Other Download:
– Pavtube old official address: http://www.pavtube.cn/blu-ray-video-converter-ultimate/
Full guides on transfer/upload movies to iCloud on Mac (Mac OS X 10.11 El Capitan included)
Step 1. Click “Add video” button to choose video files from your hard drive for converting. Or directly drag the movies you want to convert to the left item bar. If yours are DVD/Blu-ray movies, just insert the DVD disc into your computer’s DVD drive and run DVD Ripper for Google Pixel C. You can click the “Load file(s)” button to load the Christmas DVD files to the program.
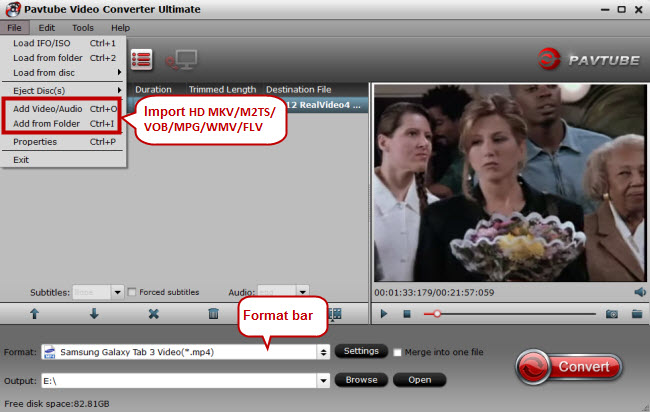
Step 2. Set right output format. Click “Format” bar, and select .mp4 from “Common video” or “HD video” to fit iCloud.

The default settings may not satisfy you, and you can click the “Settings” button to change the settings by yourself including video resolution, bit rate, audio sample rate, audio channel etc. for full screen playback smoothly. Or keep no changes, which is also a good choice.
Step 3. Click the “Start conversion” button on the main interface and the software will start to convert movies to iCloud supported video formats immediately. When the conversion finishes, click “Open” to find the converted video files. Then you can effortless transfer the video files to iCloud without any probelms.
Have more questions about Dropbox vs Google Drive, please feel free to contact us>> or leave a message at Facebook
More Topics:
- How to Upload Christmas Videos from iPhone to iCloud?
- Store Christmas camera recordings onto Dropbox, Google Drive, Sky Drive
- Backup Blu-ray Collection to Cloud Storage
- Top 3 Ways to Backup DVD to WD My Cloud
- Share YouTube to Dropbox for playing on iPad
- How to Backup DVD to My Cloud Mirror for sharing


Comments